Julie from New York City asks: I am in the process of putting a proposal together for a prospective client. The client will have eight batches of work to be completed. I need to lay out what it will take to do one batch of work that includes building in hidden contingency time. I would also like to show the timeline graphically. Each batch should take about five to six months to complete, and I need to highlight check points for the client. Any ideas?
Ellen answers: Microsoft Project 2010 Professional and Standard have the Timeline view, which can help you present your timeline graphically to your client. You’ll want to stay at a high level, showing just the tasks that will drive the batch of work you plan to represent. I would also suggest entering some milestones to represent goal points for the timeline.
Here are the requirements as you’ve stated them:
- Each batch of work is expected to take five to six months of duration.
- Each needs to include some slack for contingencies that may occur and that the client won’t see.
- The client will approve work during the project, and approval points should be shown on the timeline.
To create the Timeline view to meet these requirements the tasks to be shown in the view must be identified. All of the tasks must be present in the task list. The tasks should be higher level rather than detail level, but detail tasks can be included in the Timeline view. The client approval points should be entered as milestones. Names on tasks should be clear to denote what work will occur. In other words, don’t use “company speak” — terms that only internal employees will understand. Use terms that are easily understandable to the client to make sure you convey a clear message.
The next step would be to filter out only the tasks that should be shown in the Timeline View: This can be done several ways, but the easiest is to mark each task and apply the autofilter to the Gantt view.
To mark tasks to be filtered for the Timeline view, insert the Marked column:
Right click on the Task name column | Insert column | Marked
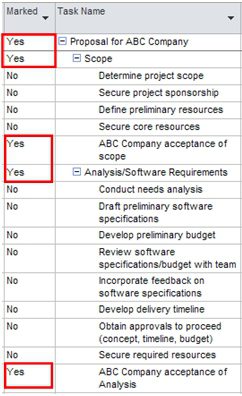
The Marked column contains only a Yes or No value. Tasks that are to be included in the Timeline view should be marked “Yes.” Note how summary and milestones tasks are marked “yes.” See the example below.
Figure 1
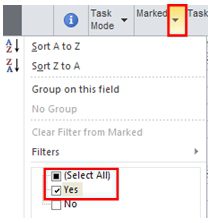
Once all tasks are marked, it’s easy to apply the autofilter to display on the “Yes” values in the Marked column. Click on the down arrow to the right of the Marked column name, remove the checkmark next to Select all, and choose “Yes.” Then click OK to apply the filter.
Figure 2
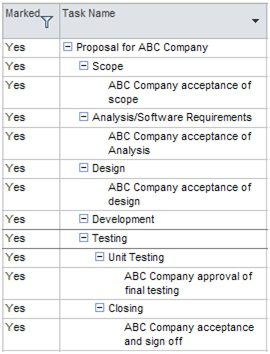
With the filter applied you should be viewing just the tasks that will be contained in the Timeline report.
Figure 3
Select all of the tasks, right click on the selection, and choose “Add to Timeline.” If the Timeline view doesnt automatically display, click on the View tab and choose the Timeline option to display that view.
If you need to tweak the view, click in the Timeline view and then click on the Format tab on the ribbon bar to access the Timeline view formatting options:
- Adjust the time density using the time zoom at the bottom right corner of the view.
- If labels for milestones overlap, select and drag them to make viewing easier.
- Adjust the date labels using the Date Format options.
- Click on a Timeline bar and change font, color, bold, italic, underline, text styles, etc. to format the Timeline view.
- If a bar ends up in the view that should be removed, click on the bar and click on Remove From Timeline.
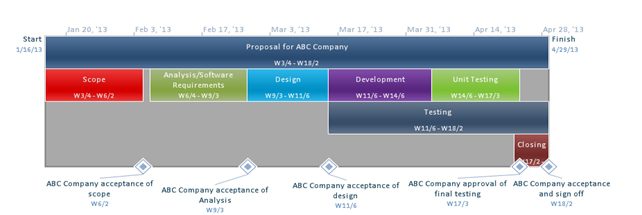
Below is an example of the finished Timeline view. Note along the bottom the clients responsibilities are shown as milestone points.
Figure 4
Clicking in the Timeline view and selecting Copy Timeline will give you several options to copy the view for email, Microsoft Word, PowerPoint, or as a full-sized image. Once copied, the image can be pasted.
When creating a proposal or communicating a higher level timeline for others to review, the Timeline view is a wonderful tool to help you convey your message. Keep detail data to a minimum and add higher level tasks (summaries). Milestones will help point out important points in time. Having the tasks marked will make it easy to reproduce this view in the future.