Preparing for your Microsoft certification in Project, exam 70-632? Here, finally, is the last column about Microsoft Project options. (Actually, the Options dialog box has a few more tabs including Interface, Save, Edit, and Spelling, which you can explore at your leisure as they aren’t essential to passing the certification test.)
Calculation options control how the internal Project abacus recalculates the schedule, critical path, cost and earned value when you update status. The challenge with these options is interpreting what they mean so you can tell Project how you want it to work. On the other hand, security options are supposed to protect your data. Set up incorrectly, these options can stop you in your tracks faster than tire spikes turned the wrong way at a rental car lot.
Calculation Options: Say What?
The Calculation tab eases into calculation options with two that apply to Microsoft Office Project itself:
- The Calculation Mode option is set to Automatic by default, which means Project recalculates values whenever you make a change in your file. If constant arithmetic gymnastics slow the program down, select the Manual option. Then, Project patiently waits until you press F9 to calculate all open projects or Shift+F9 for the active project. Less convenient is the Calculate Now button, which resides on the Calculation tab and recalculates based on the Calculate option.
- The Calculate option is set to All Open Projects initially, which recalculates every open project. To calculate only the project you are working on, select the Active Project option. (Memorizing the keyboard shortcuts F9 and Shift+F9 means you can calculate the projects you want without changing options.)
Status, Schedule, and Cost
The rest of the Calculation options apply to the active project file. The labels try hard to explain their corresponding options, but don’t quite succeed:
- The Updating Task Status Updates Resource Status checkbox is turned on by default, which tells Project to use task status values (% complete, actual duration and so on) to update the task’s assignment values. If you want to update each assignment separately (for example, one resource is 50% complete and the second resource is only 25% complete), turn this checkbox off.
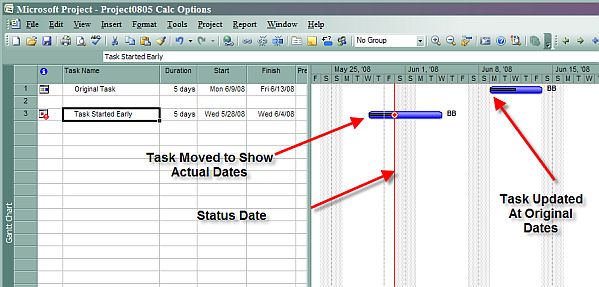
- The four options that begin with “Move,” such as Move End of Completed Parts After Status Date Back to Status Date, are turned off by default. Turning them on gives you a more accurate picture of project status, especially when tasks start ahead of or behind schedule. Turned off, these options keep task dates where they were originally scheduled, even if a task starts early or late, as the Original task in Figure 1 demonstrates. The completed work looks like it is performed the week of June 9 even though the status date is only May 30.
- Turn these checkboxes on to show completed work when it actually occurs and remaining work when it will occur. This approach also makes earned value more accurate. As Figure 1 shows, Project moves completed work to before the status date when it was actually performed, as in the Task Started Early task in Figure 1. Similarly, Project moves remaining work to continue immediately after the status date instead of at its original date.
Figure 1. The “Move” checkboxes determine how Project updates tasks when they start early or late.
- Another mindbender, Edits to Total Task % Complete Will Be Spread to the Status Date, is turned off by default, which tells project to spread actual work evenly over the actual duration of the task. Seems reasonable. If you want to spread the completed work evenly from the start date to the status date, turn this checkbox on.
- By turning off the Actual Costs Are Always Calculated By Microsoft Project checkbox, you can manually update resource costs, but that doesn’t mean you should. The only time you might resort to typing in costs is when Project’s cost calculations are totally off the mark (for whatever reason) and you want to enter the correct numbers. When you turn off this checkbox, you must type the actual costs in task Actual Cost fields.
- Project prorates fixed costs over the duration of their corresponding tasks. If your project charges customers for fixed costs at the start or end of tasks, in the Default Fixed Costs Accrual drop-down list, choose Start or End, respectively.
- The Calculate Multiple Critical Paths checkbox is turned off out of the box, so you see only one critical path. Turn on this checkbox to see every independent critical path in a project. With multiple critical paths, tasks without successors end up as critical.
- Often overlooked, the Tasks Are Critical If Slack Is Less Than or Equal to [x] Days setting specifies the amount of slack that denotes a critical task. By default, Project sets this to zero, but you can give tasks some leeway by changing the value to 1, 2 or more.
Earned Value
In the middle of the Calculation tab is the Earned Value button, your entry point to specifying how Project calculates earned value, the beloved measure of project performance.
The PMI Body of Knowledge (PMBOK) offers two definitions of “complete” for earned value. Never to be outdone, Microsoft provides three definitions of complete:
- All or nothing is the most conservative definition: A task is complete or it isn’t. 100% complete means complete. Anything less means the task is incomplete and not included in earned value. Project takes the all or nothing approach by default. Project sets the Default Task Earned Value Method to % Complete, which calculates earned value if a task’s % Complete field is 100%. Less than 100% keeps earned value fields at zero.
- For projects with very long tasks, denoting tasks as unstarted, in progress, or complete is a little less harsh. Unstarted tasks are 0% complete; completed tasks are at 100%; and in progress tasks are set to 50% complete.
- The most accurate approach is assign the percent complete to the percentage of completed.
For anything other than all or nothing, you must tell Project to use the Physical % Complete field for earned value. (Click Earned Value and then, in the Earned Value dialog box, change Default Task Earned Value Method to Physical % Complete. Poof!) You become responsible for entering values in Physical % Complete fields enter, so your values can be as precise as you want. For example, you can enter 0%, 50% or 100% to represent unstarted, in progress or complete. Or, you can copy the value from the % Work Complete field into Physical % Complete.
You can also choose which saved baseline Project uses to calculate earned value. In the Earned Value dialog box, choose the baseline in the Baseline for Earned Value Calculations drop-down list. By default, Project uses Baseline, but you can choose one of the other 10 baselines if it is the most current.
Privacy and Security
The Security tab in the Options dialog box has options to protect your data. Setting these options to suit your needs can make a huge difference in your frustration level.
The Remove Information from the File Properties on Save checkbox is turned off initially, which means information like author, company and manager get tossed every time you save your file. It’s a start, but your project files may contain far more confidential information, such as pay rates. Set this checkbox as you please, but be sure to review a Project file carefully and remove all confidential information before sharing it with someone else.
One of my pet peeves is that Project by default won’t open legacy formats such as files saved in Project 2003 or earlier, Excel files or comma-delimited files. If you’ve used Project for a while, most of your files are in earlier formats, so this default setting (the Do Not Open/Save File with Legacy or Non Default File Formats in Project) is silly and monumentally annoying if you don’t know how to change it. The middle of the road option is Prompt When Loading Files with Legacy or Non Default File Format. If you open only files that you trust, select Allow Loading Files with Legacy or Non Default File Format.
To modify the level of security for macros, click the Macro Security button. By default macro security is set to Very High, which means macros installed in trusted locations are the only ones that run. Changing the setting to High means that signed macros from trusted publishers (click the Trusted Publishers tab to identify them) run. With the Medium setting, you can choose which macros to run. Unless you have impeccable security procedures, don’t choose the Low option.
Pre-order the new book, MCTS Self-Paced Training Kit (Exam 70-632): Managing Projects with Microsoft Office Project 2007.
Read “Certification Insider: Configuring General and View Options in Project” here.
Read “Certification Insider: Configuring Tools and Options” here.
To learn more about Microsoft certification, read, “Microsoft Project Management Certification: How to Get Started.”