Brenda of Lincolnshire, IL and Tonya of Ann Arbor, MI write: I want to print sections or phases of a project schedule. What’s the best way to do this?
Answer: If you’re repeatedly printing sections of a schedule, you can easily section it off and only print the sections you want. Let’s say you want to print only Phase 2 of your project schedule. Follow the instructions below:
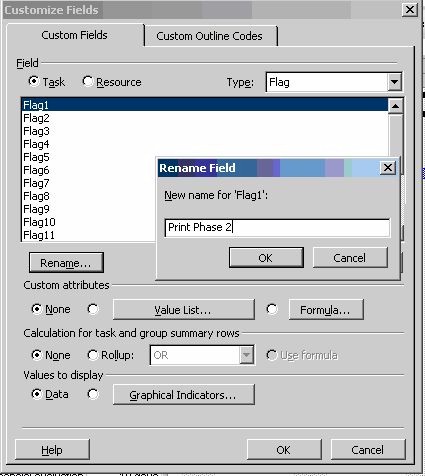
- Select a customizable flag field and change the name to “Print Phase 2.”
- Tools | Customize | Fields.
- Task will be selected on the left; select a flag field in Type on the right.
- Select an unused Flag field.
- Click Rename, enter Print Phase 2 and click OK.
- Click OK to close the form.
- Select a task table in which to insert the new column:
a. Right click on a column heading.
b. Select insert column.
c. Click “P” on the keyboard.
d. Scroll down to find “Print Phase 2” and click OK. - Scroll down the column and change the “No” value to “Yes” for all tasks that would be printed on a Phase 2 report.
- Click the auto filter on. The icon is found on the formatting toolbar and looks like this:

- When you’re ready to print the report, click on the auto filter button in the Print Phase 2 column header and select “Yes.” All tasks except Phase 2 will be hidden.
- To remove the filter, either turn off the auto filter or click on F3.
When you click on Print Preview, you will see only the Phase 2 tasks. Repeat this process for different phases and sections of a project schedule. Brenda wanted to use this function to print selected tasks that will be high level reports for clients. I also believe that this could have multiple other uses. Create as many different filters as necessary to meet all of your needs.
If you don’t want the “Print Phase 2” column to appear on the report, filter the schedule in one table and then switch to another table to print your information. Another option is to hide the “Print Phase 2” column behind the Gantt Chart.
Bonus Tip! You’ve created a custom field. By default this field is resident and only available in the project you’re creating it in. To make sure that this field is available to you in other projects, copy the field in the Organizer to your Global.mpt:
- Tools | Organizer.
- Select Fields.
- Select your new field on the right side of the form.
- Click on “copy” the center.
- Click OK to close the form