Assigning resources to your tasks is when the rubber hits the road — or, in some cases, when the project finish date hits the deadline and keeps on going. How many resources you have, the time they have for assignments, and when they’re available all affect task duration and the overall schedule. Part of passing Microsoft’s certification exam, 70-632, is knowing the best way to accomplish things in Project. This month’s column summarizes the pros and cons of each method of assigning resources to tasks. Then, you’ll learn more about the Assign Resources dialog box, which seems to get the lion’s share of exam assignment questions.
The amount of detail you want to specify for assignments is the deciding factor for assignment method:
- The Assign Resources dialog box is the be-all and end-all for resource assignments. It handles simple one-resource assignments with the same cool aplomb as when it finds types of resources or those with sufficient time to complete the work. Assign several resources to one task or several; or use it to add, remove, or replace resources.
- The Task Form works well when you already know who you want. It appears in the bottom pane of the standard Gantt chart view, so it’s easy to access. Use it to assign resources or modify existing assignments.
- A Gantt chart table works for simple assignments, such as one or two resources assigned full-time to a task. It outperforms the competition when you want to copy resource assignments to several tasks, because you can drag names from one Resource Name cell to the cells for several adjacent tasks. Ctrl-C and Ctrl-V are fast copy and paste shortcuts, too.
- The Resource tab of Task Information dialog box is another place to assign resources. You have to open and close the dialog box for each task you want to edit, so it’s best for making assignments and other changes at the same time.
On the Standard toolbar, the Assign Resources icon looks like twins in profile. You can also choose Tools | Assign Resources. Drag the dialog box to an out of the way location on the screen. It stays open until you either move it or click its Close button.
When you select a task, any resources already assigned to the task appear at the top of the list in the dialog box preceded by a check mark.
Here are several ways to assign resources to one or more tasks in this dialog box:
- To assign a resource to the task, in the Resource Name column, click the name of the resource and then click Assign. To change the units for the assignment, in the Units cell, type the number for the percentage or click the up and down arrows on the right side of the cell.
- To assign another resource to the same task, click the resource’s name and click Assign.
- To assign several resources at the same time, click the first resource’s name and then use the Ctrl-click or Shift-click techniques to assign more resources.
- To add assignments to several tasks, select all the tasks you want to work on by dragging across the tasks or using Shift-click and Ctrl-click. Then use the Assign Resources dialog box as you would for a single task.
The Assign dialog box has several handy features for helping you find the right resources. Apply a resource filter to find people with the right skills, the job code (or resource outline code) you need, or who belong to a specific group. You can also filter resources to the ones with enough available time, as shown in Figure 1.
Figure 1. Using the Assign dialog to locate people with available time.

If you can’t see the Resource list options, click the – to the left of the “Resource list options” label.
Finding Resources by Criteria
The Assign Resources dialog box uses resource filters to restrict the resources that appear in the Resources table. For example, you can filter the resource list with a built-in resource filter like Group to see only the resources that belong to a specific group. If you’ve customized resource filters, for instance to filter by the Code resource field, you can filter the resource list with those too.
To filter the resource list by criteria, turn on the top “Filter by” check box. In the “Filter by” drop-down list, choose the filter you want to apply. The “Filter by” drop-down list contains all existing resource filters. Click More Filters if you want to create a new filter, edit a filter, or copy one. To view the full resource list again, in the “Filter by” drop-down list, choose All Resources or turn off the “Filter by” check box.
Finding Resources with Available Time
The “Available to work” check box helps you find resources that are available when the task is scheduled. The best approach is to filter by type of resource and available time so you assign someone who is both qualified and available. Just turn on both the “Filter by” and “Available to work” check boxes.
To find people who have enough hours available, turn on the “Available to work” check box. In the “Available to work” box, type the amount of time the assignment requires, such as 2d or 4h, and then press Enter. The Resource table shows only the resources with that amount of time available between the task’s start and finish dates.
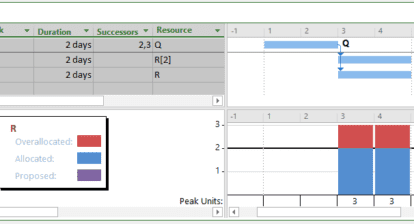
To Project, resources have enough time available or they don’t, so a filter might limit your choices more than you would like. Resource availability graphs can help you decide whether you want to assign someone who has plenty of available time or show a resource that would have availability if you make slight changes to the dates or duration.
In the Assign Resources dialog box, select the resource you want to evaluate and click Graphs. The Graphs dialog box shows the time that the selected resource is already assigned to work. To see the resource’s available time, in the “Select graph” drop-down list, choose Remaining Availability, which shows the number of available hours for the resource during each time period.
Resource graphs can also show work and availability for several resources over the same period. In the Assign Resources dialog box in the Resource table, Ctrl-click each resource and then click Graphs. The line for each resource appears in a different color. The table below the graph displays the time for each selected resource.
Assigning Material Resource
When you assign material resources, you have to specify quantity instead of time. And the quantity for material resources depends on what unit of measurement makes sense: cubic yards, gallons, or pounds. Project doesn’t do anything with a material resource’s unit of measurement. Cost is simply the material resource’s Std. Rate multiplied by the quantity you enter.
What if the quantity of material varies based on the task duration, such as gasoline to run a generator? The answer isn’t obvious. You have to type the quantity per unit of time in the Units field when you assign the material resource to a task. For example, assign the Gasoline resource and, in the Units cell, type:
10 gallons/d
Project calculates the cost of gasoline by multiplying the Std. Rate (the price per gallon) from the Resource Sheet by the task duration in days.
Think You Know Resources? Test Yourself!
One of your resources has too much work assigned to her. You want to reassign some of her tasks to other resources in her department group. Which of the following methods helps you find a resource in her group?
Answer A: Filter the Resource Usage view by the Resource Group to which she belongs.
Answer B: In the Assign Resources dialog box, select the resource in the Resources table and then click Replace. In the Replace Resource dialog box, choose Group in the “Filter by” drop-down list. Then, in the Group dialog box, type the name of her group and click OK.
Answer C: In the Task Form table, click the resource’s name to display the resource drop-down list. Choose one of the names on the list.
Answer D: In the Assign Resources dialog box, in the “Filter by” drop-down list, choose Group. Then, in the Group dialog box, type the name of her group and click OK.
No peeking! Scroll below the book ordering information to read the answer to this quiz.
Order the MCTS Self-Paced Training Kit (Exam 70-632): Managing Projects with Microsoft Office Project 2007.
To learn more about Microsoft certification, read, “Microsoft Project Management Certification: How to Get Started.”
The Answer to Test Yourself!
Answer D is correct.
The Assign Resources dialog box includes a “Filter by” check box and drop-down list of available resource filters. By choosing the Group filter, you can specify the group to display in the Resources table.
A is incorrect. Filtering assignments in the Resource Usage view by Resource Group shows assignments for the resources in her group, but it doesn’t help you assign another resource in a group to a task.
B is incorrect. The “Filter by” drop-down list appears in the Assign Resources dialog box, not in the Replace Resource dialog box.
C is incorrect. The drop-down list in the Task Form includes all resources in the Project file’s Resource Sheet, not just the resources in the selected resource’s group