After the powers that be approve your project plan, you may be tempted to sit back and rest on your… ahem… laurels. It turns out, the project execution phase is when you earn your salt as a project manager. Before you analyze performance, manage changes, and keep the project on track, you have to update your Microsoft Project file with progress data from your team. This is also a topic you need to master to pass exam 70-632, Microsoft Office Project 2007, Managing Projects.
Whether you choose quick and dirty progress reporting or track every hour of every day depends on your project’s requirements and the level of detail the stakeholders ask for. Once you know the level of detail you need, picking a recording method in Project is almost a slam-dunk.
First things first. It’s helpful (both for managing projects and passing the Project certification exam) to understand the difference between % Complete and % Work Complete. (The Summary table includes the % Complete field by default.) % Complete represents the percentage of task duration that’s complete. % Work Complete is the percentage of task work hours that are complete. And you probably know that time can pass without a corresponding amount of work getting done.
Entering percent complete is the easiest tracking approach. It’s easy to obtain progress data and it’s easy to record in Project. No surprise, it’s also the least accurate.
You’ve probably typed values in the % Complete column in the Summary table or Tracking table. Entering values in a table is perfect when you want to fill in progress for one task after another. You can type a value in one cell and then copy and paste or drag a value into additional cells.
But there are two other easy ways to update % Complete:
In Project 2010, the mini-toolbar is a great timesaver for standard percentages. Right-click a task, click the 100% down arrow, and then choose 0%, 25%, 50%, 75%, or 100% from the drop-down list. A thin black bar within the task bar represents the completed duration.
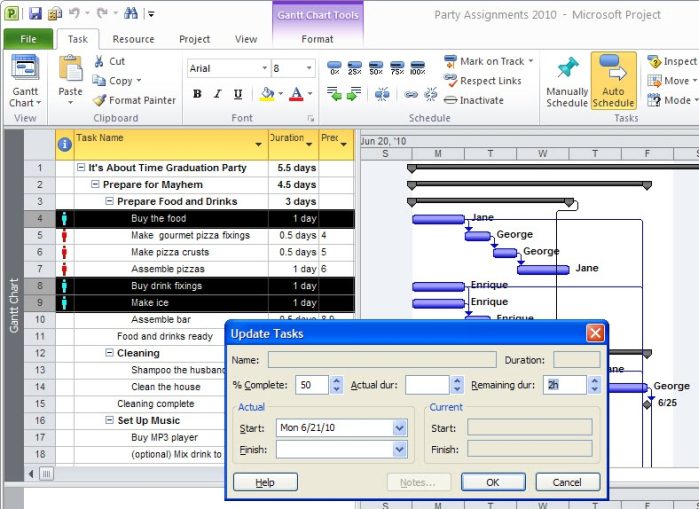
Alternatively, you can select tasks and then on the Task tab, in the Schedule section, click the Mark on Track down arrow and choose Update Tasks. In the % Complete box, type the percent complete for the selected tasks and then click OK. (If you don’t fill in the Actual Start field, Project sets Actual Start to the task’s scheduled start date (the date in the Start field).
In comparison to the Update Tasks command, the Mark on Track command (simply click “Mark on Track” in the Schedule section) sets a task to 100% complete and the actual start and finish dates to the scheduled task dates, which says the task finished according to plan.
For the next level of detail in progress reporting, you may choose to fill in actual start, percent complete, and other fields. The Update Tasks dialog box includes % Complete, Actual Duration, Remaining Duration, and Actual Start and Finish, so you can use it to report progress almost any way you want. Project calculates values for any progress fields you don’t update. If you fill in % Complete and Actual Duration, for example, the program calculates Remaining Duration.
Entering actual duration and remaining duration is more accurate, because you can tell Project that you expect the task to take longer than you originally planned. (If you fill in percent complete and actual duration, Project calculates remaining duration.)
For a task that’s complete, the actual start and finish dates are the best values to enter. In the Update Tasks dialog box’s Actual section, fill in the actual start and finish dates.
If you get actual and remaining work hours from resources, you can record that info in the Task Details Form. In Project 2010, click the View tab and turn on the Details check box. In the drop-down list, choose More Views and then double-click Tasks Details Form in the More Views dialog box. To see the field for Work, Actual Work, and Remaining Work, right-click the Task Details Form table and choose Work on the shortcut menu.

When more than one resource is assigned to a task, you can fill in progress values for each assignment for even more detail. For this level of detail, display the Task Usage or Resource Usage view. That way, the rows in the view show individual assignments and the timescaled grid shows values by time period. Choose View | Data | Tables | Work to apply the Work table to the view.
To enter work values, double-click the assignment you want to update. In the Assignment Information dialog box, select the Tracking tab.
When you enter progress for tasks, Project rolls down task values to the assignment level. If you want to record assignment values, choose File | Options, and then choose Schedule. Turn off the “Updating Task status updates resource status” checkbox.
Percentage of work complete (% Work Complete) represents the work that’s complete based on the hours worked so far divided by baseline work hours. You can fill in % Work Complete for a task or an individual resource assignment. For an assignment, double-click the assignment. In the Assignment Information dialog box, fill in % Work Complete.
If you get hours worked from resources, enter the actual and remaining work for the most accurate picture of progress (which also calculates the associated labor costs). In the Assignment Information dialog box, fill in Actual Work and Remaining Work. The value in the Work box is the sum of actual work and remaining work, that is, the scheduled work for the assignment. If necessary, change the actual start date.
The ultimate in progress detail and accuracy is actual work by time period. You enter actual work in the timephased portion of a usage view, showing the hours worked on an assignment in each time period. To display the Actual Work field, right-click the timephased portion of the usage view and choose Actual Work on the shortcut menu.
To change the time period in the timephased grid, on the Status bar, drag the Zoom Slider until the timescale shows the level of time detail you want. You can also right-click the timescale heading and choose Timescale on the shortcut menu. To display the cells for the assignment in the timephased portion of the view, choose Task | Editing | Scroll to Task.
Globally Updating a Project
Project has two ways to bring project status up to date in a jiffy. If a project was on hold and just got the green light to resume, you can quickly reschedule all the unfinished work. Here’s how:
Open any task-oriented view. If you want to update specific tasks, select them. Choose Project | Status | Update Project. The Update Project dialog box automatically selects “Update work as complete through” and “Entire project”. If you want to update the tasks you selected, choose the “Selected tasks” option.
Select the “Reschedule uncompleted work to start after” option, and fill in the date when work is supposed to resume. In-progress tasks resume on that date (and show a dotted line for the split between when work stopped and restarted). Unstarted tasks that were supposed to start before that date change to start on this new date. Of course, you have to reschedule tasks with date constraints and manually scheduled tasks.
Another way to quickly update a project emulates a cat that falls off the sofa, lands on its head, and then acts as if that’s what it meant to do. You can tell Project to update your schedule as if all tasks went exactly according to plan. This approach compromises the accuracy of your project data, so you should turn to it only as a last resort.
Choose Project | Status | Update Project. In the Update Project dialog box, select the “Update work as complete through” option and fill in the date for updating as scheduled. If you want to update tasks with partial completion, select the “Set 0% – 100% complete” option. If you want to update only tasks that should have been 100 percent complete before the specified date, select the “Set 0% or 100% complete only” option.
Updating Costs
If you set up work resources with standard rates, overtime rates, and costs per use, Project calculates actual cost based on the actual work you record for assigned resources. However, recording actual costs for cost and materials resources is a bit different.
Sure, you already filled in standard rates and/or costs per use for material resources, so Project can calculate actual material costs. (The cost is based on the number of units used, or the amount per time period and the actual duration of the task.) Remember, if you use a different quantity, you update the quantity in the material resource assignment’s Actual Work field.
When you record actual progress, Project doesn’t calculate actual costs for cost resources. For example, you could set a task to 100% complete, but an assigned cost resource would show remaining cost. (If a task has only cost resources assigned, Project calculates actual costs for cost resources based on the percent complete.) Start with the Task Usage or Resource Usage view to enter cost resource actual costs:
1. Double-click the cost resource assignment for the task to open the Assignment Information dialog box.
2. On the Tracking tab, enter the value in the “Actual cost” field.
Think You Know How to Track Project Progress? Test Yourself!
You get actual work hours and estimated remaining work hours from your team members. Which of the following is the best place to record this progress info?
A: Display the Resource Usage view and then use the Update Tasks command.
B: Display the Resource Usage view, display the Actual Work and Remaining Work fields in the timephased grid and enter the work hours there.
C: Display the Resource Usage view and display the Work table. Fill in the Actual Work and Remaining Work columns in the Work table.
D: Display the Task Details Form and right-click it to choose the Work table.
No peeking! Scroll below the book ordering information to read the answer to this quiz.
Order the MCTS Self-Paced Training Kit (Exam 70-632): Managing Projects with Microsoft Office Project 2007.
To learn more about Microsoft certification, read, “Microsoft Project Management Certification: How to Get Started.”
The Answer to Test Yourself!
Answer C is correct.
A. The Update Tasks command doesn’t let you fill in work hours.
B. The time-phased grid is too detailed. You aren’t entering work hours by time period.
D. The Task Details Form does let you fill in actual and remaining work hours, but the Resource Usage view with the Work table is faster.