

Outlook is Microsoft’s email workhorse, but email is only one of the ways that Outlook and Project 2013 work as a team. When you’re in Project, you can email Project files without jumping over to Outlook to do so. But because both programs can store lists of tasks and names, you can also export Project tasks to Outlook and vice versa. You can even use your Outlook address book to build your resource list in Project. This article explains how to use these features.
You can learn more about integrating Microsoft Project with Microsoft Outlook in an on-demand webinar featuring Renke Holert and Ben Howard.
Adding Project Tasks to Outlook
If the old saying “Out of sight, out of mind” is all too true in your case, you can keep important Project tasks in sight by adding them (one at a time) to your Outlook Task List. By adding a reminder to these Outlook tasks, you can really stay on top of things. All you need to do is copy and paste. But before you get too attached to this approach, you should know that when you add Project tasks to Outlook, you have copies of those tasks in two places — and they aren’t linked. So if you mark a task as done in Outlook, it isn’t automatically updated in Project and vice versa.
If you decide to add tasks to Outlook as reminders, here are the steps:
1. In a task-oriented view like Gantt Chart, select the Task Name cell for the task you want to copy to Outlook and then press Ctrl+C. (Or right-click the cell and choose Copy Cell.)
You can select only one task at a time. Project copies the task’s name to the Clipboard.
2. In Outlook, display the Tasks list.
Click Tasks at the bottom of the Outlook window.
3. Right-click an empty area of the Tasks list and choose New Task on the shortcut menu. (Or in the Home tab’s New section, click New Task.)
The task-entry window appears with the heading “Untitled – Task.”
4. Click the Subject box and then press Ctrl+V.
In the Subject box, the name of the task appears. If you want Outlook to remind you about the task’s due date, turn on the Reminder checkbox and then choose the date and time you want to be reminded.
5. On the ribbon, click Save & Close.
Repeat steps one through four for other tasks you want to add to Outlook.
Importing Tasks from Outlook
Every once in a while, you may create tasks in Outlook that you later realize belong in one of your projects. You can import these tasks into a Project file as a head start. When you import tasks from Outlook, the imported tasks come in with the task names from Outlook and any notes you added. Although these imported tasks come in with the standard duration of “1 day?” (the question mark indicates estimated duration), they have no dependencies, resources or dates.
To import Outlook tasks, follow these steps:
1. Open the Project file you want to import the tasks into, display a task-oriented view like Gantt Chart and then in the Task tab’s Insert section, click Task | Import Outlook Tasks.
The Import Outlook Tasks dialog box opens. Outlook doesn’t have to be running for this command to work, but you must have at least one incomplete task in your Outlook Task list. If you have no tasks in Outlook or they’re all complete, a message box tells you there are no tasks to import.
2. Turn on the checkbox for each task you want to import, as shown in the following figure.
Any notes you typed in the Notes box in Outlook appear in the Notes cell in the table.
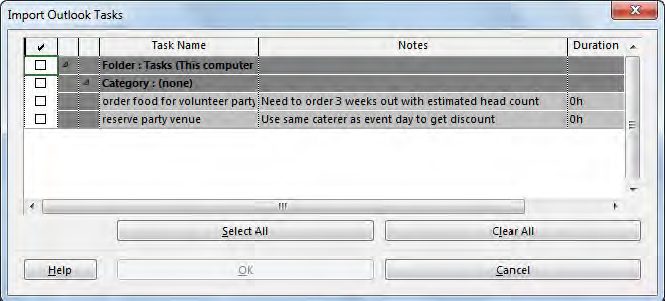
To quickly select all the tasks, click Select All. Click Clear All to turn off all the checkboxes and start over. Don’t turn on the checkboxes for folders and categories.
3. Click OK.
The tasks appear at the end of the list of tasks in your Project file.
Copying Tasks from an Email
If you copy an indented list of tasks from an Outlook email or a Word document, Project is smart enough to turn them into summary tasks and subtasks in your Project Task list. Here’s how to past a task list into Project:
1. Open the document in Word or the email in Outlook.
2. Select the tasks you want to paste into Project and then press Ctrl+C.
3. Switch over to Project and click the first blank Task Name cell where you want to paste the tasks; then press Ctrl+V.
Project inserts the task names into the Task Name cells and indents the tasks to the same levels they were at in the Word document or Outlook email.
Building a Resource List from an Outlook Address Book
If you use Outlook at work, you probably already have information about team members in your Outlook address book or Contacts folder. Rather than retyping all this information in Project, you can import resource names from Outlook into Project. Here are the steps:
1. In Project, open the file into which you want to import resources.
If you use a resource poo, import the resources into the pool rather than into individual projects. Similarly, if you use Project Server, don’t import resources directly into Project; import them into the enterprise resource pool instead.
2. In the View tab’s Resource Views section, click Resource Sheet.
Select the row where you want to insert the new resources.
3. In the Resource tab’s Insert section, click Add Resources | Address Book.
The Select Resources dialog box appears.
4. Select the names of people you want to add to your project or resource pool.
You can select several resources at a time by Shift-clicking the first name in the group and then the last name in the group. Select nonadjacent names by Ctrl-clicking each name.
5. Click Add.
The names appear in the Add box.
6. Click OK.
Project adds new rows in the Resource Sheet for the selected resources.
Sending Project Information to Others
You’ve probably emailed thousands of messages with attachments, so the concept of attaching a Project file to an email is nothing new. However, with Project, you can choose to send the whole project or only a few tasks and resources. And if your audience doesn’t have Project installed on their computers, you can create a picture of the Project information and mail that instead. Project can send files using any MAPI-compliant (Messaging Application Programming Interface) email program.
When you need approval for a schedule, Outlook’s routing mechanism can send the file to reviewers in sequence, so you can get their comments and approvals. While sending attachments tends to clutter email servers with multiple copies of the same file, publishing a Project file to a Microsoft Exchange Public Folder, a Microsoft SharePoint site or a cloud-storage location like OneDrive lets everyone look at a single copy (which requires that you use Microsoft Exchange, Microsoft SharePoint or a cloud-storage service).
Sending Project Files via Email
With the plethora of cloud-storage and collaboration tools available, you might opt to share a file online (for example, in a OneDrive folder) and send reviewers or collaborators a notification email through the online service. However, sharing a Project file with a few folks via email is easy, whether you send the message from your email program or directly from Project.
In Outlook, simply create a new message and then, in the “Untitled – Message” window, head to the Insert tab’s Include section and then click Attach File to attach the Project file. (If you use a different email program, simply compose a new message and use the program’s equivalent command to attach the Project file.)
On the other hand, if you tend to forget attachments (like most people do), you can create the email message in Project, which automatically attaches the file. Here are the steps for sending a Project file from within Project:
1. In Project, open the Project file you want to send and then choose File | Share. On Backstage view’s Share page, click Email and then click “Send as Attachment.”
Your email program starts (if it isn’t running already) and opens a new message window with the current Project file already attached. The Subject line contains the filename.
2. Click the “To:” box and then, in the Select Names dialog box, choose the names of the recipients.
You can also type email addresses directly in the “To:” box.
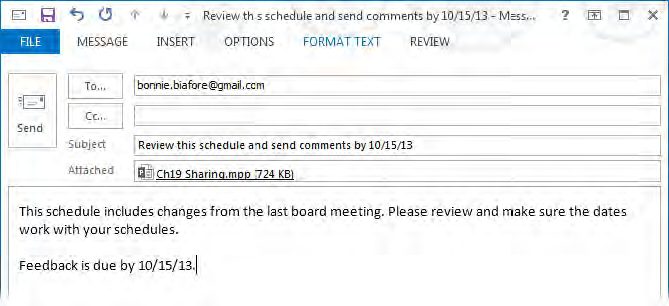
3. Edit the Subject box to tell your recipients why you’re emailing them this file.
In the message area, tell the recipients what you want them to do with the Project file, as shown in the screenshot below.
4. Click Send or the equivalent button.
The recipients receive your email message with the Project file attached.
The message form that you see is the same as the one that appears in your email program, so you can modify and format the message as you’re accustomed to.

This excerpt was taken from Microsoft Project 2013: The Missing Manual by Bonnie Biafore. Published with the permission of O’Reilly Media, which holds the copyright. Currently, Bonnie is at work on an update, which is expected to appear later this year.


Ann McPhillips
Thanks for the detailed overview of this feature and how to apply it. Nice to see more helpful features in MS Project 2013 to support continual communication improvement while also helping the PM uphold strong time management! Loving all of the added features of this new version – in addition to what the 365 platform offers!