
 There have been times throughout my career that I was given a “project,” but soon realized that it was really a group of related projects or a portfolio. In MS Project, a master project (or consolidated project) is the easiest way to work with a group of connected, large projects (or sub-projects) at the same time. You can create a master file, and then insert the sub-project files into it to consolidate them into one huge file. If you open and update a sub-project, updates will flow through to the master file and vice-versa. Some of the benefits (or powerful capabilities) of having a master file are:
- It’s easier to see the big picture when viewing all sub-projects in a single view or report.
- It’s easier to link tasks (or relationships) between sub-projects to show dependencies.
- It’s easier to add new tasks and/or delete unnecessary tasks.
- It’s easier to see if there are any resource sharing conflicts.
- You can filter, sort, and group data from all related projects.
- You can roll up information into higher levels of management.
- You will see the critical path for the entire master file (not by sub-project), which will give you a better perspective for managing your entire project or portfolio.
Preparing Subprojects for the Master Project File
To create a master file that does all I listed above, there will be a few minutes of work to do for each subproject, so that things will sync up correctly within the master project file. Let’s say we have three large subprojects that we want to combine into a master file. When we insert the subproject files into the master file, each subproject will start off with ID number 1 and so on, which means that if you leave as is, you will have three tasks with the same ID number. Of course, this is potentially confusing especially when you are filtering, sorting, and grouping tasks. To avoid this, ignore the ID numbers entirely, and refer to the WBS code with a project code prefix to individually identify every task. This approach will allow you to identify what subproject each task belongs to.
You need to come up with your own unique project code prefix for each subproject and make the changes in the subproject files before inserting them in the master file. I believe in keeping things simple. For the first subproject, I will use the code prefix X, the second one will be Y, and the third one will be Z. To start this process, I will open subproject X. On the Project tab, navigate to the Properties section, select WBS, and Define Code. Then, enter “X” in the Project Code Prefix field, and select Numbers (ordered) under the Code mask. Finalize by clicking OK (see Table 1). Repeat this process for subprojects Y and Z.
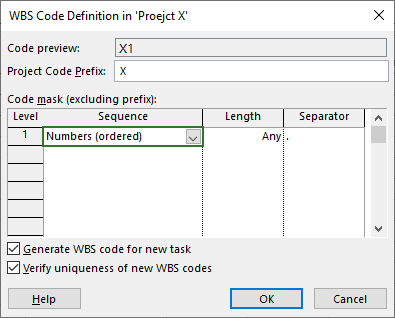
Table 1 – WBS Code Mask
Out of the three subprojects, select the one with the earliest Start date, and update the other two subprojects with the same Start date (this field is found in the Project tab’s Properties section under Project Information). This Start date will obviously be the Start date for the master file.
Odds are that the work calendars are the same for each subproject, but it doesn’t hurt to double check. Go to the Project tab’s Properties section, and select Change Working Time. It is more than likely that you will be using the Standard calendar.
Creating a New Master Project
Upon opening your new master file, you will be in the Gantt Chart table view. I would recommend you begin by inserting two new columns: WBS before the Task Name column and Subproject File after the Task Name column. When you insert the subproject file, the full path to the subproject will be shown. Do not waste valuable space by widening the column to see the entire path. Instead, when needed, just hoover your cursor over the cell to see the full path. Over time, you may even choose to hide this column to save space.
The next step is to highlight the Subproject cell in line 1, and then, on the Project tab, select Subproject Insert. Locate subproject X and click Insert. Do the same on the second line for subproject Y, and on the third line for subproject Z. Each inserted subproject appears as a collapsed summary task, with an inserted project indicator in the Indicators column. See Table 2.
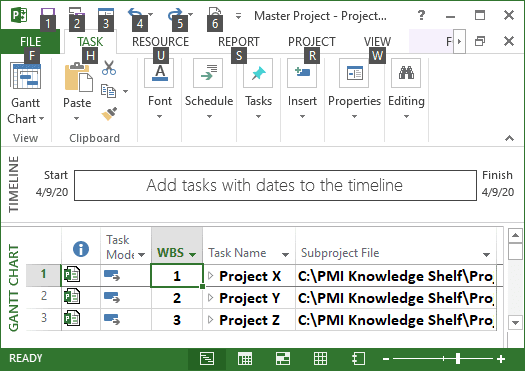
Table 2 – Inserted Subprojects
To see the details of the inserted three subprojects, highlight the three lines (or click in the upper left-hand corner of the Gantt Chart table). Go to the View tab’s Data section and select Outline and All Subtasks. MS Project will expand all the tasks in the three subprojects, and you will immediately see the usual WBS numbering system preceded with an X, Y, or Z as was defined previously.
Next, you will need to setup some dependencies between the plans or subprojects, so the entire schedule will be in chronological order. To do this, select the task you want to make the predecessor task while also selecting the task (using the Ctrl key) that you want to be the successor task. On the Task tab’s Schedule section, select Link The Selected Tasks (Ctrl+F2). The two tasks will be linked with a finish-to-start relationship. Make other necessary updates and save your master project. You will be ready to begin manipulating data and working with the various reports.
Summary and another Possible Scenario
Up until this point, my article has discussed the advantages of using a master plan for huge projects (upgrading Oracle financial systems to the latest version, for example). We’ve shown how to generate one by inserting subprojects into a master file, which is your typical scenario for using a master plan. However, there is another possible scenario which is less used, but some project managers might want to utilize.
Let’s say you spend your time on ten small, unrelated projects. Instead of juggling back and forth between plans, you could insert all of them into a master project to make updating easier. Obviously, some things will be different because you are not really trying to consolidate anything. In this scenario, for example, you probably will have no links between the projects, and you will want to see the critical path for each individual project and not the entire master file. If you go this route, there are a few things to note. You’ll most likely want to change the critical path default setting from the entire plan to calculate individual project critical paths. To do this, choose File > Options > Schedule. Scroll down until you see “Calculation options for this project,” and turn off the “Inserted projects are calculated like summary tasks” selection. Then, click OK. Remember, you can still produce consolidated views or reports for all your projects. The bottom line is that you learn as you go!
Please share your experiences using master projects. Have you ever created a resource pool to be used for your master plan or used the Enterprise resource pool in Project Server? Can you share any other benefits of using master projects that were not mentioned?


Amer
Thank you Ronald for sharing a great approach on managing multiprojects.
Is it necessary to build this approach on MS project server environment or can be done on desktop MS project?
Can we run SRA softwares or add-in in the master file ?
yl wong
Dear Ron,
Thanks for your lucid article.
I’m faced with a problem in the use of Consolidated/Master Project encompassing 15 subprojects.
1) All Subprojects (of which there are 15) are set to Schedule by their respective PROJECT FINISH DATES.
2) In order to respect the Setting of “Schedule by Project Finish Date” of the Subprojects, the Master Project is set likewise.
Thereupon, the Problems arise:
A) When all the Subprojects are Imported/Inserted into the Master Project en masse (as a group), the START DATES of the respective Subprojects are lost. Inserted subprojects START DATES take on a same START DATE, meaning, all starting at the same time in parallel!
B) However, when the Subprojects are inserted ONE-BY-ONE, the order of their respective START DATES are maintained!!!
C) Further, after the successful insertions of the Subprojects into the Master Project, from Step B above: Upon subsequent opening of the Subtasks for each Subprojects in the Master Project, same thing happens as Step A above; meaning, all the Subprojects takes on a common START DATE!!
This unexpected behaviour of Microsoft Project will render it unsuitable for Consolidation of repeated Subprojects SCHEDULED BY THEIR FINISH DATES.
Would appreciate your advice on this matter.
Are there settings that I’ve missed that will make it correctly reflect the START AND FINISH DATES of the subprojects??
Thank you in advance.
Ronald B. Smith, PMP
I am sorry for not getting back to you. Do you have any progress in fixing your scheduling problem? I did a small test (less subprojects) and didn’t have a problem. Did you try using less subprojects to see if it worked the way you expected? It was not clear to me what finish date constraint you used which could be part of the scheduling problem. There is:
* Must Finish On – Inflexible constraint
* Finish No Later Than – semi-flexible constraint
* Finish No Earlier Than – semi-flexible constraint
If you took another approach, would like to know. Take Care – Ron