Please find below highlights from Nenad Trajkovski’s Webinar Highlights: Resource Management with Project for the Web (2 of 3) on Resource Management, Groups, Attachments and Collaboration” being provided by MPUG for the convenience of our members. You may wish to use this transcript for the purposes of self-paced learning, searching for specific information, and/or performing a quick review of webinar content. There may be exclusions, such as those steps included in product demonstrations. You may watch the live recording of this webinar at your convenience.
Microsoft Project for the web is Microsoft’s Project Management solution for every day project managers or what is referred to as the accidental project manager. Project for the web is a robust solution offering just enough to manage simple projects. One such feature is resource management.
How to Assign Resources to Project for the web
Today, I’m going to show you how to assign resources to a project in MS Project for the web. In the last session I showed you how to create a project. And for that purpose, I created a project, as you can see. Now we will assign resources to this project. We will also look at how to do that with groups, but more about that later.
Let’s start at the beginning. Say you have created your project and tasks. In our example, it is task one, task two, and task three.
Now if I want to assign someone, I can assign myself, but I want to assign Mary, for example.
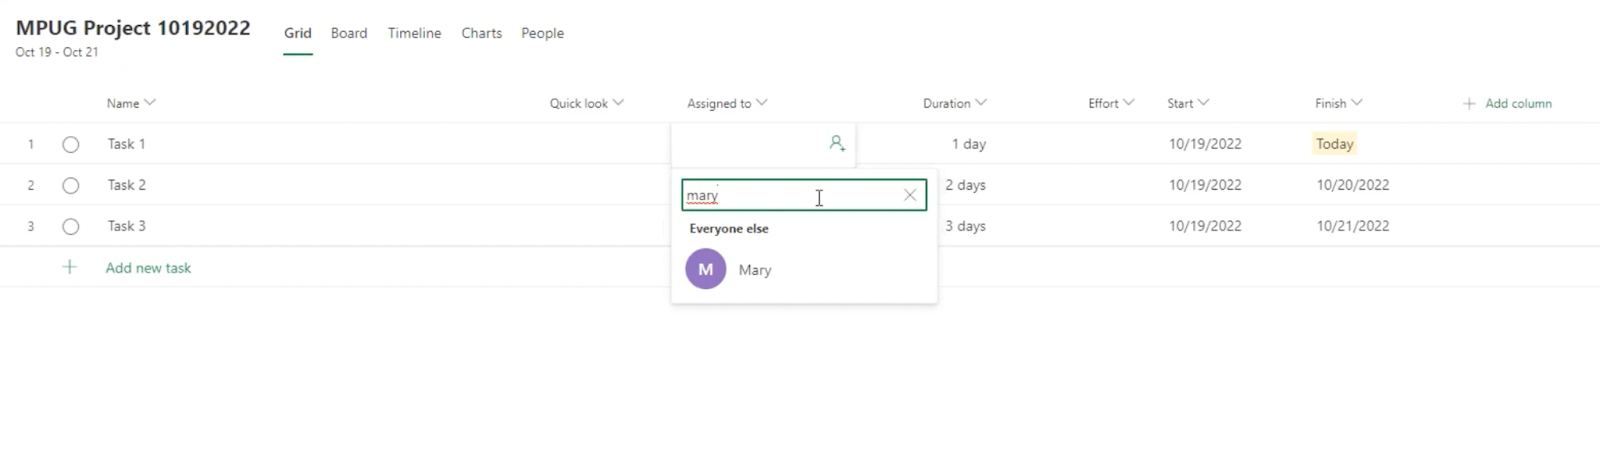
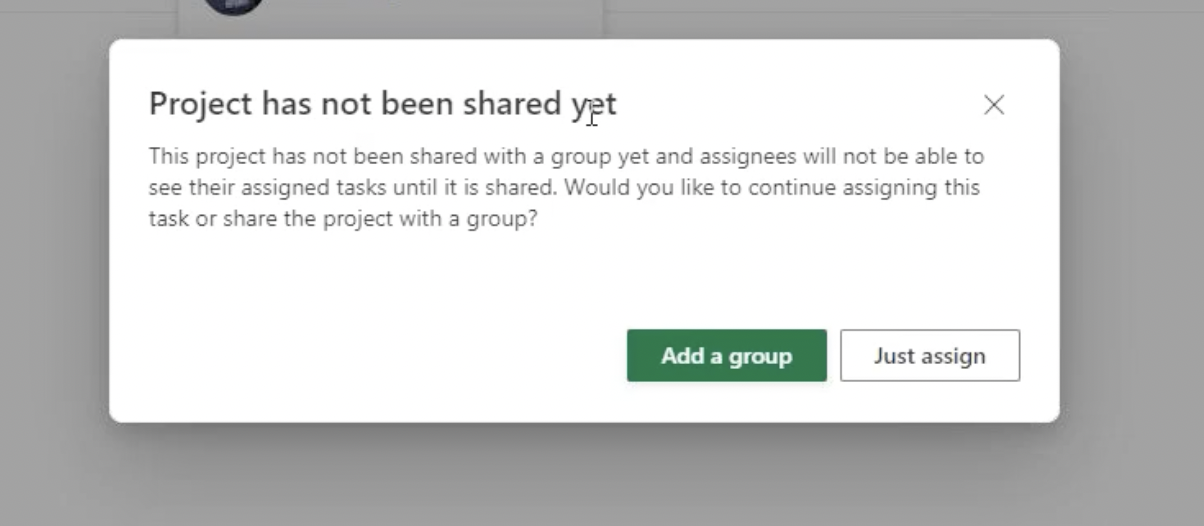
When I type “Mary” in the search field, the option to select Mary gets populated. But what if I want to search for Jennifer? It shows Jennifer does not exist. If we click on Mary, we get a message saying, “Project has not been shared yet.”
So how do you create a group and share this project with them?
How to Assign Resources to Groups
To assign resources to a group, you have two options. One is to click on “add a group” and add an existing group. The other option is to scroll to the left of your window and to select “Group members.”

After you create a project, the best practice is to go here and say, group members. You will have to choose if you are going to create a brand new group, or choose a group that already exists. If you choose to create a group, you can select that tab and start adding your members/resources to the specific group. You do not have to assign any members to the group yet, as you might not know what your resource requirements or who will be available.
One important thing to remember is that you cannot change groups associated to projects. So, if you create a group and later realize that this was a mistake, you can’t change this in Project for the web
A solution to this is to make a copy of your project, creating a new group and assigning it to your copied project
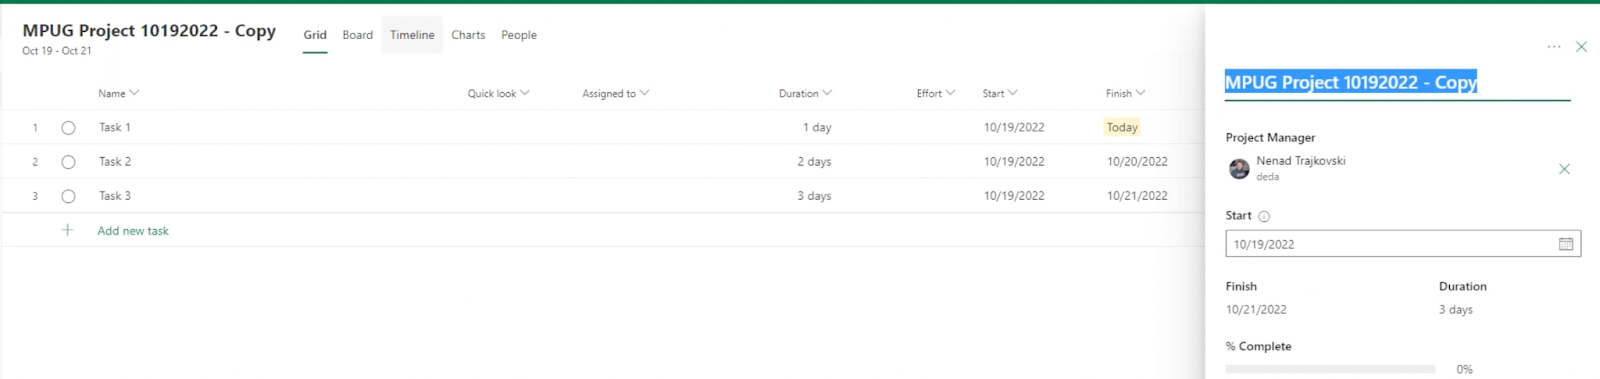
To copy a project, click on the project name to bring up the project details, then click on the ellipsis and select “copy project.” You can then delete the existing project and continue to create your new group, assigning those members to your tasks.
Now we have our project that we want to assign resources to, so we type out the names of the people and click on their names to assign. But let’s say that I need Ellen, who was not assigned to my group when I created it. What can I do?
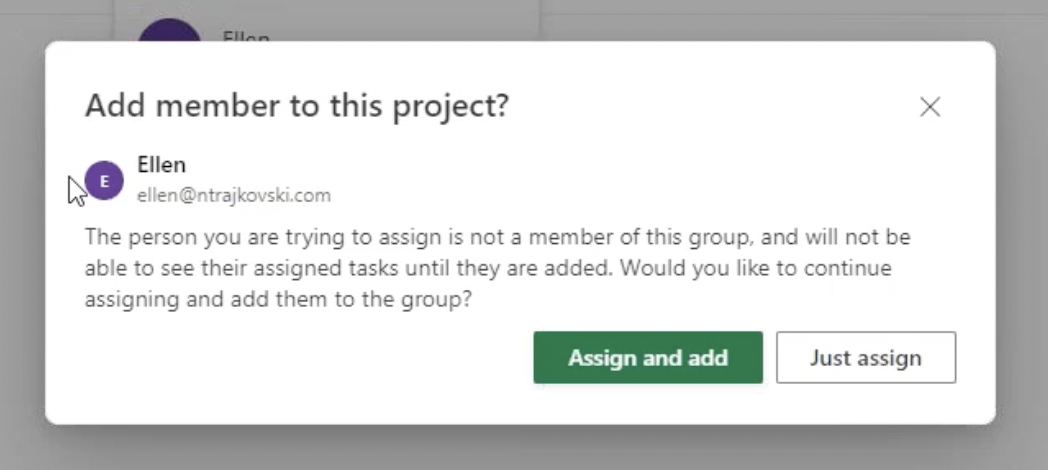
If I type Ellen into the search field, Ellen’s name will appear, but if I assign to Ellen, I will get the above prompt. Because Ellen is not yet part of my group, I will get the message, “this person you are trying to assign is not a member of this group, and will not be able to see their assigned tasks until they are added.”
If you want Ellen to be able to see their assigned task, you can click on “Assign and Add.” But what if you only wanted to add someone named Paula to report on the status of these tasks? Then you select “Just Assign.”
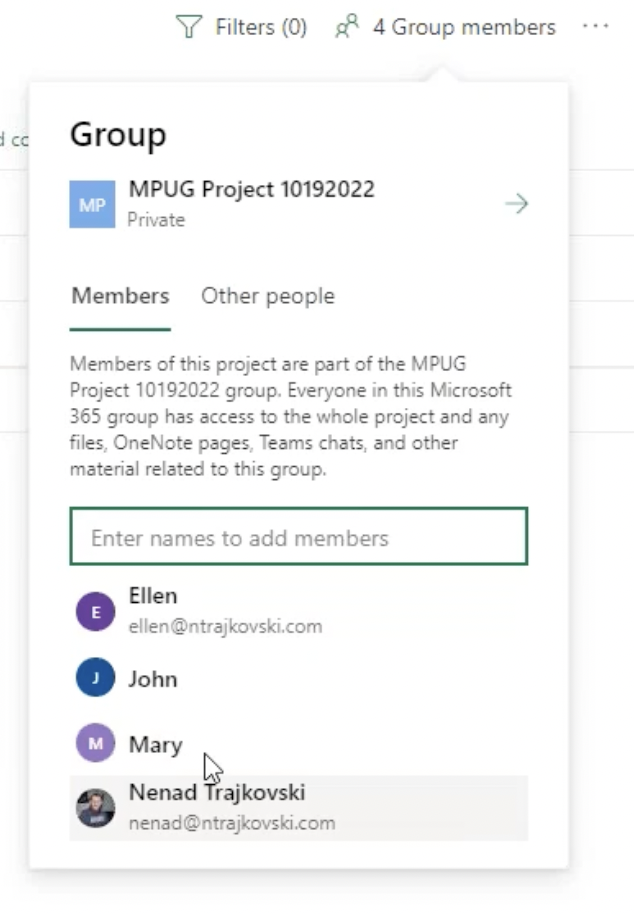
When you navigate to your project group members on the left, you can see Paula is not a member of the group. But if you click on “Other people” you can see Paula.
If I go to group them, I will see that I have and John, Mary, and myself by default, as a member of MPUG Project.
Now, remember your new group is available to all new projects created. In order to assign a group, you have to give a name to your project.
User Capabilities Based on Their Plans
For the purpose of demonstration, we have created a user with an Office 365 plan to illustrate what user capabilities they have in Microsoft Project for the web. In our example, our user is named Ellen. What can a user (Ellen) do in Microsoft Project for the web with an Office 365 Plan?
Members who have only an Office 365 plan are severely restricted in what they can do in Project for the web. In our example, this user can only update task status, but have no other editing capabilities, and can only view.
What can a member that has no subscription do in Project for the web? In our example, John is assigned tasks, but because he has no membership, he cannot view any tasks.
What capabilities does someone have in Project for the web, that has a Project Plan 5. In our example, Mary has a Project Plan 5 subscription and therefore has the highest capabilities allowed by the project manager.
Adding Additional Information to Tasks
How do you add additional comments to Tasks in Microsoft Project for the web?
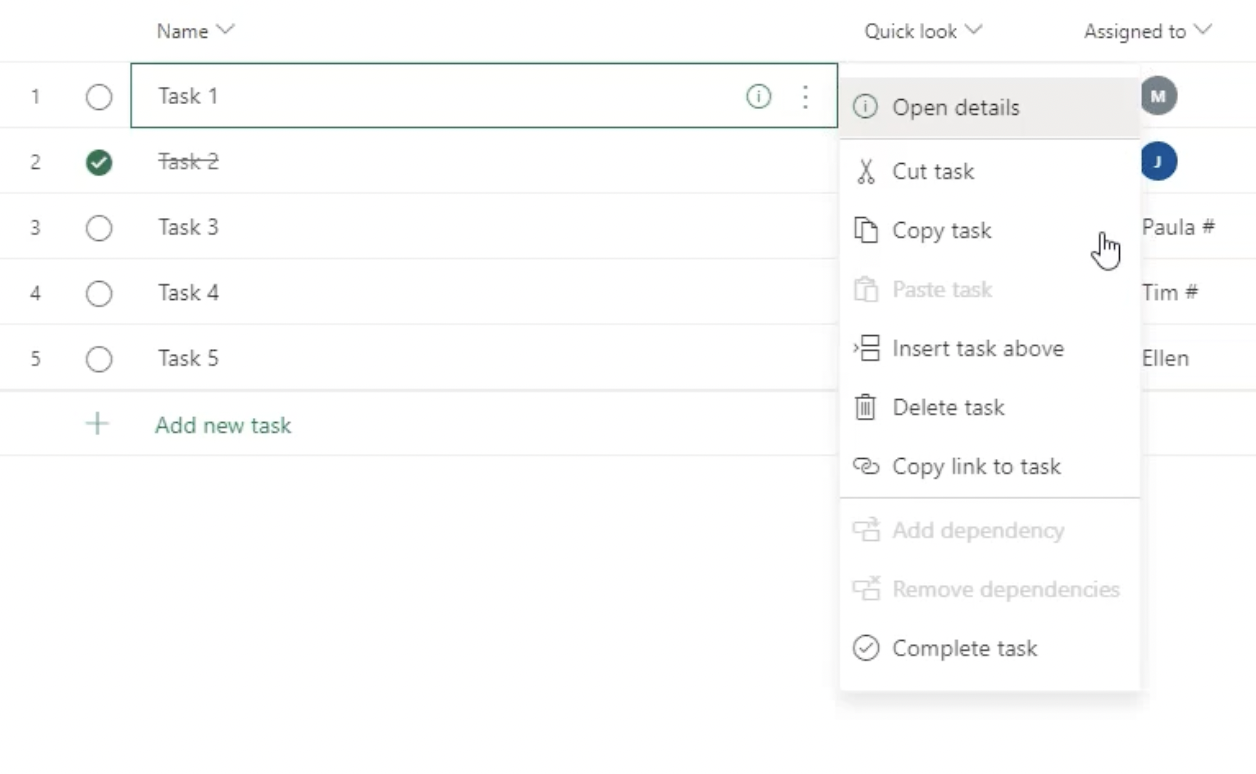
Adding notes to your tasks can be useful to provide additional information to task members, be that for collaboration or specific details required to execute a task. To create a note on a specific task, click on the “i” icon on the right side of your task, then select “open details.”
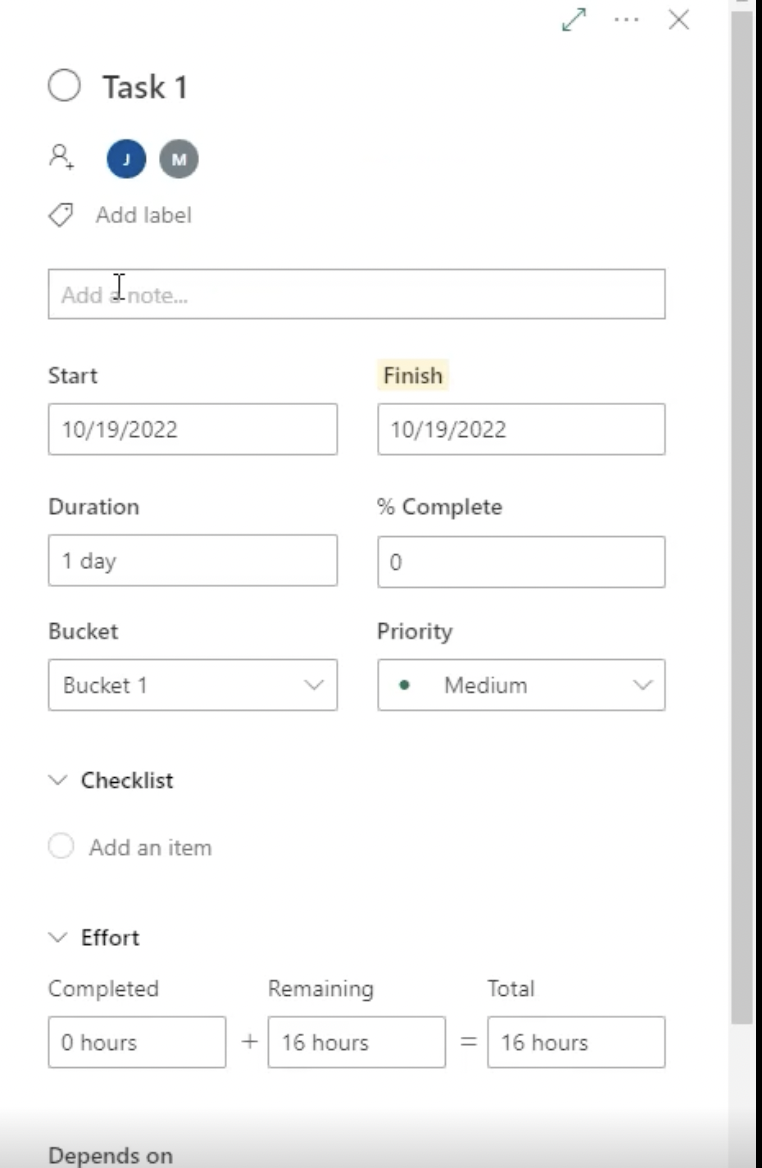
In the “add note” field, you can type your note. In our example, we used “This is a very important task and should not be late” as an example. When you click to add the note, you will see an envelope appear in your quick look column. Comments are excellent tools to streamline your workflow and ensure smoother execution of project tasks.
How to Add Labels to Tasks in Microsoft Project for the web?
Another powerful tool is labels. Labels group similar activities, providing clarity and increased productivity. Some things to indicate with labels include:
- Grouping Tasks
- Aligning Goals
- Status of Progression
- Task Priority
Labels are easy to add and customize. To add a label, click on the “i” next to your label and select “Open details.”
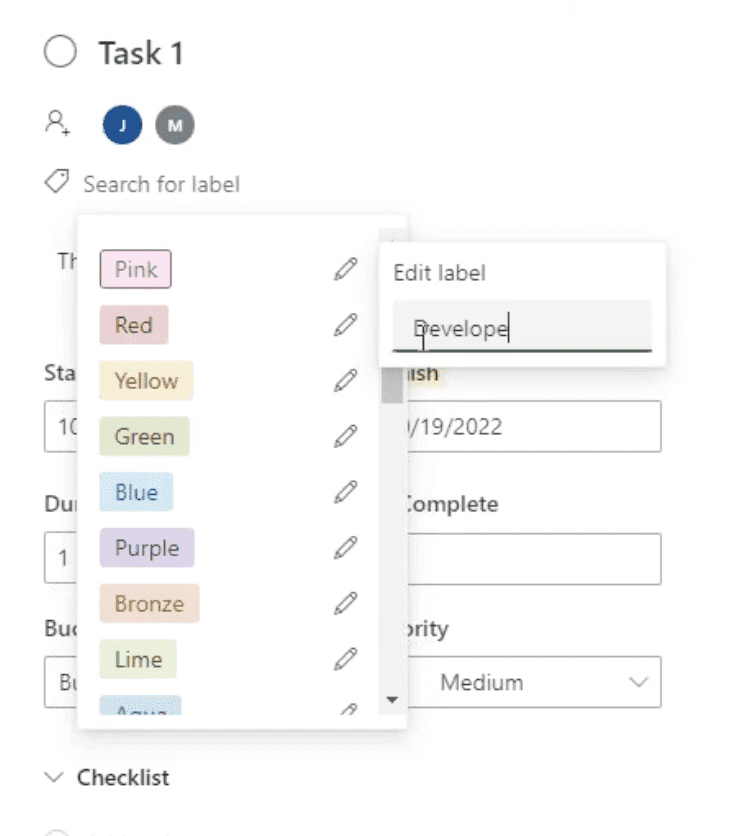
Here you can edit the labels corresponding to the color you want to use. If you want your label to be green, click on the pencil next to green and start typing the name of your label.
How to add a checklist to Tasks in Microsoft Project for the web?
Task checklists offer a meaningful way to ensure all elements required for a task are completed. A task checklist can exist of actionable items or questions to consider when executing the task. To create a task checklist in Project for the web, simply click on the “Open Details” tab and start typing your checklist items.
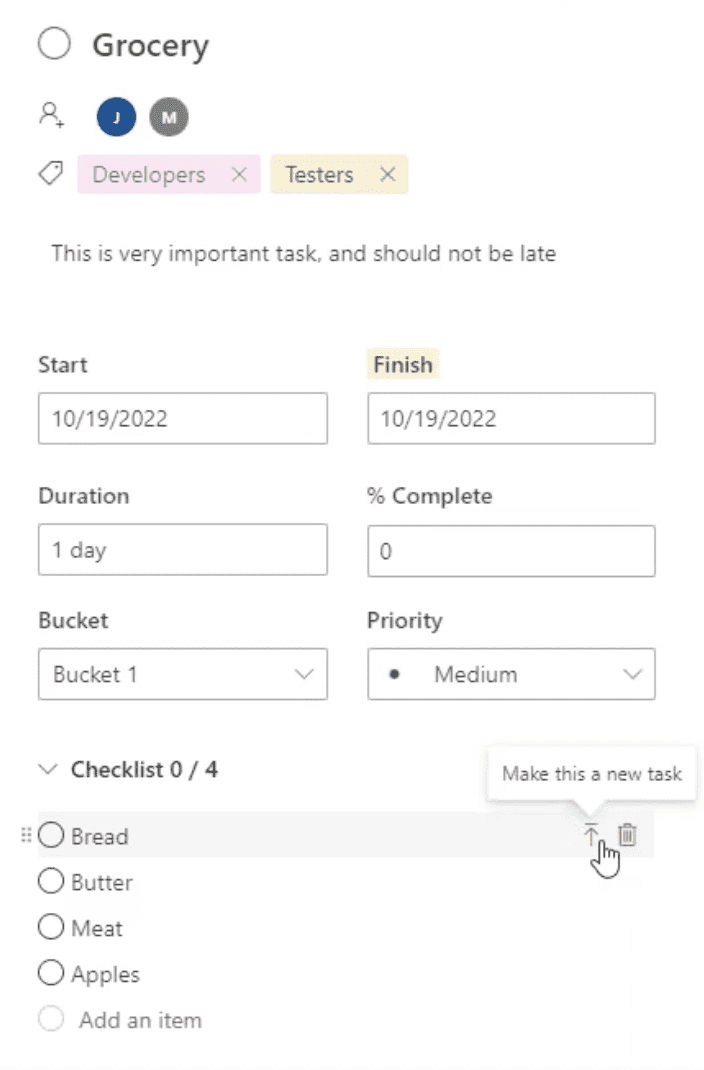
If you realize that your task checklist item is sufficient to be considered a task, you can convert it by clicking on the “up” arrow next to it. This will create a checklist below your task.
Remember that task checklist items are not assigned to a specific person. If you want to assign a checklist item, you need to convert it to a task and assign someone to it.
What Kind of Attachments Do We Have?
The benefit of adding attachments to a task is that all required information is in one place. Adding an attachment can improve productivity and ensure the person responsible for a task has all the required information to complete a task, and also has a clear understanding of what is required.
To include an attachment, click on the “i” next to your task and select “Open Details.” In here, select the “add attachment” button.
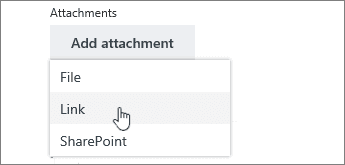
It’s important to note that if try to share an attachment with a project where there is no group assigned, you won’t be able to upload a file or share from SharePoint. You have to have a group assigned in order to do this, but you will be able to share a link
Once you have uploaded a file from your PC, you can choose to share that file at any point after that, since the file is then stored in team files.
Collaborating with Microsoft Project for the web
Advances in technology have brought on advances in the way people do almost everything. The remote-work phenomenon has, in recent times, resulted in a faster evolution of how companies work together. Collaboration is a powerful way for teams to share ideas and accelerate tasks.
Project for the web is built on Office 365 Groups. What that means is that you get all the collaboration tools found in 365. A popular collaboration tool included in Office 365 is Microsoft Teams. You can create a Microsoft Teams from your existing Project for the web group, and utilize all the benefits of Team’s collaboration functionality.
How Do You Create a Teams Channel for Project Groups?
To create a Teams channel for your existing group, you must navigate to teams and select “join a team” or “create a team.” A dialogue will pop up, giving you the option to select either to create a group from scratch, or from an Office 365 group. Select “create from existing Office 365 group.”
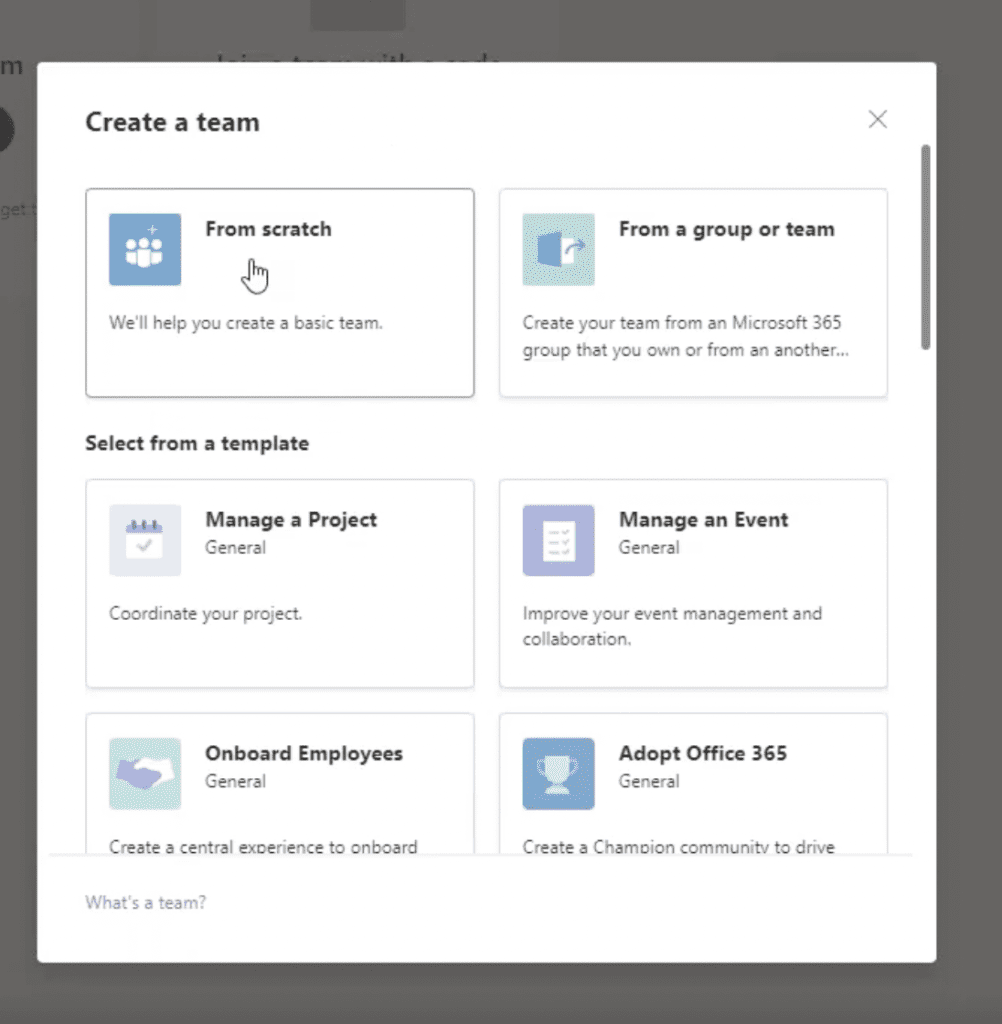
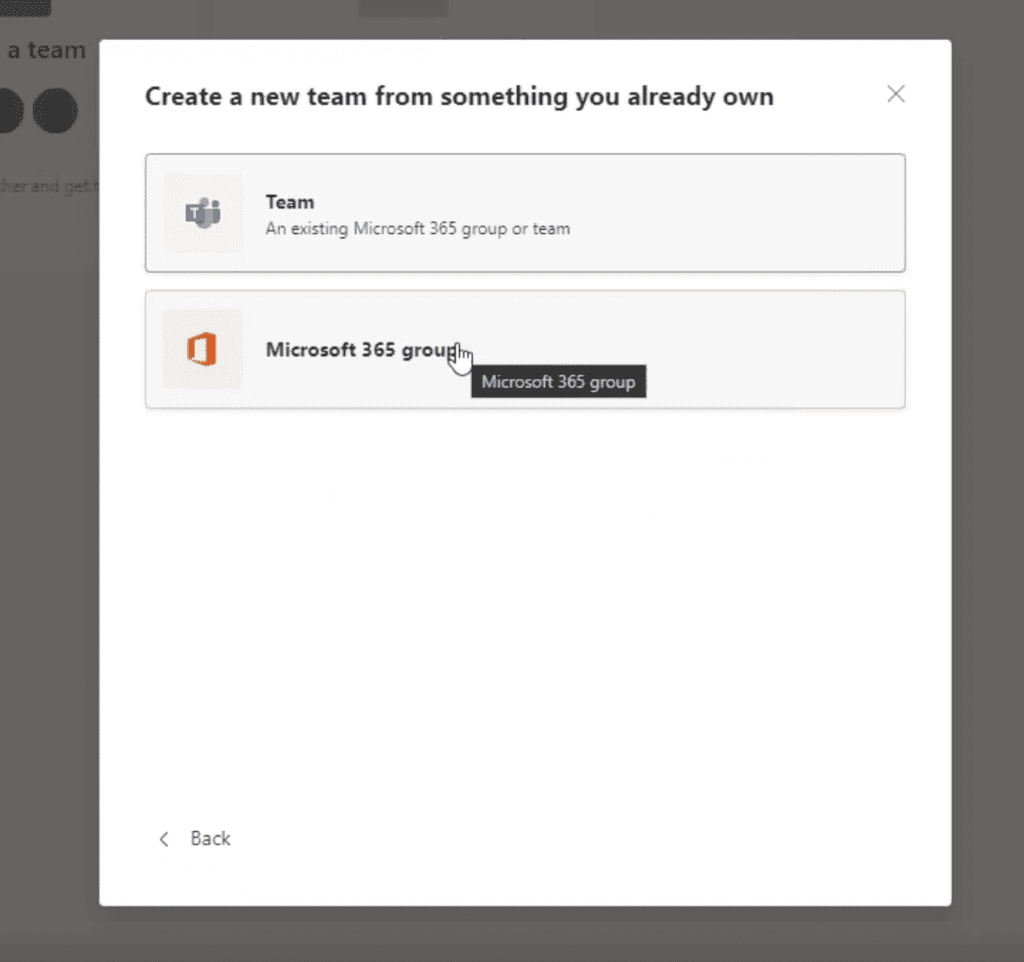
It’s important to note that if you already have a Teams channel for a group, you won’t be able to create another channel for your group.
Creating a Project from Microsoft Teams
Microsoft Teams has become an essential tool for collaboration, and can be considered the town square for most organizations or teams. Therefore the ability to create and manage a project from Teams is powerful.
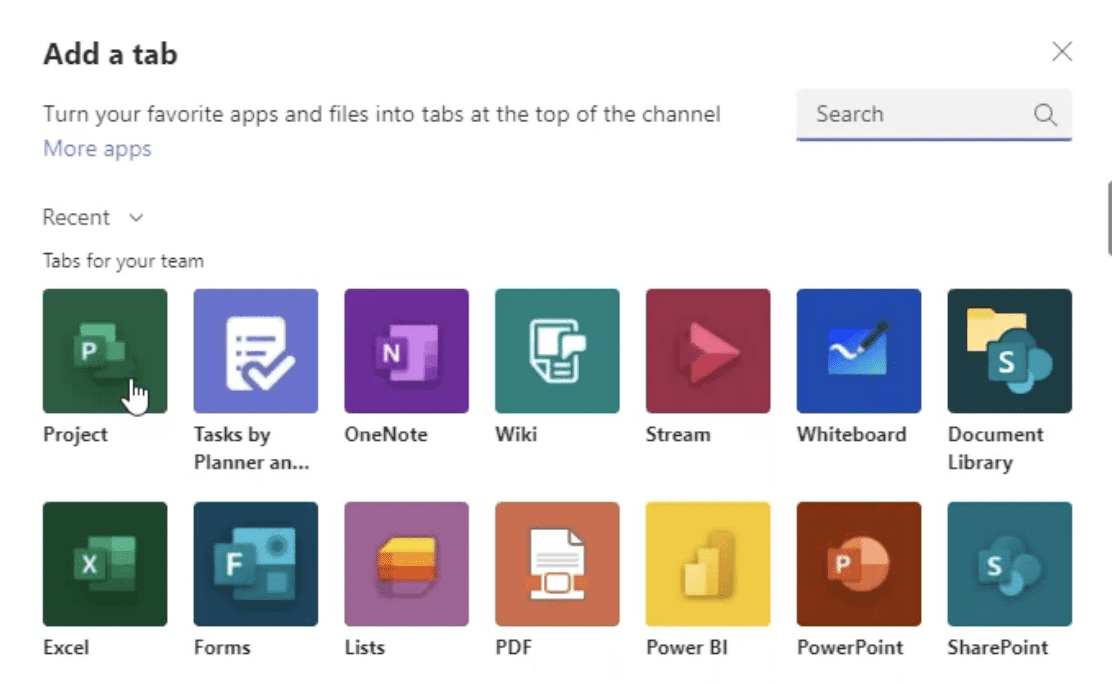
To create a Project from within Teams, you need to install the Microsoft Project App. You can do this by click on the + icon in your top tab bar and selecting or searching for Microsoft Project.

Once you click Microsoft Project, you will get an option to choose to create a new project or to import an existing project. In our example, we have selected to import an existing project.
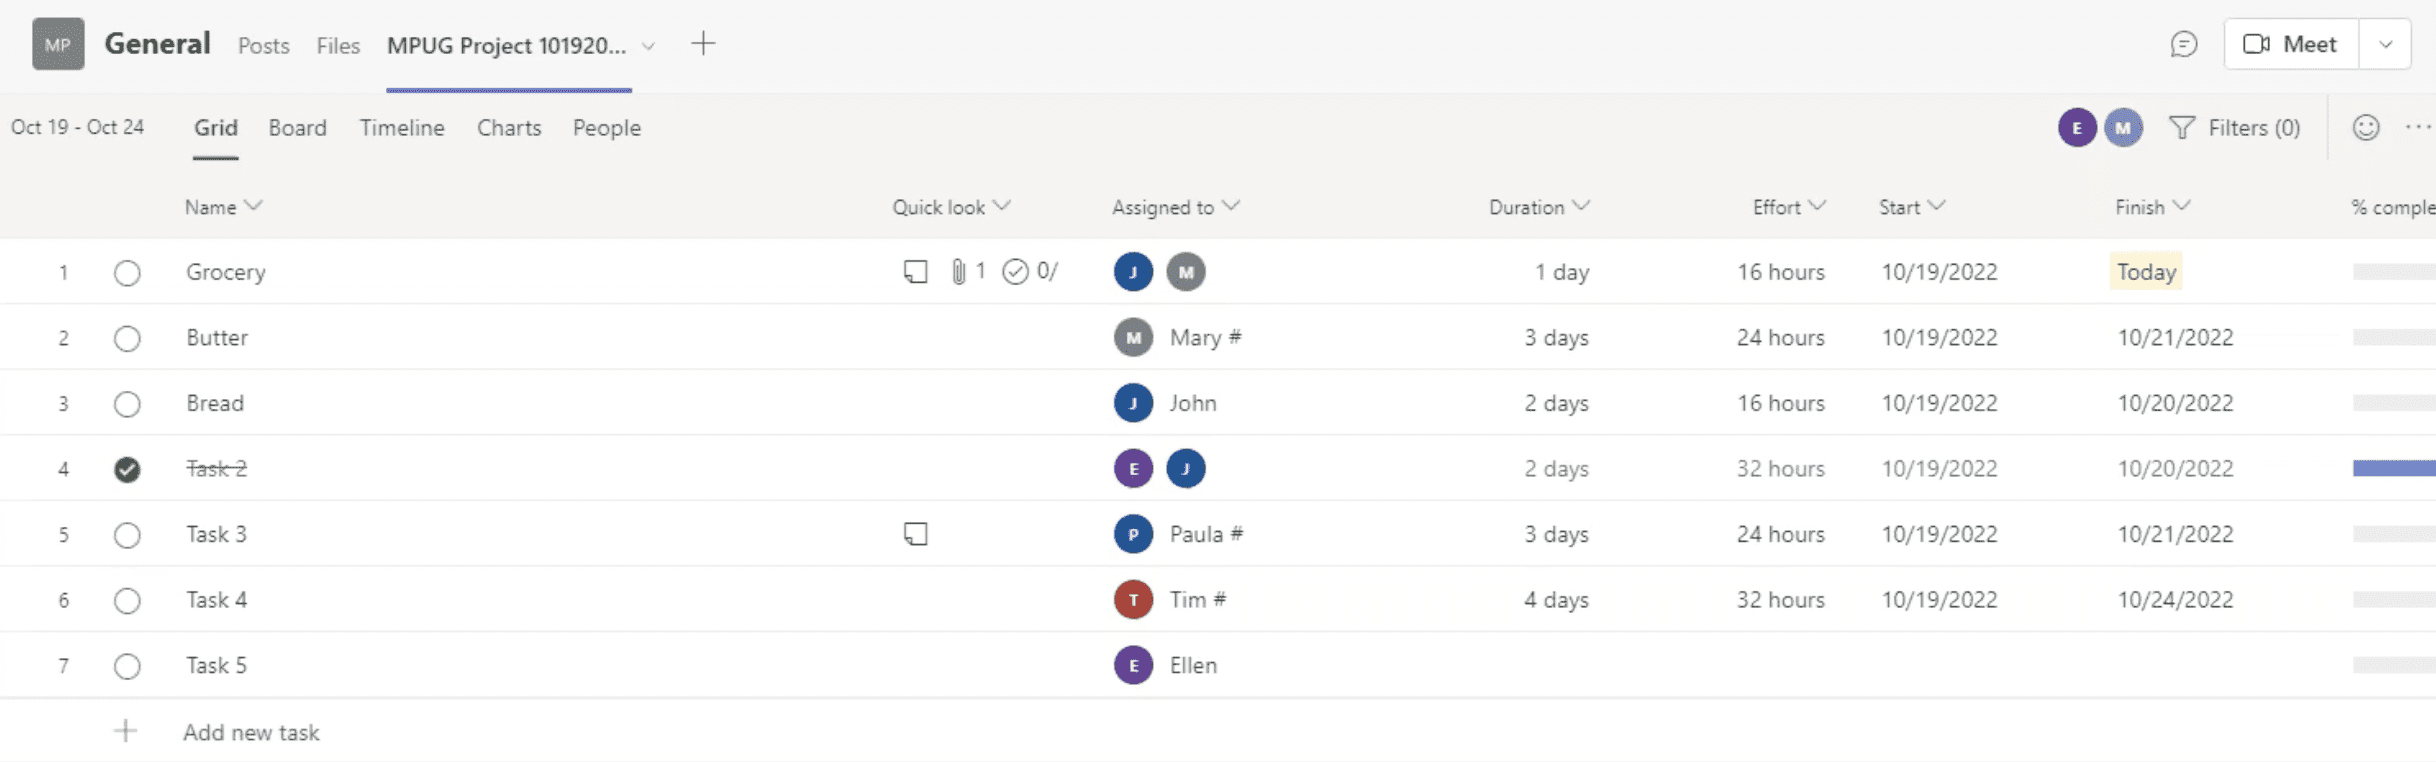
Once you have imported your existing project, you will see the same interface you see when you work in Project for the web in Microsoft Teams. In here you can do everything you are able to do in Project for the web. You can create and assign tasks. More importantly, in Microsoft Teams, you can create a conversation based on a task.
How to Create a Chat Based on a Project Task in Microsoft Teams?
To create a chat based on a task in Microsoft Teams, navigate to the task in question, select the “i” icon and choose “Start Conversation”. After clicking this button, a channel will open on your left where you can start you conversation. If you want to direct your message to a specific person, you can use the @ symbol, followed by their name, to mention them.
Once you have sent your message, a message icon will appear on your task alerting everyone that there is a message on this task. The message will also appear in your posts feed.

It’s important to note that you cannot change your project’s name within Teams, nor can you see the project summary.