
I have been playing around with Power Automate, which used to be called Microsoft Flow, for some time now. It is a very powerful way for a non-developer to create automated processes supporting day to day work.
In this post, I would like to share how I created a useful PMO flow, and yes, flows aren’t called automations.
The Goal
This flow is designed to send out an automated mail containing the names of all projects (and their owners) that haven’t been published for longer than a month to a PMO department. This flow is set up to run every month, but you could make a small alteration and make it run at the push of a button.
The Flow
Below you see an overview image of the flow. There’s the recurrence at the top, some parameters that we dive into in the next section, and the e-mail that is created and sent out at the end.

Figure 1: An overview of the PMO mail flow
With Power Automate, you have a wide range of options and connectors. It’s focused on Project Online data, but similar flows can be created on, for instance, a document library. Or maybe you have a planner board that needs some automation. There is a very large, active community that creates examples of such. Have a look at this site for inspiration.
The Details
Let’s jump into the specifics. I’d liked to take apart every item and describe what it does.
Step 1: Choose a type of flow. Navigate to https://flow.microsoft.com, and select ‘My flows’ or ‘Create.’ From there, choose the ‘Scheduled—from blank’ option. Or select the ‘Instant—from blank’ template if you want to create the button version of this flow. If you do, the button will appear in the app on your smartphone.
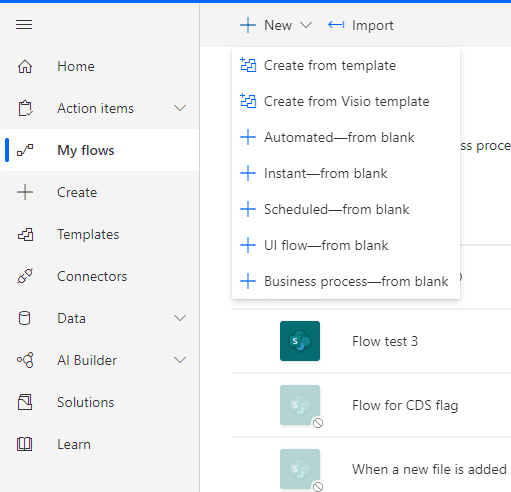
Figure 2: The new flow options
Step 2: Give the flow a name and set the frequency. In my example, I’ve named the flow “Reminder to PMO,” and set the frequency to once a month.
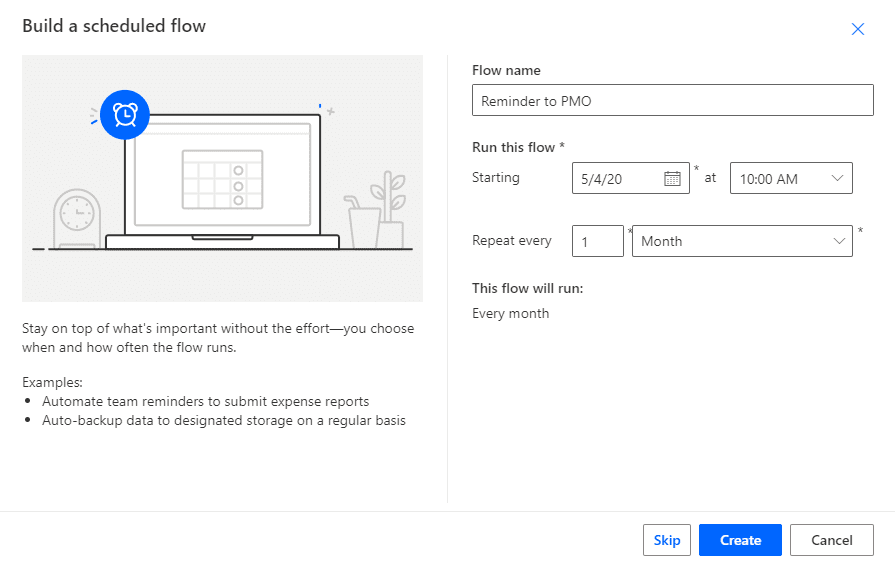
Figure 3: Give the new flow a name and frequency
Step 3: Start adding additional actions in the flow.
| The first additional action is called ‘Get past time.’ When selecting the ‘Add an action type’ in ‘Get past time,’ you will want to select the action shown in Figure 4. Make sure to set the interval to 1 and the time unit to Month. This action is required because we want to focus on only those projects that haven’t been published in a month. If you need a more active scheduling frequency, you could also set this to a 1 or 2 week interval or time unit. That said, I find such a frequency can become overkill for a lot of PM’s out there.
The second action is to retrieve the Project Online information. To get Project Online information, we need to use the action called ‘Send an HTTP request to SharePoint.’ This action opens up a dialog that gives us the option to retrieve (GET) data in an oData format. This format |
 Figure 4: get past time action in Power Automate |
shouldn’t come as a surprise to most Project Online users, as it is the feed used to create reports, as well.
The specific oData string that we want to use here is as follows:

Please note that the section in yellow actually references content from the previous step, and looks like this on the flow itself:
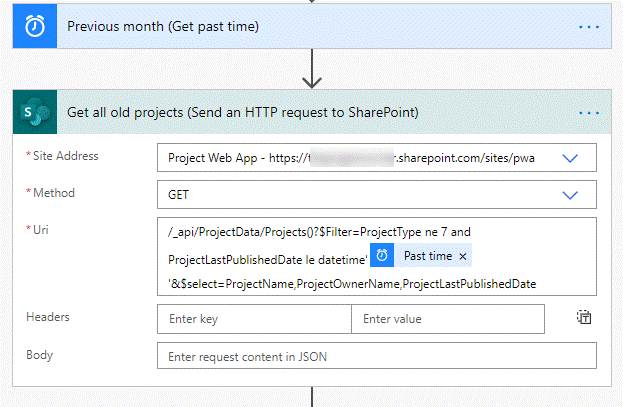
Figure 5: Get the correct list of projects in an oData format
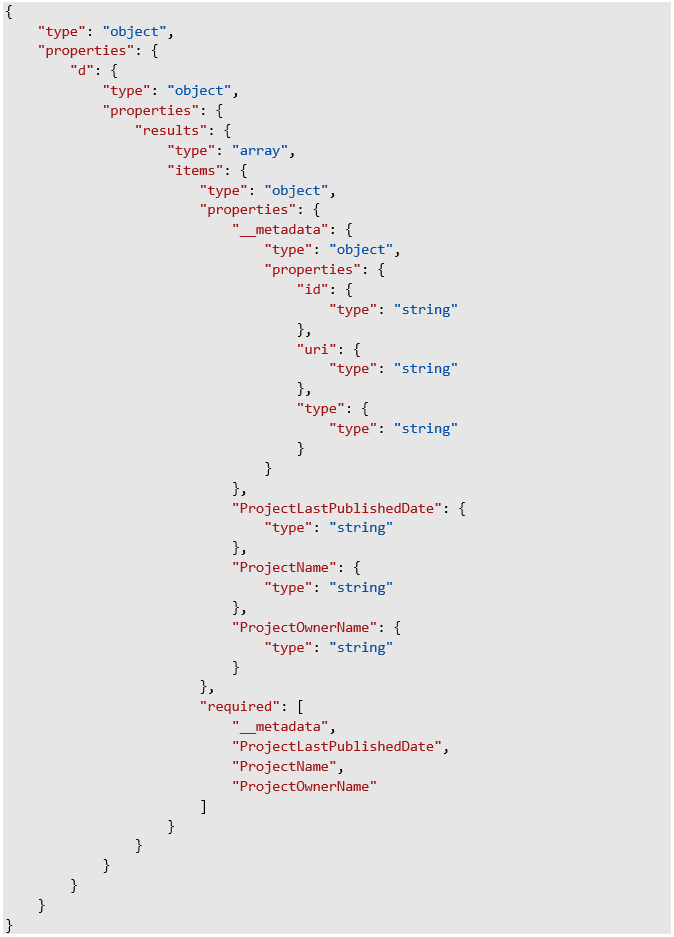
The third action is a Parse JSON action that is required to convert the oData to something we can include in an email. Do this by selecting the body of the previous step as content, and then setting up the following schema:
Next, we ‘Create a HTML Table’ based on the result of the previous action. I choose a HTML table instead of a CSV table because the HTML provides a nicer visualization in e-mails.
Make sure to select advanced options and the custom columns option, otherwise you will be flooded with non-essential data in your table.
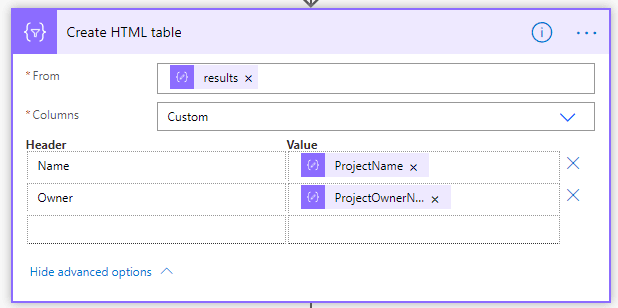
Figure 6: Create a HTML table with project name and owner
Select ‘Send an email (v2)’ as the final action in the flow. You have the option here to select a ‘To’ value, but there’s also advanced options to select CC and even BCC.
Customize the mail to whatever it is you desire. The only real requirement is to include the “output” from the previous action.
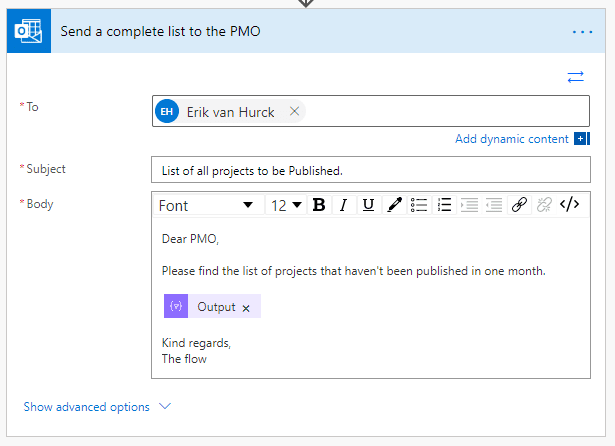
Figure 7: The email that will be send to the PMO
Step 4: Save and test your flow before putting it into production.
Step 5: Marvel at your first flow mail coming in the next month!
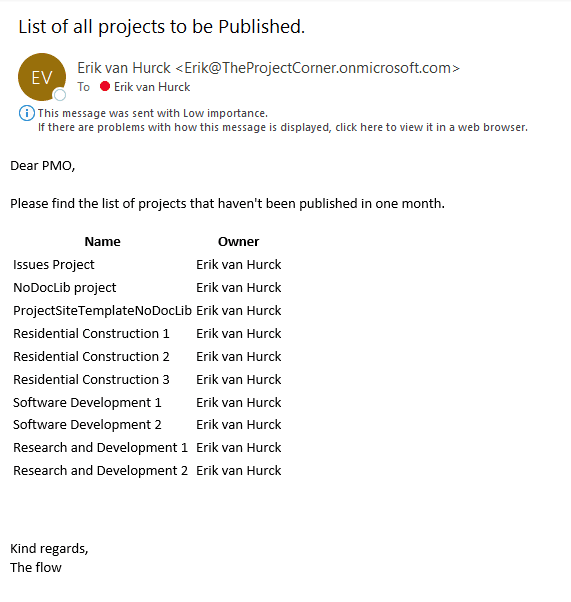
Figure 8: I really should update these schedules!
As you can see, a flow like this is straightforward. There could probably even be some improvements once you get the hang of this part of Power Automate. A few options are:
- Include a group of email addresses instead of a single person’s mail account.
- Add a BCC to the creator of the flow, so that he/she knows if something went wrong.
- Add a counter that would be displayed in the tile of the mail telling you the number of projects that aren’t published since last month (sum).
- Extend the oData feed to include more information in the table. Perhaps you want to include the current stage of the project or have other valuable meta data that you want to collect as a table on a monthly basis.
- Send the mail to the PM’s themselves (However, I do expect that this is the type of thing that is going to land in a spam folder once a person gets three in a row, so you’ll have to let them know they should take action to circumvent that).
Jose
Great tip. This makes me think of so many things we can automate. Have you done any work to automate things like deactivating users, adding Max Units? One great example would be to remind PMs when Milestones in Projects are overdue.
Sara
Great Info! I have been searching for something like this for weeks. Finding Power Automate and Project Online content has not been easy to find. Keep up the great work.
Erik van Hurck
Hi John,
I totally agree, I’m by no extend a developer so the parse JSON is still magic to me. I’m just happy to see it work the way it does 😎.
Glad you liked the article. And remember it’s more a low code then a no code solution.