Background Information
In my third and previous article in this series, I demonstrated how the use of Deadline dates can negatively impact the Total Slack calculations for tasks in your Microsoft Project schedule. If this behavior is unacceptable for you, I believe there is a better way to manage “target dates” in your projects.
Instead of using a Deadline date to specify the “target date” for task completion, I would recommend you use a custom Finish By field instead. In this newsletter article, I will teach you how to create a custom Finish By field and how to configure the Gantt Chart pane to show a symbol for each Finish By date.
Creating the Finish By Field
To create the custom Finish By field, first open a project and then complete the following steps:
- Click the Project tab to display the Project ribbon.
- In the Properties section of the Project ribbon, click the Custom Fields button. Microsoft Project displays the Custom Fields dialog, such as the one shown in Figure 1.
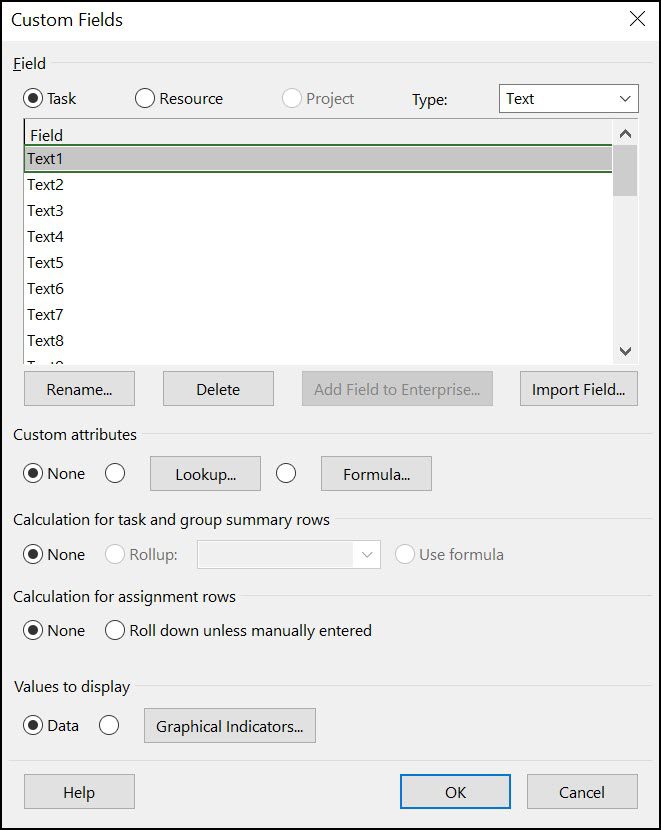
Figure 1: Custom Fields dialog
- In the upper-right corner of the Custom Fields dialog, click the Type pick list and select the Finish item on the pick list.
- In the Custom Fields dialog, select the first unused custom Finish field and then click the Rename button. In the Rename Field dialog, enter Finish By as the name for your custom field, such as shown in Figure 2
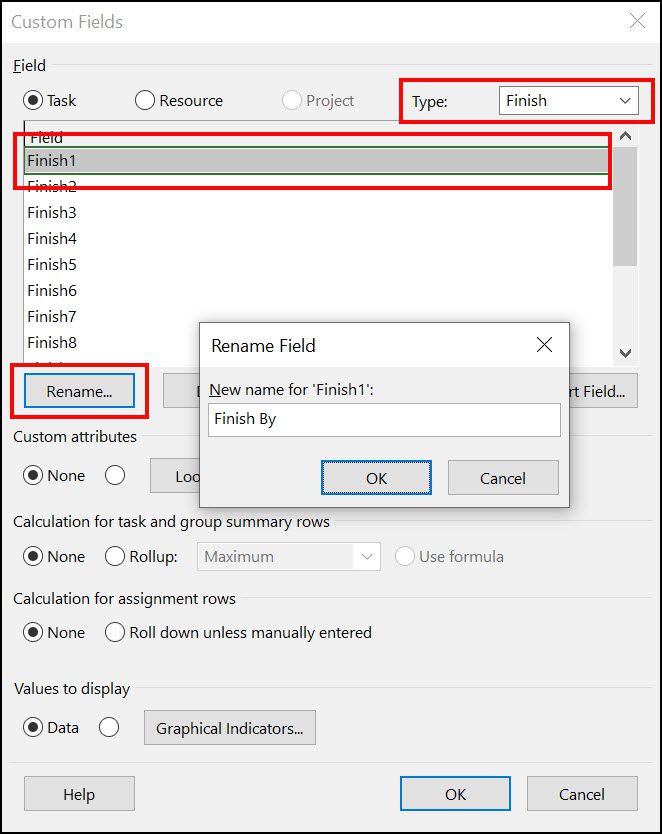
Figure 2: Rename a custom Finish field
- In the Rename Field dialog, click the OK button.
- In the Custom Fields dialog, click the OK button.
After creating the custom Finish By field, add this field to any Task view (such as the Gantt Chart view). Enter your “target finish” dates in the Finish By field for specific tasks in your project. For example, in Figure 3 notice that I entered a date in the Finish By field for several major milestone tasks, along with the final Project complete milestone task as well.

Figure 3: Finish By date entered for major milestones
Displaying the Finish By Date in the Gantt Chart Pane
To maximize the benefits of using a custom Finish By field to track “target dates” for completion of tasks, I recommend that you display a symbol for the Finish By dates in the Gantt Chart pane of your projects. This is similar to how Microsoft Project displays the green arrow symbol in the Gantt Chart pane for Deadline dates. To set up the display of Finish By dates in the Gantt Chart pane, you will need to create a custom Flag field for this purpose, and then you will need to use the Bar Styles dialog to create the symbol.
Creating a Custom Field
To display a symbol for Finish By dates in the Gantt Chart pane, you must a special trick. This trick requires using a custom Flag field to determine which tasks have a Finish By date entered for them. To create this custom Flag field, complete the following steps:
- Click the Project tab to display the Project ribbon, if necessary.
- In the Properties section of the Project ribbon, click the Custom Fields button. Microsoft Project displays the Custom Fields dialog, shown previously in Figure 1.
- In the upper-right corner of the Custom Fields dialog, click the Type pick list and select the Flag item on the pick list.
- In the Custom Fields dialog, select the first unused custom Flag field and then click the Rename button. In the Rename Field dialog, enter Has Finish By Date as the name for your custom field, such as shown in Figure 4.
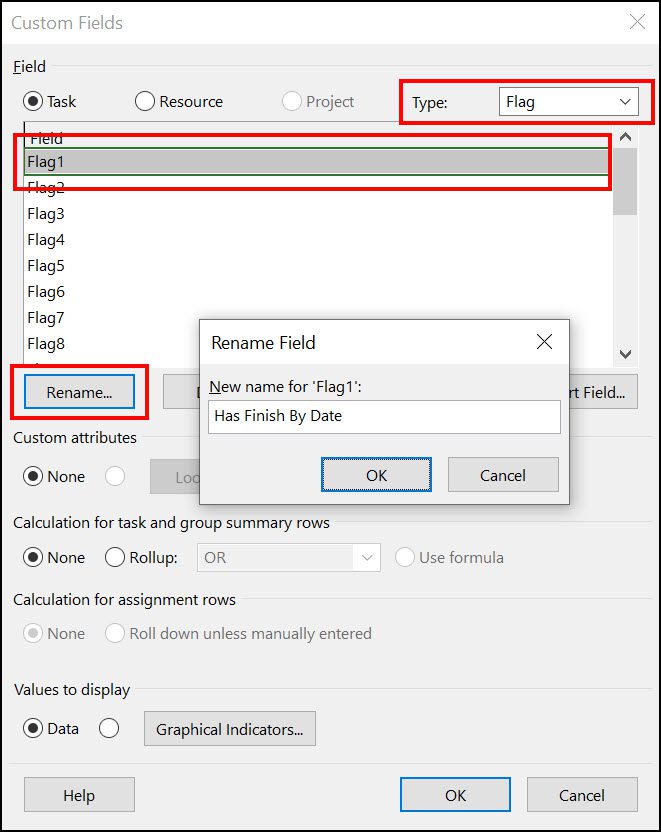
Figure 4: Rename a custom Flag field
- Click the OK button to close the Rename Field dialog.
- Leave the custom field selected at the top of the dialog and then click the Formula button. Microsoft Project displays the Formula dialog, such as the one shown in Figure 5.
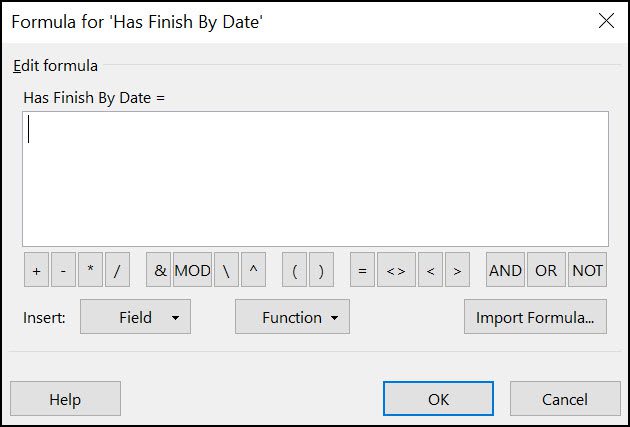
Figure 5: Formula dialog
- In the white workspace area in the middle of the Formula dialog, enter the following formula:
IIf([Finish By] = ProjDateValue(“NA”), False, True)
The preceding formula uses the ProjDateValue function to determine if the task contains a date in the Finish By field. If the task does not contain a date in this field, the formula returns a False value. If the task does contain a date in this field, the formula returns a True value.
- When you finish entering the preceding formula, click the OK button to close the Formula dialog.
- In the formula confirmation dialog shown in Figure 6, click the OK button.
Figure 6: Formula confirmation dialog
After creating the formula for the custom Flag field, you need to configure the calculation setting that determines how Microsoft Project will calculate values in this field for summary tasks. You must do this regardless of whether you specify Finish By dates on summary tasks or not.
- To configure this setting, select the Use formula option in the Calculation for task and group summary rows section of the Custom Field dialog, such as shown in Figure 7.
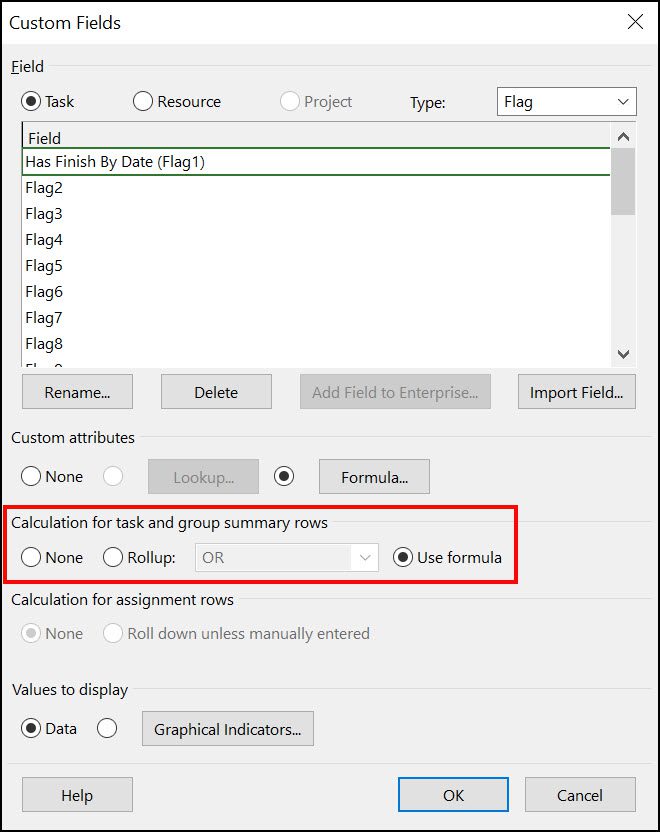
Figure 7: Calculation setting for summary tasks
Warning: Before you close the Custom Fields dialog, jot down the which Flag field you customized to create the Has Finish By Date custom field. You will need this important information shortly.
- Click the OK button to close the Custom Fields dialog.
Configuring the Bar Styles Dialog
After creating the custom Flag field, you are ready to format the Gantt Chart pane so that it will display a symbol for every task in which you enter a Finish By date. To do this, complete the following additional steps:
- Display the Gantt Chart view, if not already displayed.
- Double-click anywhere in the white part of the Gantt Chart pane. Microsoft Project displays the Bar Styles dialog, such as the one shown in Figure 8.

Figure 8: Bar Styles dialog
- Scroll to the bottom of the list of bar styles shown in middle of the dialog and then select the first blank row in the data grid.
- Enter Finish By in the Name cell of the blank row and then select the Appearance cell in this row.
- In the Start section of the Bars tab at the bottom of the dialog, click the Shape pick list and select the symbol you want to use for Finish By dates.
- In the Start section of the Bars tab at the bottom of the dialog, click the Color pick list and select the color of the symbol you want to use for Finish By dates.
- In the Middle section at the bottom of the dialog, click the Shape pick list and select the blank item at the top of the pick list. The blank item is the first item on the Shape pick list, by the way.
In the Start section of the Bars tab at the bottom of the dialog, notice in Figure 9 that I selected the down-pointing arrowhead symbol using the red fill color.
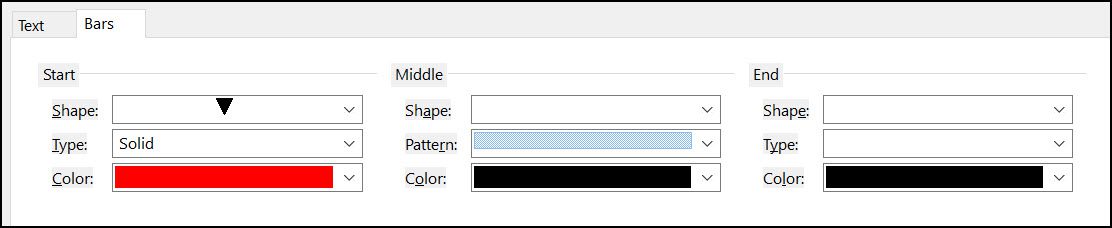
Figure 9: Symbol selected for Finish By dates
- Select the Show for…Tasks cell in the Finish By row, click the pick list in this cell, and then select the Flag field that you customized to create the Has Finish By Date field. For example, notice in Figure 7 shown previously that I customized the Flag1 field.
- Select the From cell in this row, click the pick list in this cell, and then select the Finish By field.
- Select the To cell in this row, click the pick list in this cell, and then select the Finish By field.
Figure 10 shows the completed criteria I entered for displaying a symbol for Finish By dates in the Gantt Chart pane.
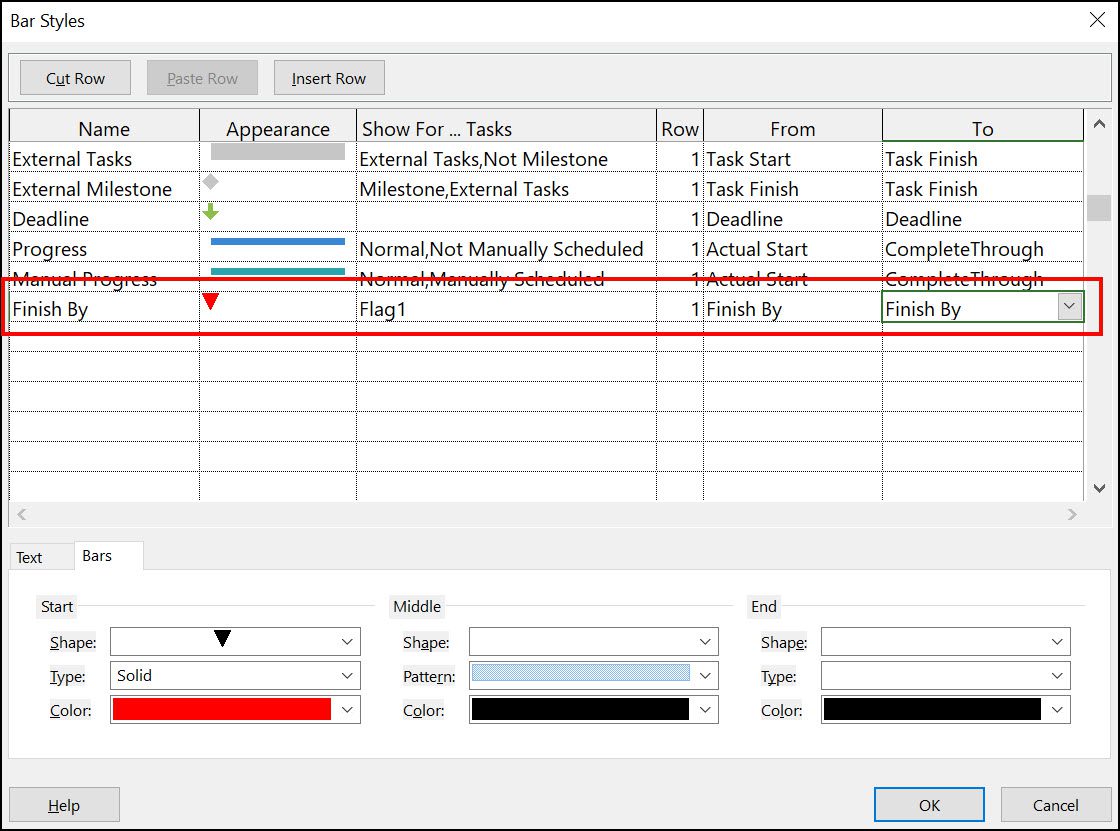
Figure 10: Bar Styles dialog – completed criteria for Finish By dates
- Click the OK button to display the special symbol for Finish By dates in your Gantt Chart pane.
Notice in the Gantt Chart pane shown in Figure 11 that you can clearly see the Finish By dates for each of the major milestones in this project, since each date is represented using the red arrowhead symbol. Unlike the Deadline dates feature, Finish By dates will not impact how Microsoft Project calculates the Critical Path in your project schedules.
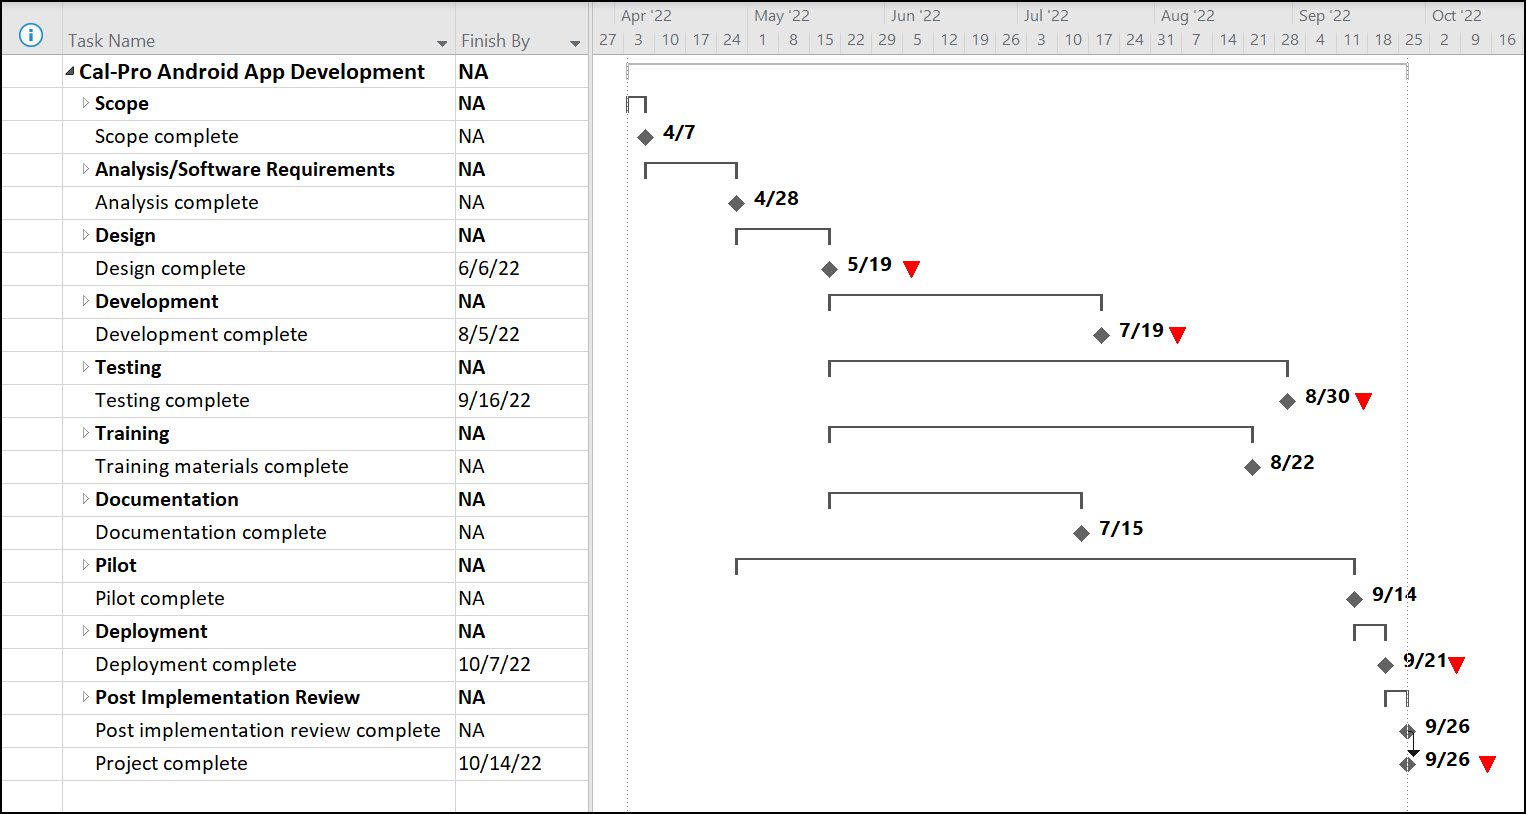
Figure 11: Red arrowheads displayed for Finish By Dates
Saving the Customization to the Global.mpt File
After you create and test this Finish By custom solution in one project, you will probably want to use it in other projects as well. To make this solution available to all of your projects, complete the following additional steps:
- Click the File tab and then click the Info tab in the Backstage.
- On the Info page in the Backstage, click the Organizer button.
- In the Organizer dialog, click the Fields tab.
- In the Fields page of the Organizer dialog, select the two new custom fields on the right side of the dialog, and then click the << Copy button, such as shown in Figure 12.
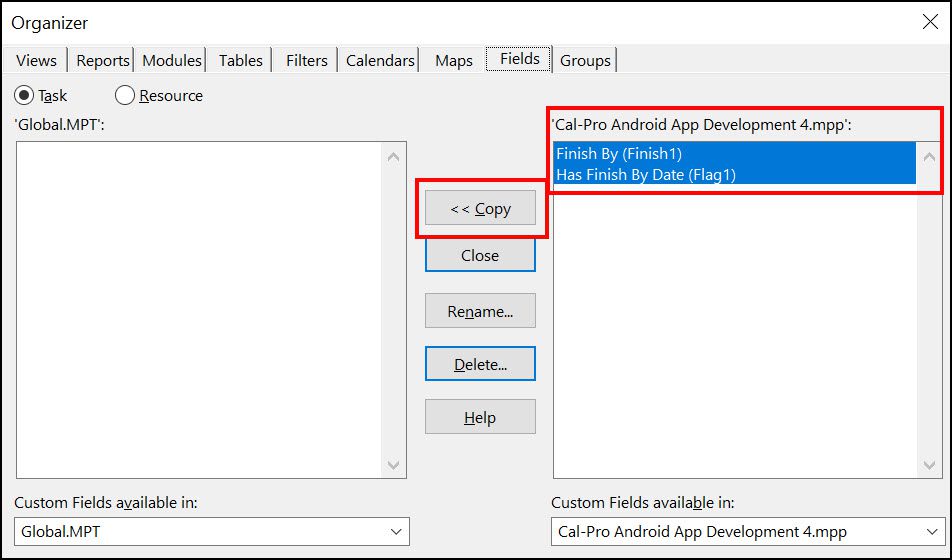
Figure 12: Organizer dialog – Fields page
- Click the Views tab in the dialog.
- In the list of views on the right side of the dialog, select the Gantt Chart view, and then click the << Copy button.
- When prompted in the warning dialog shown in Figure 13, click the Yes button.

Figure 13: Warning dialog about overwriting the Gantt Chart view
The preceding actions copy the two new custom fields and your customized Gantt Chart view from your project to the Global.mpt file on your hard drive. Every time you launch Microsoft Project, the software loads a copy of the Global.mpt file into memory so that you can access all of your default and custom objects, such as views, tables, filters, groups, and even fields.
- Click the Close button to close the Organizer dialog.
- Click the Save button in the Backstage to save the latest changes to your project.
Extra for Experts: In my second article in this series, I taught you how to create a custom Deadline Slack field that calculates the number of days between the Finish date of a task and its Deadline date. If you like the concept of using Finish By dates instead of Deadline dates, you could easily create a Finish By Slack field as well. To create this custom field, use the information in the second newsletter article, but with the following differences:
- Use the name Finish By Slack for the custom Duration field.
- Use the following formula for the Finish By Slack field:
IIf([Finish By] = ProjDateValue(“NA”), “-16000d”, ProjDateDiff([Finish], [Finish By]))
Remember to use the graphical indicator criteria shown in the newsletter article so that you can see stoplight indicators to show you how much time you have left before your task Finish dates slip past their Finish By dates.