

This is the first part of a two part series on using Microsoft Planner.
Planner Overview
Microsoft Planner is an Office 365 application that is aimed at providing a simple, visual way to organize teamwork. Whereas Ms Project is really aimed at the “serious” Project Manager, providing advanced functionality such as resource and schedule management, Planner is aimed at the more casual Project Manager. This is the PM who requires task management and task ownership, hence the focus on teamwork.
I want to drill into task management and task ownership a little and provide my own definitions and input into these items. When I talk about task management, I’m really concerned with whether a task has been completed or not, and who owns it. I might actually go a little further and define progress on tasks as one of three states: not started, in progress, or completed. In fact, Planner already has these three states built in for tracking progress.
Planner allows us to display tasks on a “board” in either bucket or by one of a selection of criteria, such as start date, due date, progress (not started, in progress, completed), or other user-defined labels. It’s worth thinking about what your buckets and labels might be. Of course, you might not use any of those I listed, but other categories that could be applicable are department, priority, etc. Note that whilst you can have unlimited buckets, you are limited to six labels per Plan.
What I’m not concerned about is the work or effort required to do the task. That’s out of the scope of task management! Task ownership is pretty easy to define, but because Planner is focused on teamwork, it’s important to be able to collaborate with one or multiple teams. Planner neatly fills the gap between a personal task management system (Microsoft To Do / Wunderlist) and an Enterprise Project Management System (Microsoft Project Online with MS Project).
Now that we know what Planner is and where it fits into the Microsoft ecosystem, let’s get started with some how to’s and best practices.
Accessing Planner
Planner is an O365 application accessed from the Waffle when you’ve logged into Office 365. Planner is available in the following plans:
- Office 365 Enterprise E1, E3, E4, and E5
- Office 365 Education E3 and E4
- Office 365 Business Essentials
- Office 365 Business Premium

Creating a Planner Plan
Planner is designed to be a visually intuitive application, and so I’ll include as many screen shots into this post as possible to give you a flavour of what we’re dealing with; however, just as there are many ways to use and view schedules in MS Project, the same can be said for Planner.
When diving into Planner, all that’s needed to create a new plan is to hit the New Plan button, give the plan a name, decide on the privacy level, and type in an optional description! The plan is set up and the user will receive a nice email of welcome. What has actually happened in the background is that Planner has created a new Office Group, and it’s actually an Office Group email which is sent. Yes, it’s worth noting that Planner is built on Office Groups.
To recap, the steps for creating a Planner Plan are as follows:
- Click on New Plan
- Enter the Plan Name
- Select the privacy level
- Enter a description
- Create the Plan

Creating Tasks
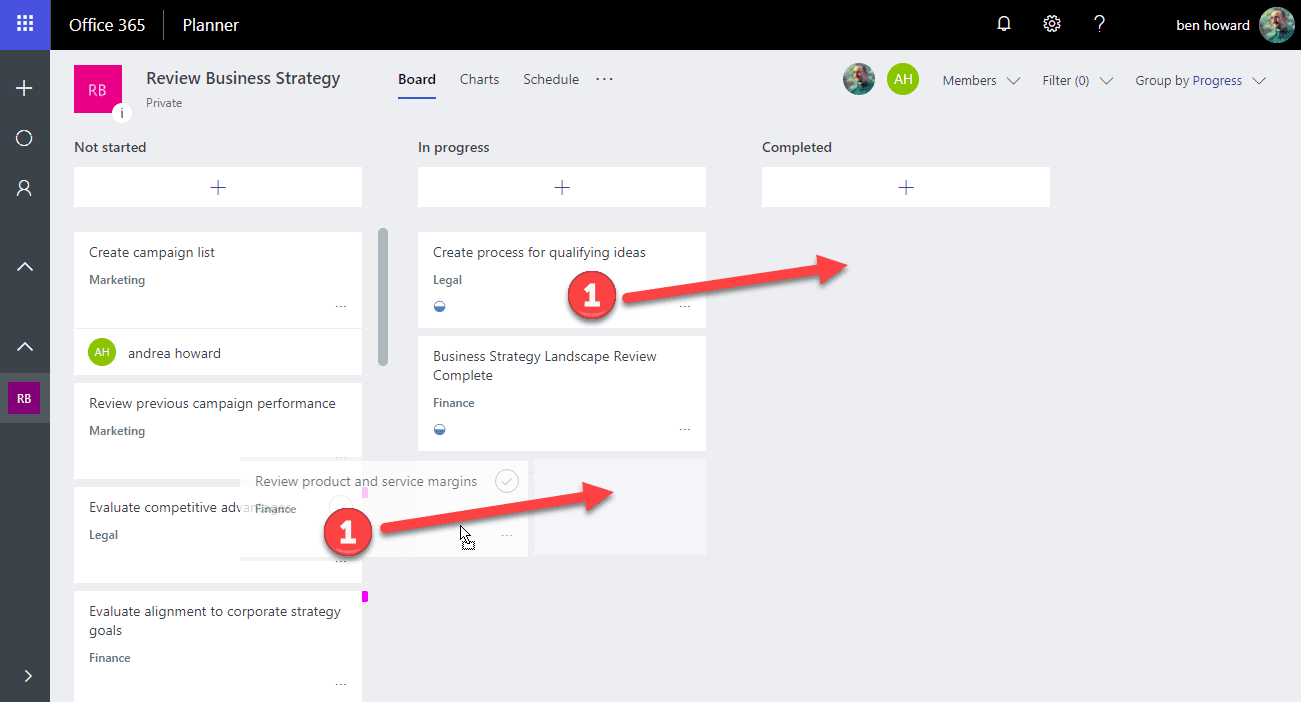
Once the plan is created, the user will be able to create tasks. Here’s where a bit of typing is required. Really it’s a two click operation and a question of entering the task name. In the image below, I’ve already organised my “board” by assignee, and so to assign another task to Andrea I just click on the + button.
Follow these steps to add a task:
- Click on the + button
- Enter the task name
- Click Add Task

As well as creating new tasks, you can copy an existing task and use it as a “template” for a new task. You can choose to replicate everything except the bucket, so this is useful when a task is assigned to multiple resources, or has the same start/due date, etc. The screen shot below displays the “Copy Task” interface.

Creating and Renaming Buckets
Planner doesn’t give us any formal structure like a Work Breakdown Structure, and so we’re limited to viewing the tasks by Progress, Assignee, Start Date, etc. Let’s say I want to define which department “owns” the task. I would simply create a “bucket” for each department and then drag each task into the bucket. When I create a new plan, a single bucket called “To do” is created, so it’s a simple question of renaming this bucket to “Marketing” for example, and then creating a few new ones. Note that when using the Board view, grouping by Bucket is the default. If you are not sure whether to use Buckets or Labels, choose Buckets.
To rename the default bucket:
- Select the ellipses button for the To do list
- Select Rename
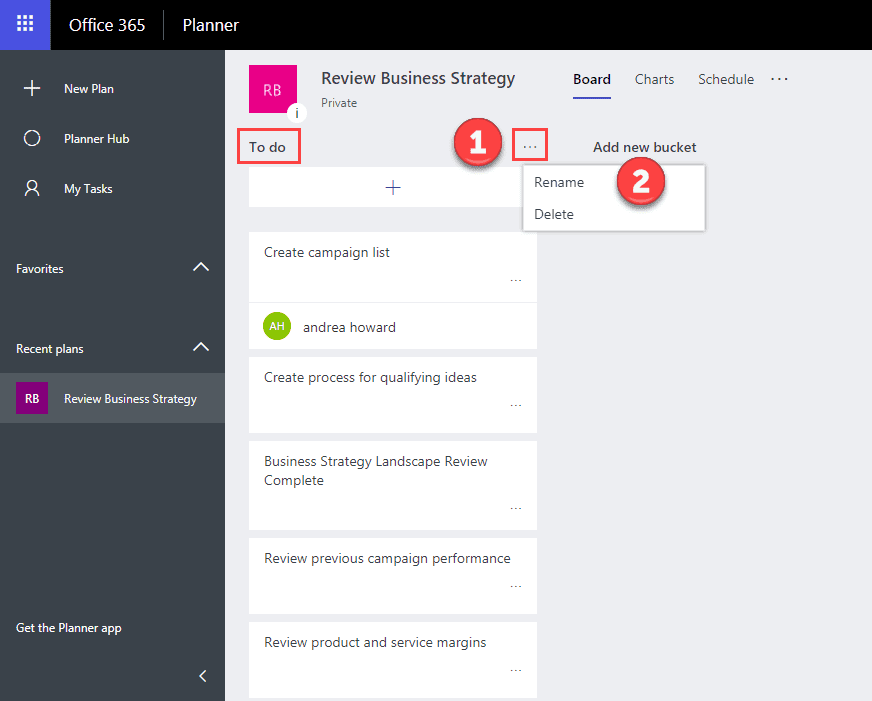
To create new buckets, simply click the Add new bucket button.
Once the buckets have been created, tasks can simply be dragged from one bucket to another. It’s this ease of configuration that makes Planner a winner for simple task management.
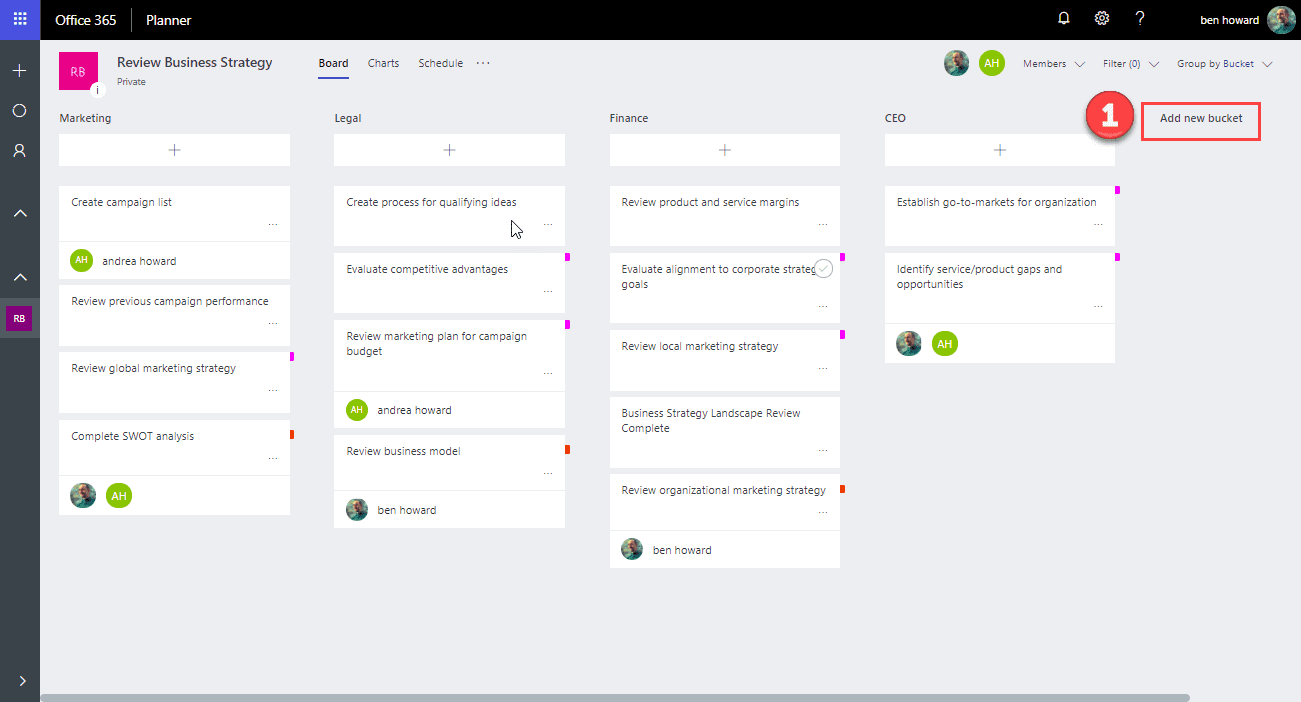
It is worth noting one other great thing. Tasks can be ordered within the list simply by dragging them up or down, and you can apply an order to your tasks simply by dragging and dropping them in the list in the order you want them done.
Sharing Tasks
One of the key components of Planner is email and other collaboration (Skype, etc.), and when you assign a user to a task, the user gets a notification in Outlook. Of course, this means that the user can then open the task directly from Outlook to update the progress or add notes/attachments to the task. Remember that Planner is built on top of Office Groups and these are displayed in Outlook by default:
- The user logs into Outlook
- Groups that the user is a member of are displayed in Outlook.
- The user is sent emails with details of their assignments. When the user clicks “Open in Microsoft Planner” the user is taken directly to the task, which can then be updated.
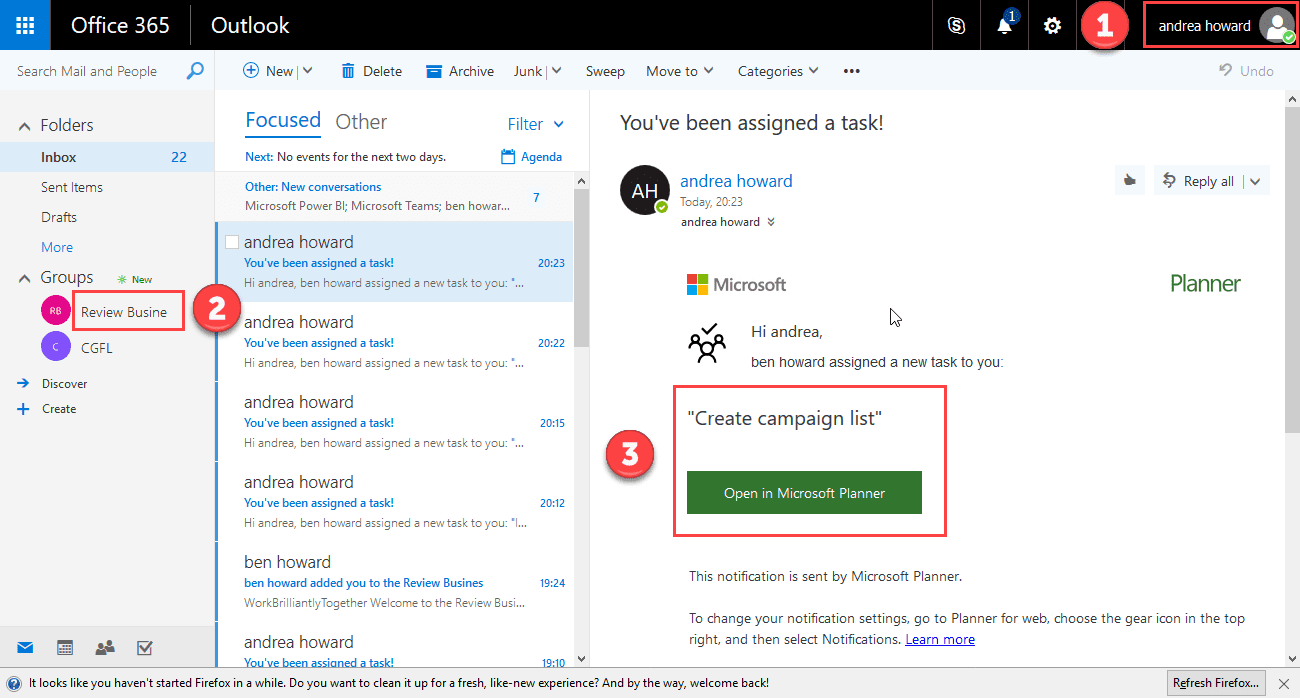
It’s also possible to update a task and then manually send an email to the user.
Progressing and Monitoring Tasks
In addition to users updating their tasks with Outlook, as we saw above, the plan owner can also update any task. A great way to do this is in a team meeting, and since planner is an internet tool, it’s great for managing virtual teams! Let’s assume you’ve fully completed a few tasks, and want to mark some others as started. It’s a single click to mark a task as completed, and a simple “drag” to move a task from Not Started to In Progress. Let’s deal with tasks that are completed first. If you want to set a task as completed, simply hover over it and click the “complete task” button. To be a little more granular, one can change the board view to display by progress and begin to drag tasks into the correct progress stage.
To update the progress of a task:
- Hover over a task to set it as completed (the task will be hidden from the view)
- Select Group by Bucket
- Choose Progress for a more granular progress view
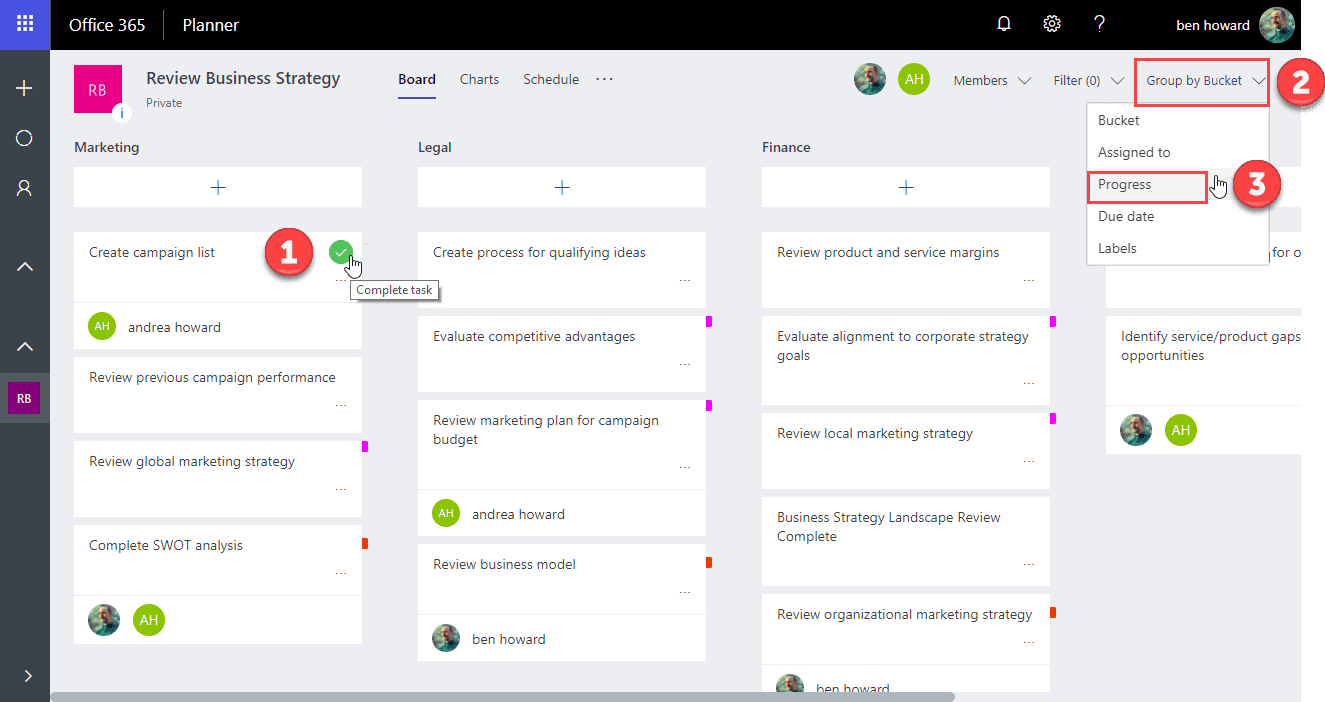
With the Board grouped by Progress, it’s then possible to drag the tasks between the buckets to progress them. Just drag tasks to different buckets to change their status.
Note that if you have two resources assigned to a single task, only one resource has to mark the task as complete!
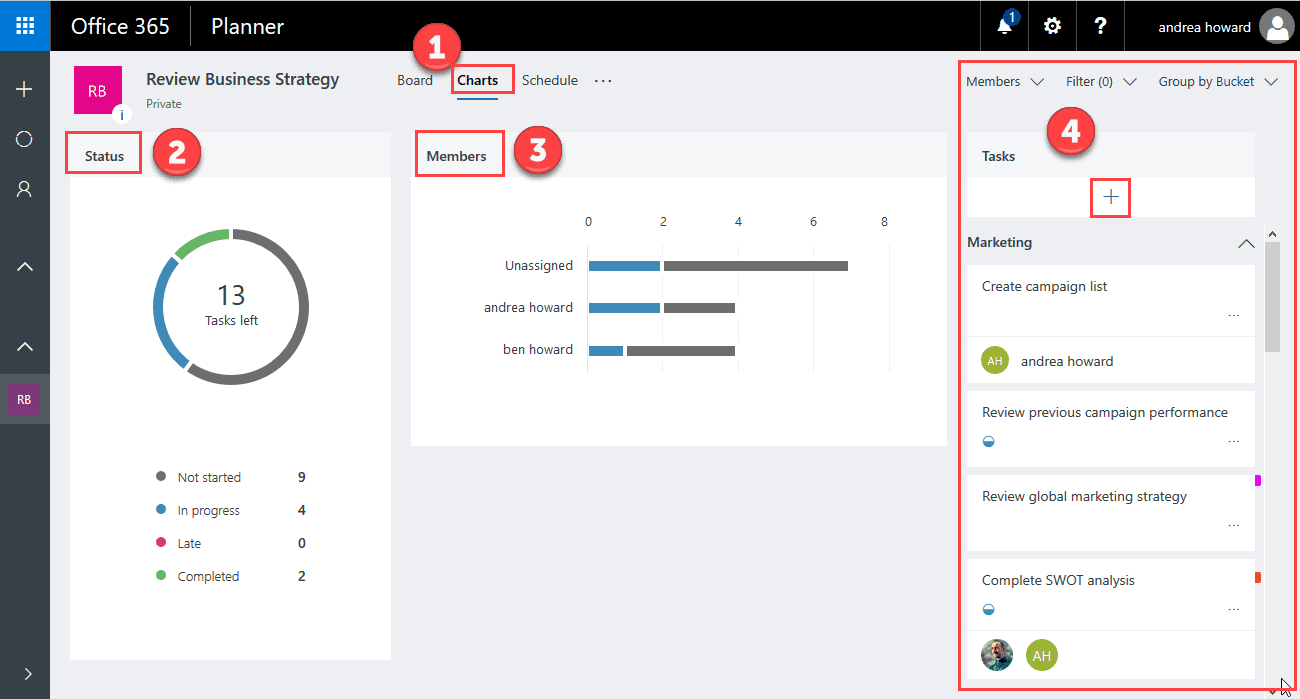
Reports
Planner allows you to view the progress of the plan by whether the task is completed, in progress, late, etc. (Tasks are late if they are past their due date, and due date is an optional field.) We’re also able to see the number of task by resource, and of course, add new tasks to the plan.
The steps to view progress are as follows:
- Select the Charts button to display the charts
- The Status graphic provides an overview of the number of uncompleted tasks
- The Members histogram displays the number of outstanding tasks by resource
- New tasks can be added in the Tasks section
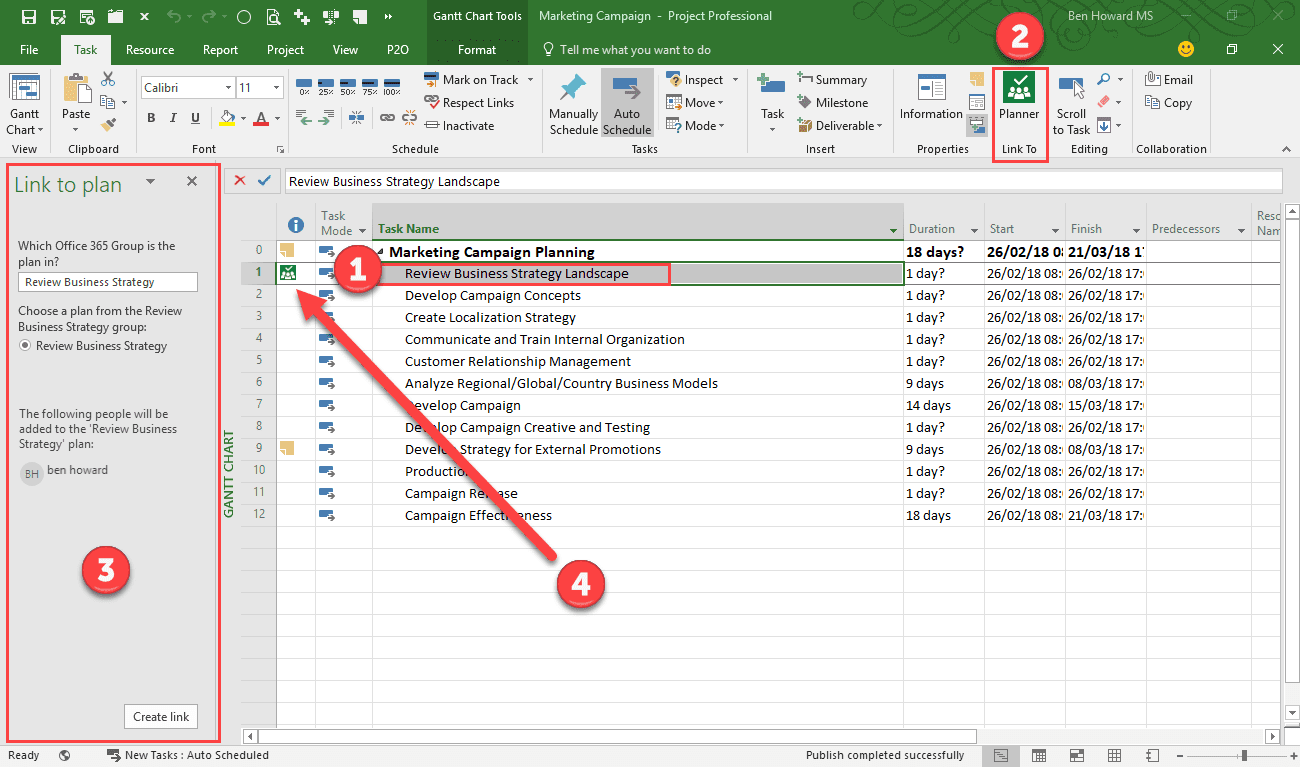
Linking Planner into MS Project
Now that we’ve used planner to define and track our tasks, we can begin to see that it’s a useful tool for task management, but it’s limited by design in terms of resource management and dependencies between tasks. This isn’t a criticism of Planner, it’s just the way it is. Luckily we can use a combination of Project and Planner to track and plan work. In doing that, there are a couple of caveats which should be pointed out as I see them as a bit of a stumbling block at the moment.
- You must be connected to a Project Online instance, and not everyone will want to have the expense of doing this.
- The plan must be published to Project Online.
- You must be using the subscription version of MS Project (Microsoft Project for O365).
In the 1st instance, it’s important that we’ve already gotten our Planner plan set up, and once that is done, we can associate a single task in MS Project with a single Plan in Planner.
To link the Project and Planner together:
- Highlight the task you wish to link
- Click on the Planner button
- Select the Plan to link to
- Click on the Planner button in the indicators column to jump directly to the Planner plan
In this scenario, there isn’t any feedback mechanism from Planner to Project, and so the Project Manager will need to update the project plan status.
Related Content
Webinars (watch for free now!):
Task Planning using Microsoft Project
What’s the value of Schedule Risk Analysis?
Webinars (watch for free now!):
Microsoft Planner Deep Dive
Articles:
Levels of Project Scheduling Proficiency
Are You Using the Team Planner View Feature in Microsoft Project?
Resource Leveling: Scheduling vs. Leveling
Microsoft Planner vs Microsoft Project


Chip Eckardt
My main reason for not using Planner is there is no way to export the data that I have found. Even SharePoint, Tasks let you export to a .csv file. I would not want to build a project in Planner only to find Planner does not meet my needs and have no way of exporting the data (but maybe linking Planner to Project is an answer. I did not know about linking Planner to Project. I will have to try that, Planner is getting noticeably better. Now you can assign multiple people to a task, etc. I do wish there were more options (Not Started-In Progress-Complete)
Ben Howard
Hi Chip, This is great feedback for Microsoft, and indeed it has already been given. To add your voice to the next steps for planner, you can provide feedback directly to Microsoft at
and specifically for Power BI integration at
Cheers, Ben.
Karim Harb
Would you recommend to use Planner to keep track on Action Items? Currently, I use Excel to trac them.
Ben Howard
Hi Karim,
If you have a licence for planner then I think that this is an excellent use of Planner and Project. Also there is a great add-in from Solvin that links Project to Planner and provides more value than the default MS tool, but costs I think $10 per month per project licence.
Ben Howard
Hi Yaron,
Planner is available to all users who have an Enterprise subscription of O365 (E3 or above I think). If you haven’t got this subscription then I don’t know how you access planner.
ben howard
Hi Mark,
I cannot tell you what Microsoft are thinking of in this area – I know there is a request on the Planner uservoice for this – . I think https://us.wicresoft.com/ have or had a soln in this area.
Antonio Cerini
Please there is a reasonable mode (not hard as internet shows!) to obtain a gantt chart from planner tasks?
It’s mandatory to buy project on line ? Because I have Project Professional 2019 on my PC.
many tanks antonio.