
 Marty McFly had a problem. He was stuck in the past. Like Marty, project schedules can have a similar problem with “remaining work” stuck in the past. In this article I show you how to recognize the problem, identify the cause and implement a solution to move those remaining work hours — back to the future.
The Problem of Remaining Work
Marty had it simple. He had obvious clues that something was amiss. The shopping center was gone, everyone dressed like they were in a 1950s sock hop movie and his parents were teenagers. Project managers aren’t so lucky. “Remaining Work in the Past” is more elusive. It hides in the schedule, and Microsoft Project provides no warning lights or indicators that the problem exists. So how do you find remaining in the past?
The easiest place to find it is the timescale data within a Task Usage view. Modify the timescale data to show Actual Work by right clicking in the Details column and clicking Actual Work. The timescale values (week, day) shouldn’t matter. The view should look like the view shown below.
Remaining in the past can be found by looking at past timescale values in the project summary row. When it exists, the Actual Work and Work cell values won’t match. When all cell values prior to the Status Date match, yo won’t find remaining work in the past.
Looking at the sample below, this project has remaining in the past. A vertical red line for the project Status Date of 8/13/16 has been manually added to delineate past and future. Examining past timescale data cells, Monday appears to be OK; Work and Actual Work cell values match (highlighted in rose). Tuesday and Wednesday illustrate remaining in the past (highlighted in yellow). The Work cell values are greater than the Actual cell values. The difference of these numbers represents the amount of remaining in the past. Tuesday shows four hours of remaining in the past (8 Work – 4 Actual) and Wednesday indicates eight hours.

Identifying the specific tasks causing the problem is critical to resolving the issue. Drilling down further into the schedule, the view shows that Task 2 is the source of the remaining in the past.
Causes and Solutions
Once again, Marty had a leg up on the project manager. In his case, the cause was the DeLorean time machine he was driving, and the solution was finding 1.2 jigawatts of power. But project managers usually don’t have a creative scriptwriter explaining how to fix remaining in the past.
Let’s examine the potential causes of remaining in the past:
- Regular schedule maintenance not performed;
- Hard constraints;
- Manually changing the Finish Date of a Fixed Duration task;
- Editing timescale data Work fields;
- Leveling can create splits in remaining work; and
- Manually scheduled tasks.
Note that the information I provide in this article is based on a Microsoft Project 2013 environment.
Cause #1: Regular Schedule Maintenance Not Performed
Problem description
The Project owner isn’t performing regular schedule maintenance to ensure that remaining in the past moves to the current date (and beyond).
Solution
The regular schedule maintenance process has two steps:
- Set the Status Date.
- Update Project. Establishing the Status Date sets the date through which Project will calculate earned value, and it also sets the default date from which Project will schedule remaining work in the Update Project function. Updating the project, if executed with the options shown below, will move remaining work from the past and reschedule all remaining work starting from the Status Date.
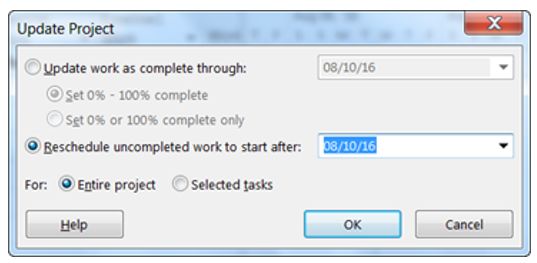
Unfortunately, this doesn’t occur automatically in Project. It is entirely up to the project owner to ensure this function is executed. When the Update Project function isn’t performed, remaining work will stay in the past.
If the Update Project process doesn’t resolve the issue of remaining in the past, the root cause for it may be one of the other causes.
Cause #2: Hard Constraints
Problem description
Hard constraints such as “Must Finish On” or “Finish No Later Than” can, in some cases, cause remaining in the past. How Project reacts to these types of constraints is controlled by the backstage option shown below. (File | Option | Schedule)

When this option is checked, Project will NOT move a task with a hard constraint. As a result, hard constraints can force remaining work to stay in the past.
When this option is NOT checked, Project WILL allow the Update Project function to move remaining in the past caused by a past hard constraint date.
Solution
Change the hard constraint. This can mean removing it all together or changing it from a hard constraint to a soft constraint such as “Finish no earlier than.”
Cause #3: Manually Changing the Finish Date of a Fixed Duration Task
Problem description
When the Finish Date of a fixed duration task is manually changed and moved backwards, Project simply shifts the entire duration block of work backwards. The task keeps the same duration and hours per day, but it is now realigned to the new Finish date.
In the sample below, Task 2 is a five-day Fixed Duration task finishing on 8/19/16. The project Status Date is 8/13/16 (red line).

In the following sample, the Task 2 Finish date was manually changed to Wednesday, 8/16/16. Thus, the entire block of five days’ duration has been shifted backwards and three days of remaining work (highlighted) have been shifted into the past.

Solution
As a general practice, DO NOT manually change task Finish dates. This will help ensure this scenario doesn’t arise. However, if the Finish date was already changed manually, Project created a hard constraint at that time. Remove the task constraint and perform the Update Project function again to move remaining work forward.
Cause #4: Editing Timescale Data Work Fields
Problem description
This scenario is typically caused by a project manager trying to manage the schedule manually, by directly adjusting timescale data cell values — for example, adding two additional hours to the timescale Work cell instead of adding those hours to the Remaining Work column. This maintenance approach may seem like a good idea at the time, but according to Microsoft it may cause the following:
- Project effectively turns the task into a manually scheduled task, except that it provides no indication that it has done so
- Project changes the Work Contour field value to “Contoured,” indicating the project owner has entered a manually-defined workload pattern
- Project doesn’t know how to make needed adjustments to the task when performing functions like Update Project, scheduling, or leveling. As a result, three things may happen:
- Actual Work hours may appear that are unaligned to any timesheet entries;
- Actual Work hours may reappear after they have been corrected; or
- Remaining work may get stuck in the past and the Update Project function may NOT move them forward.
As a best practice, avoid directly editing the timescale data fields. Remaining work adjustments should be made in the Remaining Work field at the task assignment level.
Solution
To resolve this scenario, reset the Work Contour field value and Update Project:
- Add the Work Contour field to a Task Usage type view. The work contour values will only appear on the resource assignment level rows.
- Looking at the timescale data, identify tasks where remaining work is in the past.
- Check the Work Contour field value on all resources assigned to that task. If the Work Contour field value is “Contoured” on any of the assignments, change the value to “Flat,” which is the default.
- Repeat steps 2 and 3 until all tasks showing remaining work in the past have been adjusted.
- Ensure the Status Date is set correctly and then perform an Update Project to move remaining work in the past up to the Status Date.
Cause #5: Leveling Creates Splits in Remaining Work
Problem description
This scenario is a bit more complex, but it’s similar to cause #4 above. In this case, Project changes the Work Contour field value to “Contoured” without the PM directly editing the timescale data. So how does that happen?
The cause of this scenario can be found in the following Leveling Option. To understand why, there needs to be an understanding of what this option allows Project to do.
![]()
The “Leveling can create splits…” option allows Project to create splits in remaining work after the Resume Date. (See the note below.) This option effectively allows Project to create a custom load pattern by slotting remaining work into allocation gaps left by previously leveled tasks. It sounds complicated, but it’s easily demonstrated in the following examples.
The example below is a schedule before leveling. Bob is assigned to both tasks. Task A has been created with a manually entered work load pattern as a simple means to create gaps in Bob’s scheduled work. These gaps are the zero-hour allocation highlighted in the timescale data. Additionally, note that Bob’s Work Contour value on Task B is “Flat.”

The sample below shows the schedule after leveling. Note that Bob’s workload on Task B has been customized by Project to slot work into the allocation gaps left by Task A. As a result, Bob’s Work Contour field on Task B has also been changed to “Contoured.”

Generally speaking, Project recognizes the difference between a Work Contour field value of “Contoured” created by a project manager entering values directly into the timescale data cells and a value of “Contoured” created by Project during leveling. But sometimes it doesn’t.
Solution
There are two potential approaches that will generally resolve this scenario.
The first approach involves clearing the leveling values and then updating the project.
- Click Clear Leveling. This should reset the Project created “Contoured” values to “Flat.”
- Update Project. This should move remaining work into the future.
Sometimes, however, Clear Leveling doesn’t reset the Work Contour field values. When this occurs, the second approach is to perform the resolution steps identified in Cause #4 above.
Note: The Resume date is set during the scheduling function (Calc) and is tightly tied to the Scheduling Option “Split in progress tasks.” The Resume date is the date on which Remaining Work starts or resumes for a task. For tasks not started, the Resume date is driven by the completion of predecessor tasks, and it will equal the Start date. How a started task calculates the Resume date is dependent upon the “Split in progress tasks” option. When the option is checked, Resume is the next business day for started tasks. When the option isn’t checked, Resume is a date based on the completion of predecessor remaining work.
Cause #6: Manually Scheduled Tasks
Problem description
When a task is configured as Manually Scheduled, this tells Project that the project manager will manually take care of ALL task maintenance. Consequently, Manually Scheduled tasks are bypassed by processes like Resource Leveling and Update Project.
Despite a project manager performing regular Update Project functions, the fact that the tasks are configured as Manually Scheduled causes them to be ignored. Remaining work in the past just stays there. It does NOT get moved forward.
If the project is being leveled, it’s a good idea to ensure that all tasks and WBS levels are configured as Auto Schedule.
Solution
Change the task to Auto Schedule and perform the Update Status function. Or, if there’s a reason the task must remain Manually Scheduled, manually move the task up to or beyond the Status Date.
