
 In a recent blog post article, I discussed how to apply and use the Task Entry view. This view, by the way, is a combination view or “split” view that includes the Gantt Chart view in the top pane and the Task Form view in the bottom pane. What I did not explain in my blog post article is how to take advantage of additional functionality available in the Task Form view.
When you apply the Task Entry view, the Task Form pane displays a default set of fields and columns known as the Resources & Predecessors details. These default details include fields such as Duration, Effort Driven, and Task Type, along with columns such as Resource Name, Units, and Work. When you assign resources to tasks using the Task Entry view, the default set of details in the Task Form pane is ideal for the resource assignment process. However, did you know that there are other sets of details available for you to use in the Task Form view?
If you right-click anywhere in the Task Form pane, Microsoft Project displays the sets of details available for the Task Form view, such as shown in Figure 1. You can select any of the eight sets of details shown on the shortcut menu. Let’s take a look at the other sets of details available in the Task Form view, and talk about best uses for each set.

Figure 1: Right-click in the Task Form pane
The Predecessors & Successors details shown in Figure 2 is ideal for use during the dependency planning process when you need to specify dependencies on the tasks in your project schedule. To use this set of details, select a task in the Gantt Chart pane, then use the columns in the Task Form pane to specify the predecessor and successor tasks for the selected task. Using this set of details makes it very easy to specify multiple Predecessors and multiple Successors for the selected task simultaneously.

Figure 2: Predecessors & Successors details
The Resources & Successors set of details shown in Figure 3 is nearly identical to the Resources & Predecessors details, except that the Task Form pane includes Successor column on the right side rather than Predecessors column. This set of details is also ideal for assigning resources to tasks in your project schedule.

Figure 3: Resources & Successors details
The Schedule set of details is ideal for assigning multiple resources to a task when the assigned resources will start their task work at different times. To use the Schedule details, initially assign all of the resources to the task, such as shown in Figure 4. Notice that I assigned Mickey Cobb, Carmen Kamper, and Audrey Kehrli to work on this task full-time (Units value of 100%) with 40 hours of Work, yielding a Duration value of 5 days.
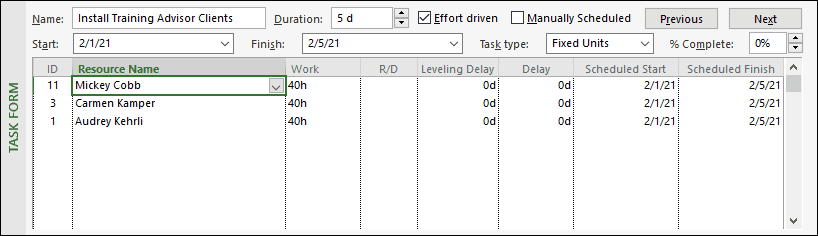
Figure 4: Schedule details – initial resource assignments
To delay the start of one of more of the assigned resources, enter a value in the Delay column or manually enter a date in the Scheduled Start column for the resource(s), and then click the OK button. Notice in Figure 5 that I delayed the start of Carmen Kamper’s work by 2 days, and delayed the start of Audrey Kehrli’s work by 3 days. Notice also that Microsoft Project automatically calculated the new Duration value for the task to 8 days, and automatically recalculated the Scheduled Start and Scheduled Finish values for these two resources as well.

Figure 5: Schedule details – two resource assignments delayed
The Work details are ideal for assigning overtime work to resources assigned to a task to “speed up” task completion by assigning more than 8 hours of work per day. By the way, assigning overtime work in this manner does not cause resource overallocations. To use the Work details, initially assign one or more resources to the task, such as shown in Figure 6. Notice that I assigned Terry Uland to work full-time (Units value of 100%) with 160 hours of Work, yielding a Duration value of 20 days.

Figure 6: Work details – initial resource assignment
To speed up task completion, we decided to ask Terry Uland to perform overtime work on this task. In Figure 7, notice that I entered 32h in the Overtime Work column and then clicked the OK button. In response, Microsoft Project recalculated the Duration as 16 days, shortening the Duration value by 4 days.

Figure 7: Work details – overtime work scheduled
You can use the Cost details to study the cost information for the resources assigned to a task. Notice in Figure 8 that the Task Form pane displays all of the relevant cost-related columns for Marilyn Ray, including the Cost, Baseline Cost, Actual Cost, and Remaining Cost columns.
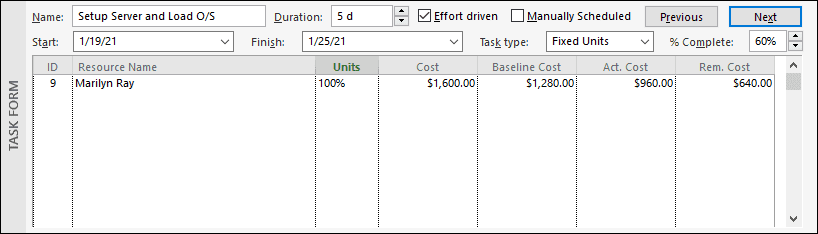
Figure 8: Cost details
The Notes details allow you to view and read all of the notes for the selected task, and even to add additional notes whenever needed. The Task Form view with the Notes details applied displays the same information that Microsoft Project displays on the Notes page of the Task Information dialog. In Figure 9, notice that you can see both of the notes for the selected task, along with the formatting buttons immediately above the notes section.

Figure 9: Notes details
The Objects details appear to be an artifact from much earlier versions of Microsoft Project and which no longer works in more recent versions. The original purpose of the Objects details was to display OLE objects inserted in tasks in the project schedule. I tested this functionality in the 2010, 2013, 2016, and 2019 versions of Microsoft Project, but the Task Form view did not display the OLE objects with the Objects details applied. Because of this, I do not include a screenshot of the Objects detailed applied to the Task Form view.
As a final note, please keep in mind that there is no way to customize the Task Form view the way that you can customize other views. Your limit for Task Form view customization is selecting different sets of details in the view. Microsoft Project does not allow you to add any other fields or columns to any of the sets of details.
