Background Information
Last month there was a fascinating “brain teaser” question posted in the Project and Planner User Group on LinkedIn. The user wanted to know if there was a way to display the Actual Duration value in calendar days (including weekends and company holidays) and not in working days. At least one other group participant tried to answer the question, but the answer given was not correct.
After waiting a couple more days and seeing that no one else attempted to answer the user’s question, I decided to give it a try. Figure 1 shows the sample project that I used to develop the solution for this problem. Keep in mind that Microsoft Project displays the Actual Duration value of 15 days in working days and not in calendar days.
Solution
The solution to this problem involves two steps. The first step is to create a custom calendar that shows every Sunday through Saturday work day using 8-hour working days. Complete the following steps to create this custom calendar:
- Click the Project tab to display the Project ribbon.
- In the Properties section of the Project ribbon, click the Change Working Time button.
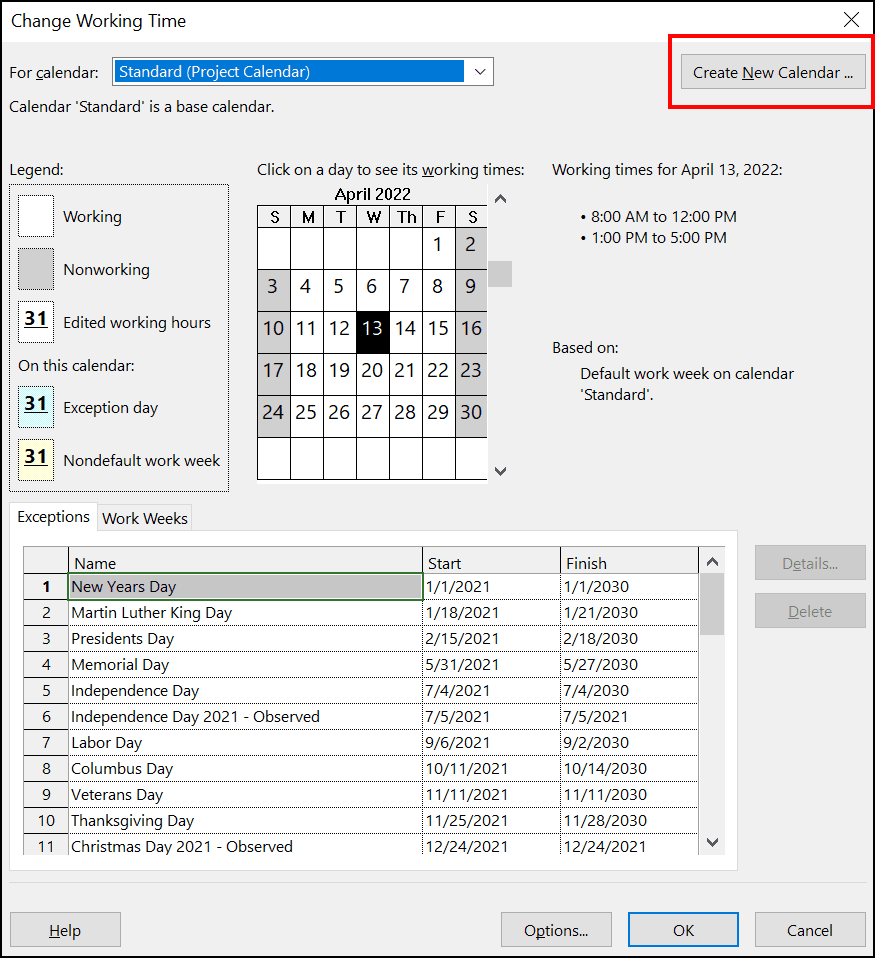
- In the upper-right corner of the Change Working Time dialog, click the Create New Calendar button, such as shown in Figure 2.
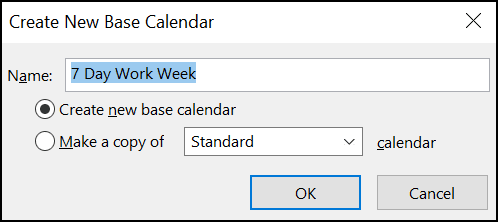
4. In the Create New Base Calendar dialog, select the Create new base calendar option, enter a name such as 7 Day Work Week, such as shown in Figure 3, and then click the OK button.
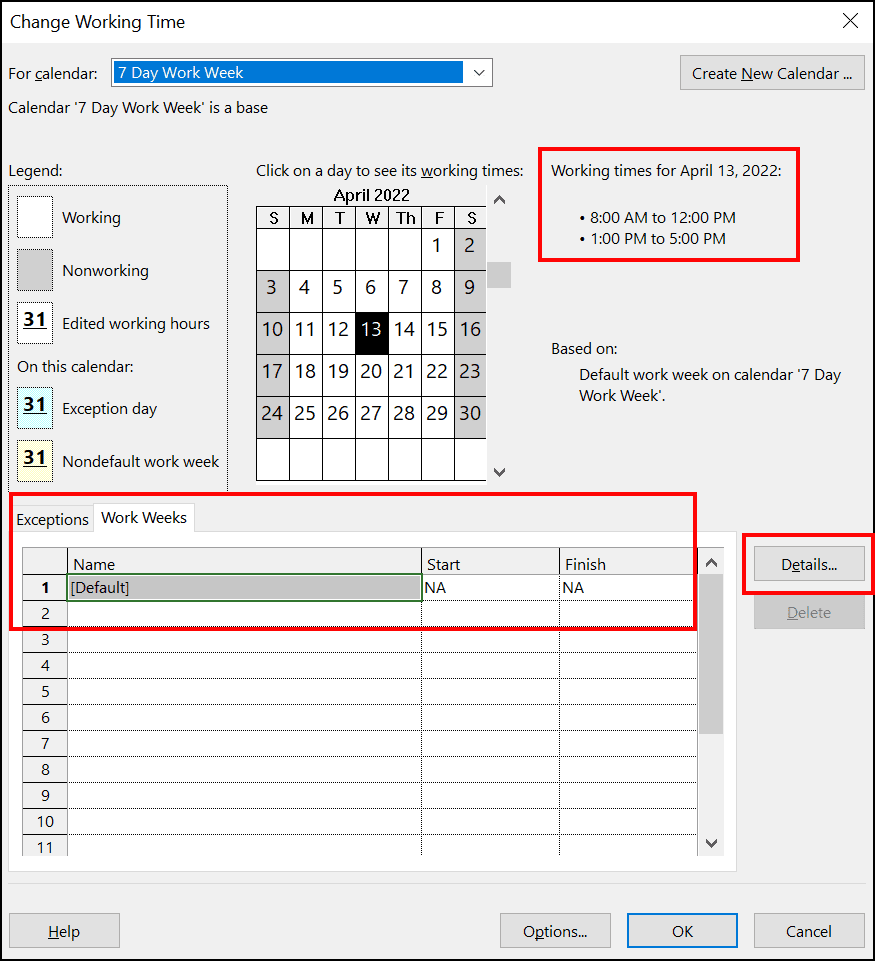
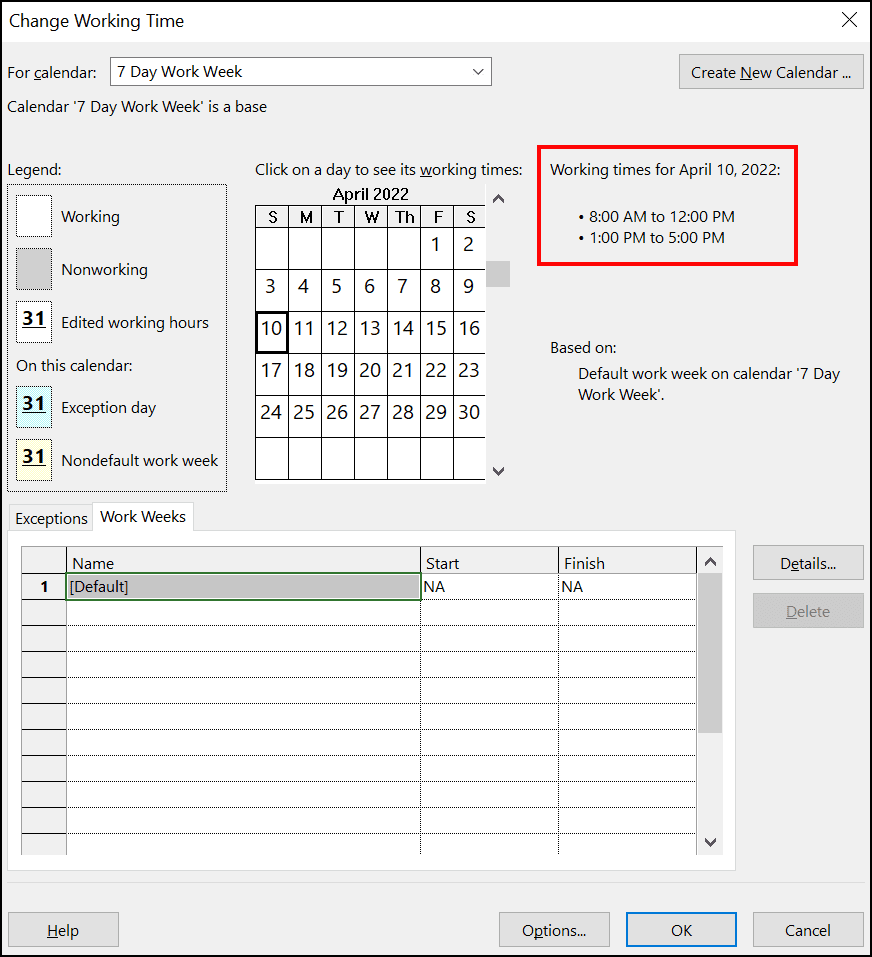
Microsoft Project will create the new base calendar and then immediately display it in the Change Working Time dialog. Notice in Figure 4 that the new calendar uses the default working schedule, with Monday through Friday scheduled as working time, from 8:00 AM to 12:00 PM and 1:00 PM to 5:00 PM each day.
5. In the middle of the Change Working Time dialog, click the Work Weeks tab.
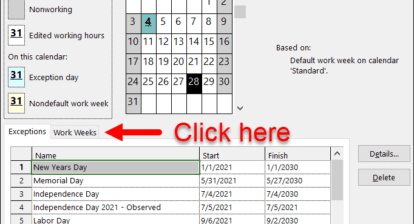
6. In the Work Weeks data grid, leave the [Default] item selected and then click the Details button, such as shown previously in Figure 4.
7. In the Details dialog, use the Control key to select Sunday and Saturday, both of which are currently shown as nonworking time.
8. In the Details dialog, select the Set day(s) to these specific working times option.
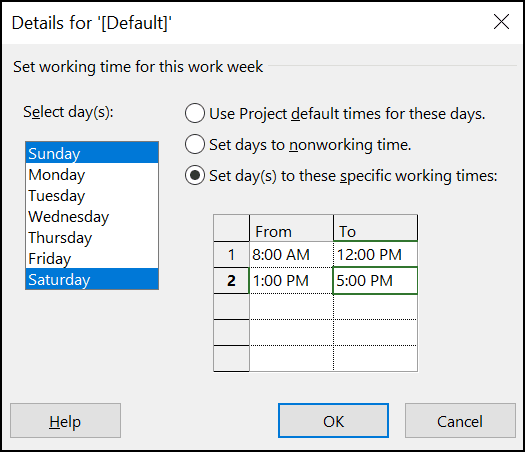
9. In the data grid that shows working time, enter a schedule that shows working time as 8:00 AM to 12:00 PM and 1:00 PM to 5:00 PM, such as shown in Figure 5.
10. In the Details dialog, click the OK button.
Figure 6 shows the schedule for the new 7 Day Work Week calendar. Notice that every day of the week is scheduled as an 8-hour working day.
11. After creating the new calendar, click the OK button to close the Change Working Time dialog.
The second step in the solution is to create a custom field containing a formula to make the necessary calculation of an Actual Duration value measured in calendar days. Complete the following steps to create this formula:
- In the Properties section of the Project ribbon, click the Custom Fields button.
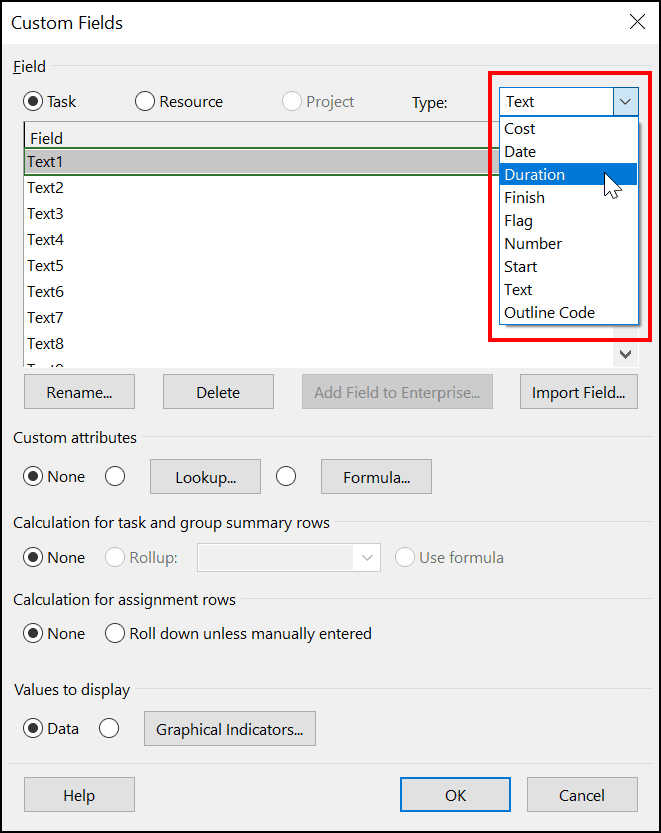
- In the Custom Fields dialog, click the Type pick list and select the Duration value, such as shown in Figure 7.
3. In the Custom Fields dialog, select the first unused Duration field and then click the Rename button.
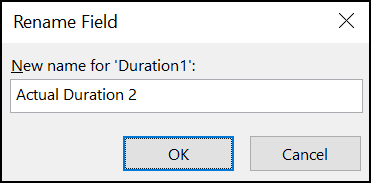
4.In the Rename Field dialog, enter a name such as Actual Duration 2, such as shown in Figure 8, and then click the OK button.
5. With the new Actual Duration 2 field still selected, click the Formula button in the Custom Attributes section of the Custom Fields dialog.
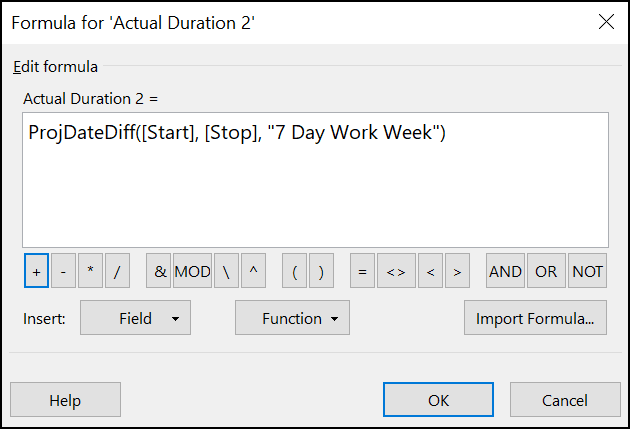
6. In the Formula dialog, enter the formula shown in Figure 9.
If you want to copy and paste this formula, the formula is as follows.
ProjDateDiff( [Start], [Stop], “7 Day Work Week”)
WARNING: If you copy and paste the formula from this article, make sure that the paste operation results in straight quotes in the formula (the ” ” characters) instead of the curly quotes that are used by default in Microsoft Word (curly quotes look like this “ “).
In the preceding formula, I use the ProjDateDiff function to calculate the difference between two days. In the formula, the [Start] field represents the Start date of the task, and the [Stop] field represents the date on which the current progress (the % Complete value) ends. In other words, it is the end date for the Actual Duration progress bar shown in the Gantt bar for the task. The “7 Day Work Week” portion of the formula forces Microsoft Project to calculate the resulting duration value in calendar days, not working days.
7. In the Formula dialog, click the OK button.
8. In the confirmation dialog shown in Figure 10, click the OK button.
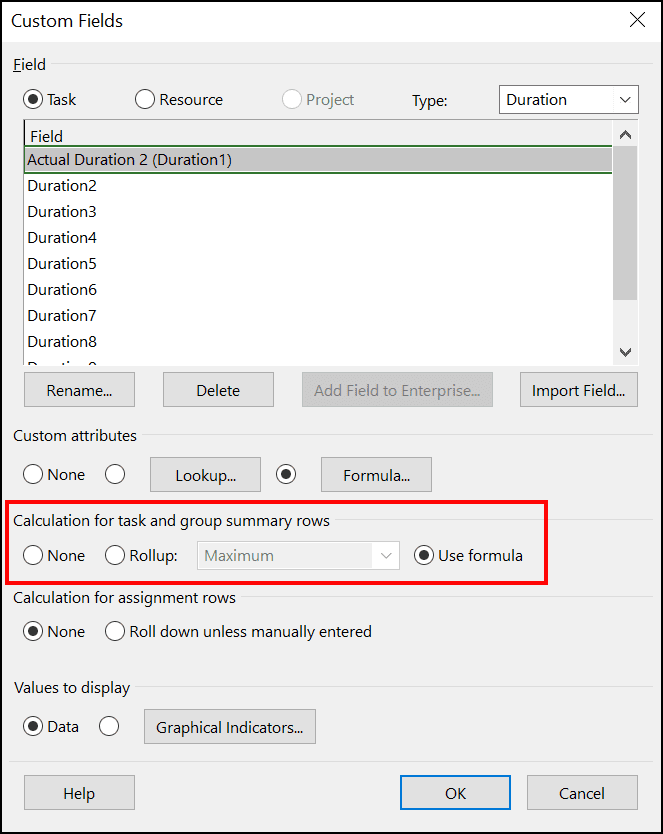
9. In the Calculation for task and group summary rows section of the Custom Fields dialog, select the Use formula option, such as shown in Figure 11.
10. Click the OK button to close the Custom Fields dialog.
After creating the custom calendar and the custom formula that references that custom calendar, you can insert the new custom field in any Task view, such as in the Gantt Chart view, for example. Notice in Figure 12 that the new custom Actual Duration 2 custom field shows a duration value of 19 calendar days for the task in question. The time span calculated for that duration includes 15 working days and 4 weekend days, resulting in a grand total of 19 calendar days.







Dale Allen
Rob —
Thank you for asking. Yes, this is very possible. Double-click the Timescale bar at the top of the Gantt Chart screen to display the Timescale dialog. Leave the Middle Tier tab selected in the dialog. On the Middle Tier page, click the Show pick list and select the One tier (Middle) option. Click the Units pick list and select the Days item. Click the Label pick list and select one of the following items, depending on what you want to see:
Day 1, Day 2, … (from Start)
D1, D2, D3, … (from Start)
1, 2, 3, 4, … (from Start)
The setting you choose will determine how “wide” each day will appear in the Timescale bar. Click the OK button when finished. Hope this helps.
Tess
I’ve gone through all of these steps twice, but when I try to insert the new column showing the actual duration, I just get #ERROR the entire way down. I can’t figure out why and Project isn’t giving me any pointers. Are there some common mistakes that I may have made?
Michaela
Tess, I had the same result when I followed the steps. I went back to the custom formula and changed the [Stop] to [Finish] because that is the name of the field where I have my end date for each task. That fixed the error.
I have another question: I want some tasks to start based on when the predecessor ends. I want to be able to enter in the Actual Duration and for the end date to calculate based on the number of calendar days, not just for the Actual Duration to be calculated based on the custom calendar. The way I have thought to do this is creating a custom field for my Finish field, and writing a formula based on Actual Duration. I have not done this yet, but it seems like it may become a circular formula. Any tips?
Dale Allen Howard
Tess —
Have you entered progress for tasks in your project? If a task has no progress, the formula will generate an error message. If the task has progress, the formula will show the measurement of the progress in calendar days, not work days. Hope this helps.
Dale Allen Howard
Michaela —
To answer your most recent question, you would need to create a custom field that expresses the Actual Duration and Remaining Duration values in calendar days and not working days. But keep in mind that Microsoft Project will recalculate the Finish date of the task based on the progress entered so far and the Remaining Duration, based on work days and not calendar days. That’s just the way the software works. Thanks for asking and hope this helps.