Dragging and Dropping Tasks
Many Microsoft Project users probably know that you can move tasks in any task view, such as the Gantt Chart view, by “dragging and dropping” the tasks. To drag and drop a task, click the row header at the far left end of the task row, then release the mouse button. The software highlights the entire task row and changes your mouse pointer to a four-headed arrow. Click and hold the selected row header to “grab” the task, then drag the task to its new location.
As you drag the task, Microsoft Project displays a gray insertion point. When the gray insertion point is located where you want to drop the task, release the mouse button. Microsoft Project moves the task from its original location to its new location. For example, in Figure 1, notice that I am moving the Design task from row #3 to a position immediately above row #1 at the beginning of the project.
To drag and drop multiple tasks simultaneously, select the row headers of two or more tasks that you want to move, then release the mouse button. Click and hold one of the row headers in the selected block of tasks to “grab” the block, drag the block of tasks to their new location, and then release the mouse button. Microsoft Project moves the block of selected tasks from their original location to their new location.
Dragging and Dropping Task Assignments
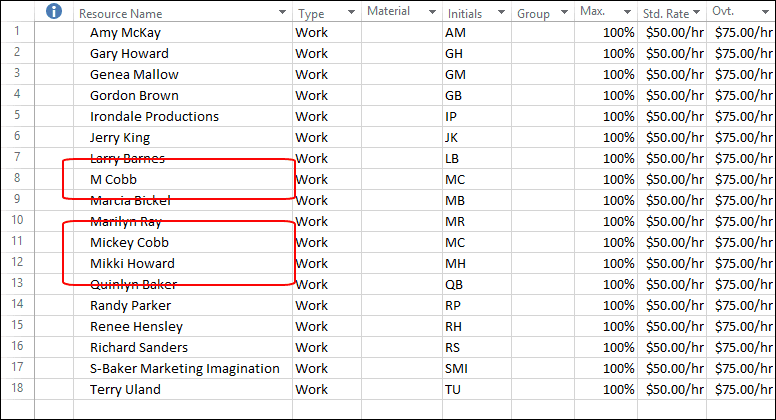
Now that you know you can drag and drop tasks in any task view, did you know that you can also drag and drop task assignments in the Resource Usage view? For example, Figure 2 shows the Resource Sheet view in a project that was originally created by three different project managers. Two of these project managers made a big goof when they entered the incorrect spelling for a resource named Mickey Cobb. One of them entered her name as M Cobb, while the other one entered her name Mikki Howard. As the current project manager of this project, I need to consolidate the tasks assigned to M Cobb and Mikki Howard, and reassign all of those tasks to Mickey Cobb.
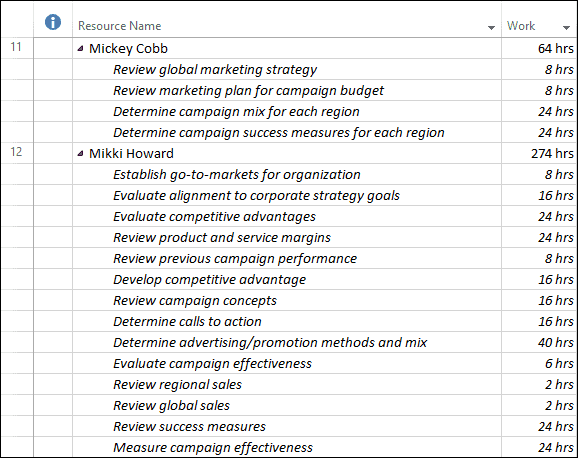
To complicate matters, this project is already under way. Some of the tasks assigned to the three resources are already completed, some tasks are in progress, while other tasks are unstarted. The easiest way to resolve this problem is to drag and drop task assignments from M Cobb and Mikki Howard to Mickey Cobb in the Resource Usage view. Figure 3 shows the Resource Usage view in this project with the tasks assigned to Mickey Cobb and to Mikki Howard.
Before I attempt to move the task assignments from M Cobb and Mikki Howard to Mickey Cobb, it would make the moving process a little easier if I collapse all of the task assignments, and then expand only the assignments for the three resources in question. To collapse all of the task assignments, click the Select All button (blank button in the upper-left corner of the sheet) to select all of the resources and their task assignments. Click the View tab to display the View ribbon. In the Data section of the View ribbon, click the Outline pick list button and select the Hide Subtasks item. After collapsing all of the task assignments for every resource, I can now expand the assignments for only M Cobb, Mickey Cobb, and Mikki Howard.
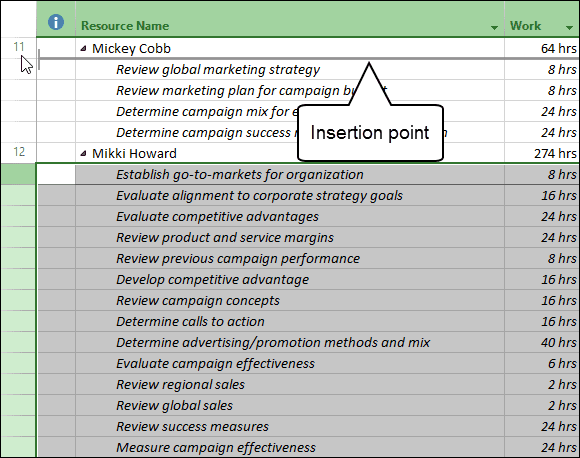
To begin the process of moving the task assignments from Mikki Howard to Mickey Cobb, I must select the row headers for all of the task assignments for Mikki Howard, and release the mouse button. I then need to click and hold one of the row headers in the selected block of task assignments to “grab” the block of task assignments. Finally, I need to drag the selected block of task assignments to a position anywhere below the name, Mickey Cobb, such as shown in Figure 4.
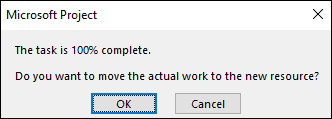
When you drag and drop completed task assignments from one resource to another, Microsoft Project displays the confirmation dialog shown in Figure 5 for each completed task assignment. Click the OK button in the dialog to move the completed task assignment from one resource to another. In my sample project, the software displayed the dialog five times because there were five completed task assignments which I moved from Mikki Howard to Mickey Cobb.
After moving the task assignments from Mikki Howard to Mickey Cobb, I can use the preceding steps to move the task assignments from M Cobb to Mickey Cobb. When I finish this process, I can safely delete the resources named M Cobb and Mikki Howard, as they are no longer needed in this project.


