
As project managers, I suspect we’ve all considered starting or completing work in the future. When you think about it, although jumping ahead to tracking future work could seem handy, this ability has the potential to cause some problems, too. Would your cost and work reports be skewed? Would resource availability be a problem? Are task dependencies still valid? Is the original schedule still viable? The list of issues goes on and on. Given the potential problems, what would be a good reason to track progress now for work that is to be started or completed in the future?
I can think of two reasons immediately, but there are probably more:
- “What If” Analysis: imposing progress on future work gives you a “free” look at expected work and cost expenditures at specific date and data points. You could then evaluate if the schedule is realistic or if re-planning is required. You probably don’t want to set a baseline until you are more comfortable with the schedule.
- In a scenario where progress was entered by mistake: many users look at status by using the %Complete buttons. Often these very alluring buttons are used without considering planned start and finish dates. Even if a task started early, the actual start date would be different than the planned start date.
In the absence of other tracking data, setting a %Complete on a future task forces Project to set the Actual Start date as the original Start date. Then, the selected or entered %Complete is applied to the task. Project does this without alarms or messages. All of this happens easily and is surprisingly hard to detect. If this sounds familiar to you, I have a troubleshooting tip to share! It’s a new column containing a formula and graphic indicator that looks at the current date for every task. If a task has an Actual Start Date in the future, a graphical indicator will catch your eye and get your attention.
There are many aids to help with tracking in Microsoft Project. Some are built-in and some are add-ins, but all are pretty useful and should be considered depending on your needs. (Please check out MPUG’s list of vendors to see if any might work for you.)
What follows is a custom solution that I use in instruction to emphasize data entry errors that may then create scheduling and tracking errors. This can be a problem in both Agile or original waterfall designs. Both have dates associated with tasks, and are at risk to entry errors. If you are part of a larger organization or are using Enterprise tools, check with your administrator to make sure they are not proprietary before trying out the techniques discussed in this document.
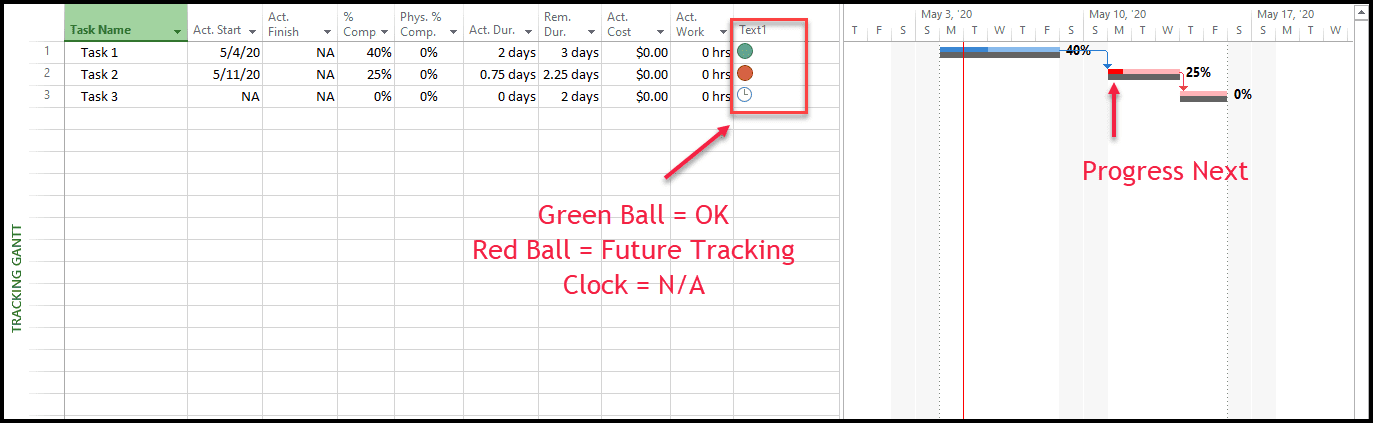
The simplified example project is shown below in the Tracking Gantt view and Tracking Table. It is Automatically scheduled in order to see entry results quickly. No resources are utilized as this example will focus on schedule only. Notice there are three tasks, and they have a finish to start dependency. A baseline has been set, but no progress entered because the current date is before the project is planned to start. The planned and baselined start date of Task 1 is May 4, 2020. So far there are no issues with the model.
Figure A- Example Project Tracking Gantt View

Note that I set the current date to May 5, 2020 and entered status on Task 1 and 2. Task 2 is a future task. If the task started early this is not the best technique to enter the early progress. This will be discussed later in this article.
Figure B- Example Project Tracking Gantt View after status. Note the absence of visual clues, warnings or error messages. Only the current date gridline gives a hint of the issue.

Imagine how difficult identifying this would be if there were hundreds of tasks with only a few tasks being tracked in the future! You need an indicator to help you do any troubleshooting on this error. The final result should look something like is shown in Figure C.
Figure C- Example Project Tracking Gantt View with indicators noting tracking state.

Creating this very visible indicator requires only a formula in a text field, a graphical indicator representing the formula results, and a little testing. For the purpose of this example, I chose the Text 1 field and did not rename it, so you can identify that it is indeed a text field. Then, I entered a formula that looks at the current date and evaluates whether the task is being tracked in the future or not. It serves no other function (no looking for incomplete or late tasks and no cost or schedule comparisons to baseline). Its only purpose is to give you a starting point in customizing a specific tool for analysis and trouble shooting.
Figure D- Formula used for analyzing if a task is tracked in the future. Your formula may need to be modified for your version of Project.

Figure E- Assignment of graphical indicators to formula results. Note that summary tasks are not included. The Value(s) column explains the tracking state and the image associated with the result.

Figure F- The Problem with the future tracking is visible as indicated by the new custom field and indicators.
So, what if the task did start early and just needs to be edited? In Figure G, I changed the actual start of Task 2 to May 7, 2020. Project redrew the Gantt bar to illustrate that change. Note that the new finish date has modified the successor’s start date to a date earlier than the baseline start. The result is a small amount of schedule savings.
Figure G- The correction of actual start has an effect on schedule!

Obviously, this is a simple example. Real tasks involve resources, work, cost, and other complications that you will have to keep in mind, but now that you have a tool to help you troubleshoot both early and future task tracking.
Once the column, formula, and indicators are in place, you can rename the field and develop a group for it. In the next two screen shots, I renamed the field to “Task Tracking State” and created a group with the same name.
Figure H- Text 1 field renamed “Task Tracking State”

Figure I- Group “Task Tracking State” created and applied.

Would you like to see this concept in action? Or want more details on custom fields and groups? Watch my on-demand webinar entitled “Microsoft Project Do’s, Don’ts, and Cool Customizations.” It should be very fun and educational.
Until then…let me know what you think in the comments below!
