Overview
Ever since the introduction of Project for the web in late 2019, Microsoft has slowly and steadily rolled out new features for this software application. In this article, I want to document the major new features added recently to Project for the web, which include the following:
- New actions on the Project Home page
- Filtering on the Board and Timeline views
- Importing a Microsoft Project desktop schedule
- Creating a custom field with a pick list
- Creating a custom Number field with rollup
New Actions on the Project Home Page
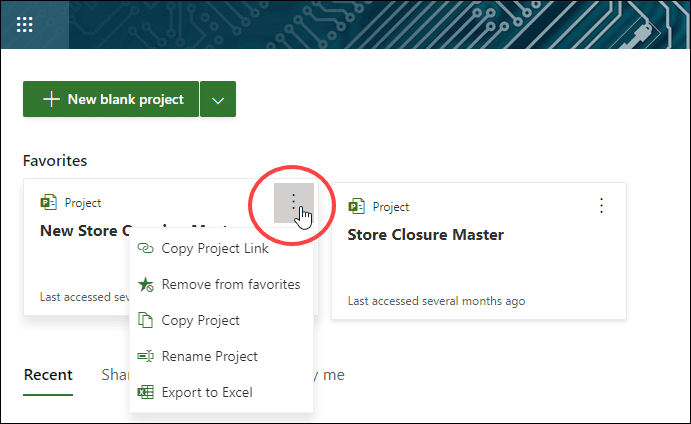
For ease of use, Microsoft has consolidated many of the project-related actions on the Project Home page. These actions currently include copying, renaming, and exporting a project without the need to open the project first. To access these project-related actions for a Favorite project, click the More options button in the upper-right corner of the project tile, such as shown in Figure 1.
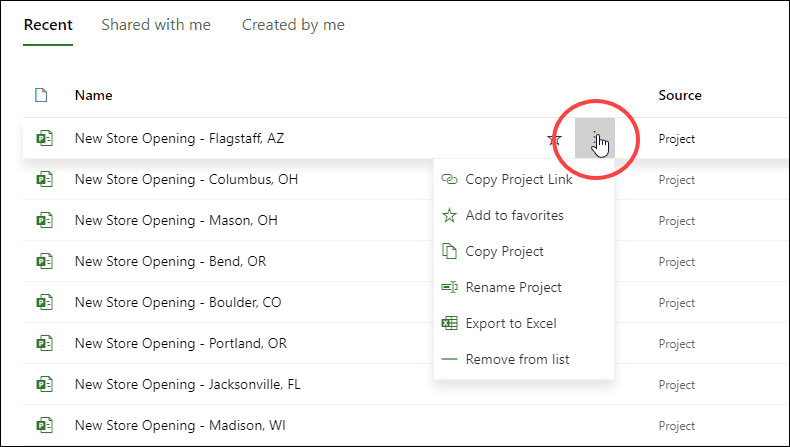
To access these project-related actions for project shown in the Recent section of the page, float your mouse pointer over the name of a project and then click the More options button at the right end of the project row, such as shown in Figure 2.
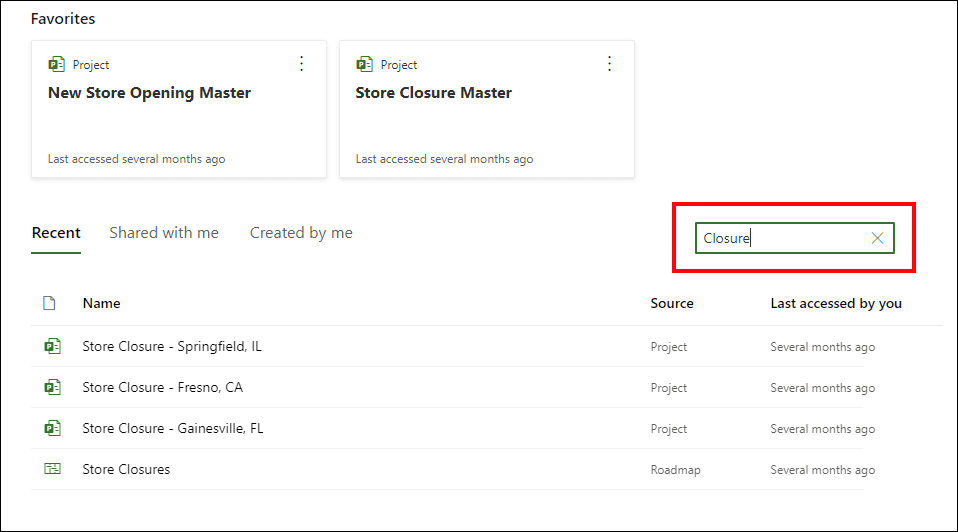
Although relatively minor, another new feature on the Project Home page is the Filter field shown in Figure 3. You can quickly filter the list of projects shown on the page by typing a text string in the Type to filter list field. As you type the text string, Project for the web immediately filters the list of projects. To remove the current filter, by the way, click the Remove button (the X button) at the right end of the Type to filter list field.
Filtering Changes
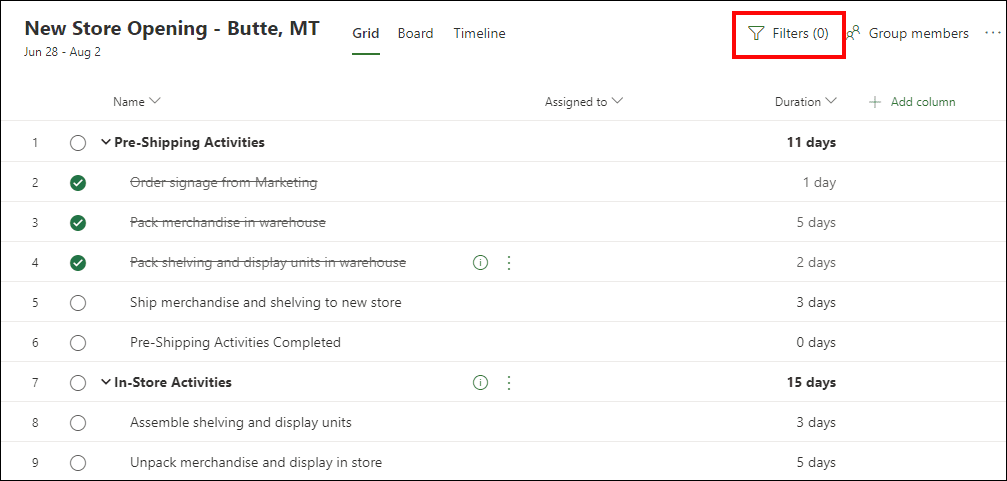
Project for the web now offers a Filters button for all three project views, including the Grid, Board, and Timeline views. You can see the Filters button on the Grid view of my project in Figure 4. By the way, the Filters button displays a 0 character to the right of the button when you do not have any filter applied.
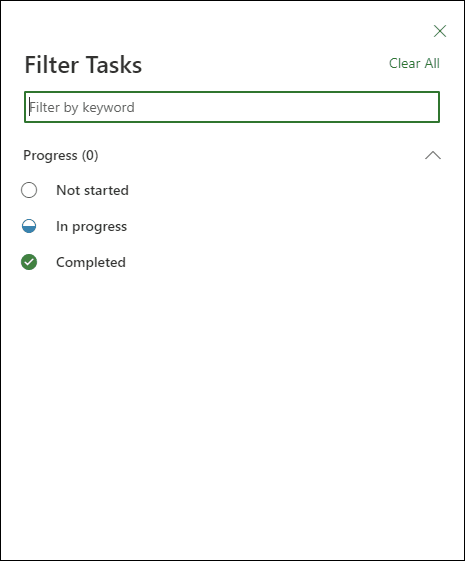
When you click the Filters button, Project for the web displays the Filter Tasks sidepane on the right side of the page, such as shown in Figure 5. To filter the tasks in your project, you can type a text string in the Filter by keyword field, you can select one or more of the task status items below this field, or you can do a combination of both actions.
By the way, the three task status items are another new feature in in Project for the web, which is filtering tasks by their status. You can now select task status values to filter the task list for un-started, in-progress, and/or completed tasks.
When you use any of the methods for filtering tasks in the Filter Tasks sidepane, Project for the web immediately filters the task list. To remove the task filter, click the Clear All link in the upper right corner of the sidepane. If you close the Filter Tasks sidepane without clearing the filter, by the way, Project for the web will display a 1 character to the right of the Filters button. In addition, when you apply a filter on one of the three views in your project, Project for the web will automatically apply the same filter on both of the other views.
Importing a Microsoft Project Desktop Schedule
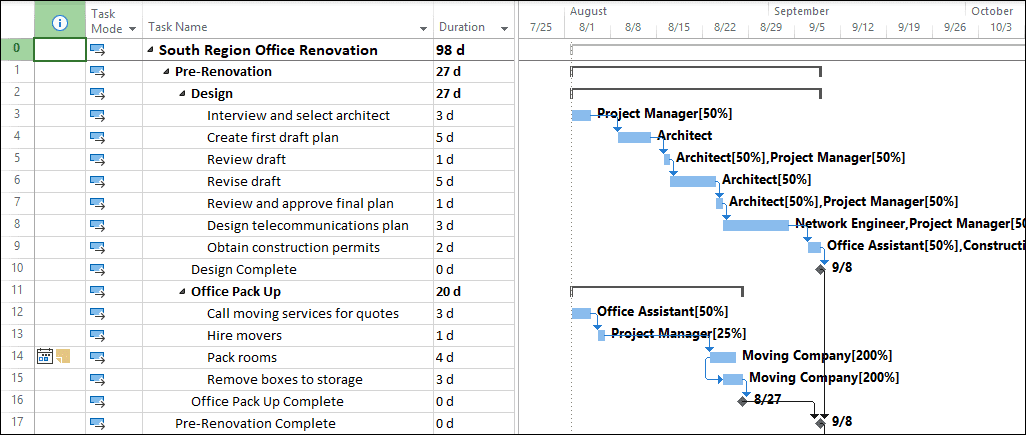
If your organization intends to transition to Project for the web from the Microsoft Project desktop application, this new feature may prove beneficial to you in the transition process. For example, in Project for the web, I want to import the Microsoft Project schedule shown in Figure 6. Because this project takes advantage of the full set of features in the Microsoft Project desktop application, this project contains the following:
- Summary tasks, detailed tasks, and milestone tasks
- Several types of task dependencies, including Finish-to-Start (FS) and Start-to-Start (SS) with Lag time
- Task constraints and Deadline dates
- A project team that includes Work resources, Cost resources, and Material resources
- One or more resources are assigned to each detailed task in the project schedule
- An original baseline has been saved in the Baseline set of fields and then backed up into the Baseline 1 set of fields
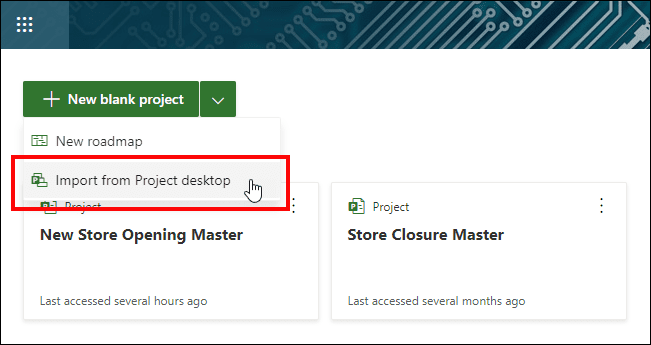
To import a Microsoft Project schedule into Project for the web, navigate to the Project Home page. Click the + New blank project pick list button at the top of the page and then select the Import from Project desktop item on the pick list, such as shown in Figure 7.
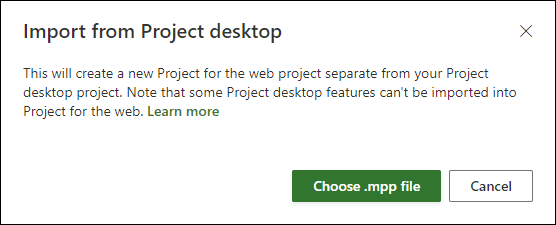
Project for the web displays the Import from Project desktop dialog shown in Figure 8.
If you click the Learn more link in the dialog, the system displays a web page that lists all of the Microsoft Project desktop features that cannot be imported into Project for the web. Because the list of incompatible features is so long, I do not want to document the list in this blog post article, but suffice it to say that the list of incompatible features is very long.
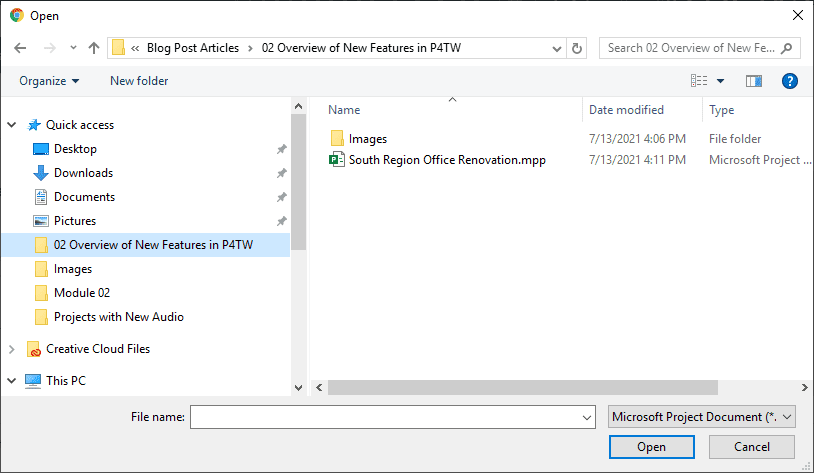
In the Import from Project desktop dialog, click the Choose .mpp file button. Project for the web displays the Open dialog, such as the one shown in Figure 9.
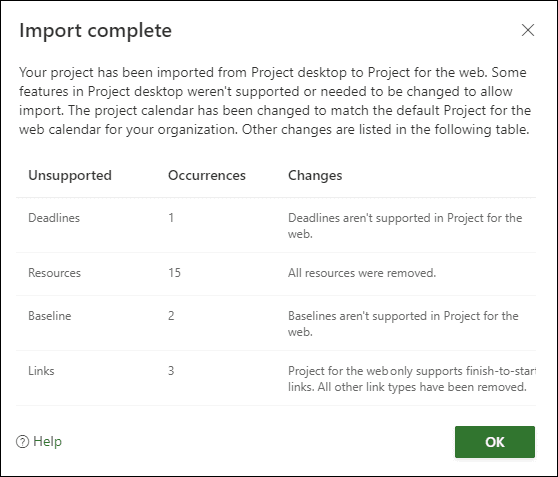
In the Open dialog, navigate to the folder containing the Microsoft Project schedule you want to import, select the project schedule, and then click the Open button. When Project for the web completes the import process, it displays the Import complete dialog shown in Figure 10. This dialog reports which features could not be imported from the Microsoft Project schedule. Notice that in my Import complete dialog, there were a number of features that could not be imported, including the schedule shown on the Project calendar, one Deadline date, fifteen resources (all of which were assigned to tasks, by the way), two Baselines, and three task dependencies that were not Finish-to-Start.
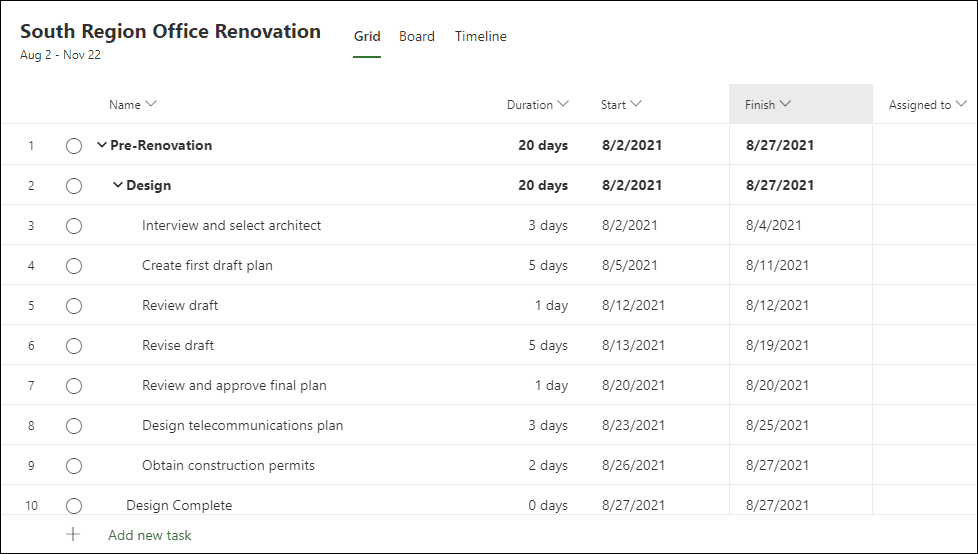
In the Import complete dialog, click the OK button to close the dialog and view your imported project. Figure 11 shows my newly imported project in Project for the web after I edited the Grid view to show some additional columns for the project.
I want to warn you that the schedule of your imported project in Project for the web may not match the original schedule previously shown in Microsoft Project. This is because of the following:
- The default calendar in Project for the web does not contain any company holidays.
- You cannot use dependencies other than Finish-to-Start.
- You cannot use constraints in your project.
On the other hand, if your project schedule in Microsoft Project uses a calendar that does not have company holidays, uses only Finish-to-Start dependencies, and does not contain any constraints, then the project schedule in Project for the web should exactly match the project schedule shown in Microsoft Project.
After importing the Microsoft Project schedule into Project for the web, you will need to create your project team using the Group members button in the upper right corner of the page, and then you will need to assign one or more resources to each task using the Assigned to column.
Creating a Custom field with a Pick List
In addition to the eleven default fields included with Project for the web, the software also allows you to create your own custom fields as well. The newest addition to the custom fields feature allows you to create a custom field that includes a pick list of acceptable values for the field. Project for the web refers to this type of field as a Choice field, by the way.
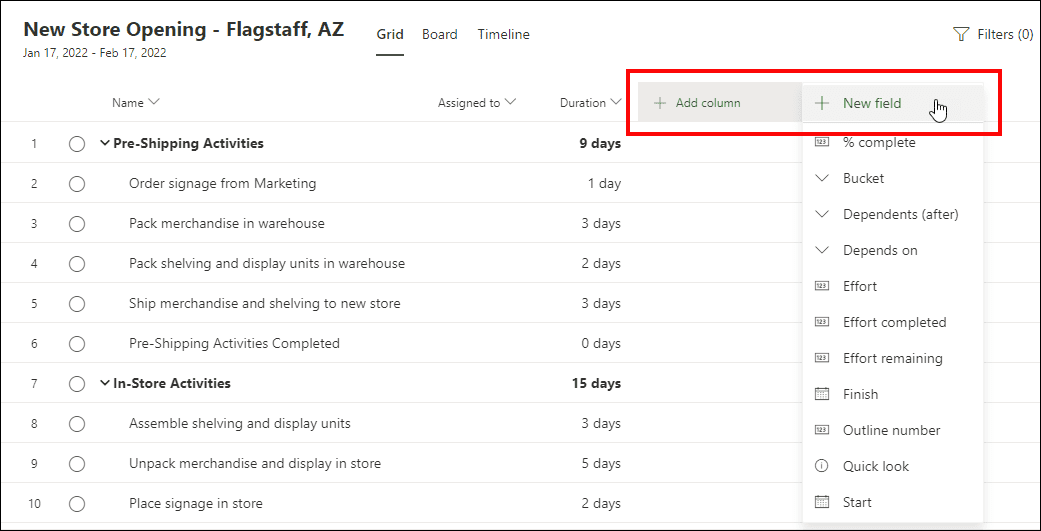
To create a custom field with a pick list, open any project and display the Grid view. Click the + Add column virtual column header and then select the + New field item at the top of the flyout menu, such as shown in Figure 12.
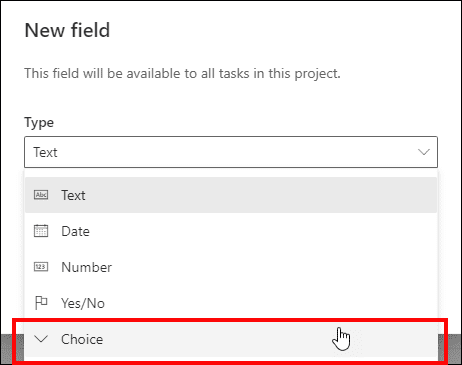
Project for the web displays the New field dialog. In this dialog, click the Type pick list and select the Choice item at the bottom of the pick list, such as shown in Figure 13.
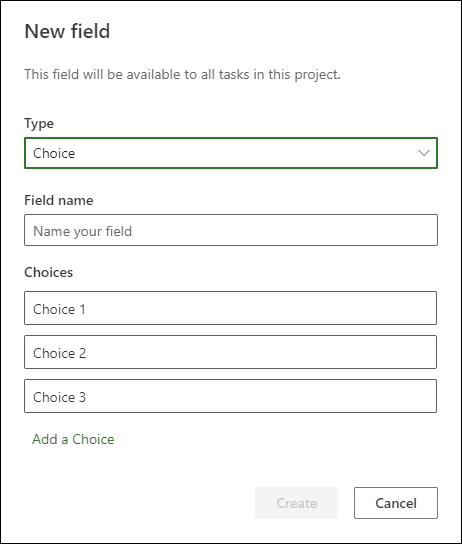
Project for the web updates the New field dialog with the options needed to create a Choice field, such as shown in Figure 14.
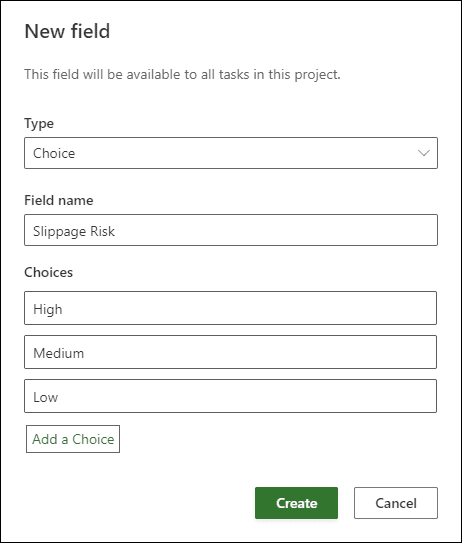
In the New field dialog, enter a name for the custom field in the Field name field. In the Choices section of the dialog, enter the values that you want to appear on the pick list in the Choice 1, Choice 2, and Choice 3 fields. If you need more than three values in the pick list, click the Add a Choice link for each extra value you want to add to the pick list. Figure 15 shows the New field dialog after I set up my new Slippage Risk field.
Warning: Project for the web limits you to no more than 20 items on your pick list in a Choice custom field.
In the Choices section of the dialog, you can move the fields into a different order by clicking the left end of the field to “grab” the field and then “dragging and dropping” the field to its new location. To delete one of the Choice fields, click the Remove choice icon at the right end of the field. When finished, click the Create button to create your new Choice field. Figure 16 shows my new Slippage Risk field.
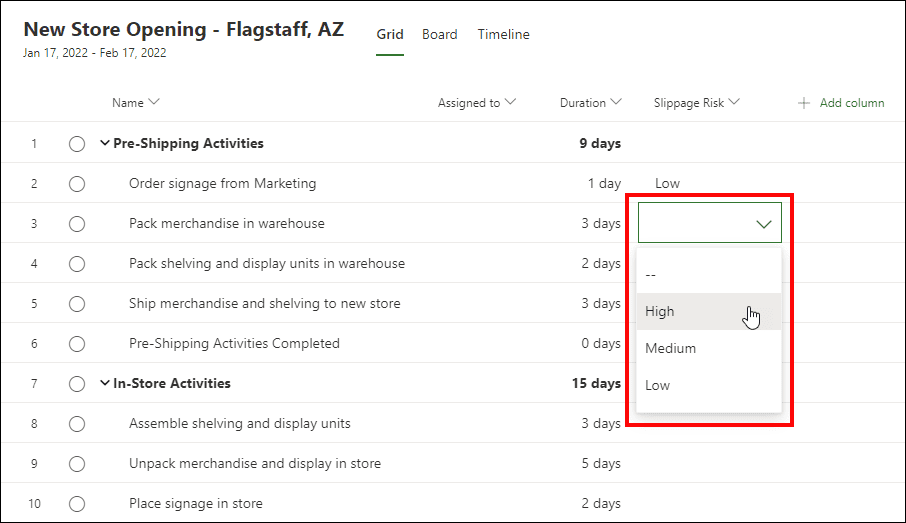
To select a value in your new Choice field, click a cell in the column for the Choice field and then click the pick list button in the selected cell. Select any value on the pick list. To remove a value previously selected in a cell, select the — value at the top of the pick list.
Creating a Custom Rollup Number Field
The final new feature I want to describe is the new behavior added to custom Number fields. Project for the web now allows you to designate a custom Number field as a Rollup field, which means that the values entered in the field “rollup” to their respective summary tasks. For example, a default field that uses “rollup” functionality is the Effort field. When you enter an Effort value for each detailed task in a project, Project for the web automatically “rolls up” the values to the respective summary tasks using the Sum functionality.
To create a new custom Number field with the Rollup functionality, open any project and display the Grid view. Click the + Add column virtual column header and then select the + New field item at the top of the flyout menu, such as shown previously in Figure 12.
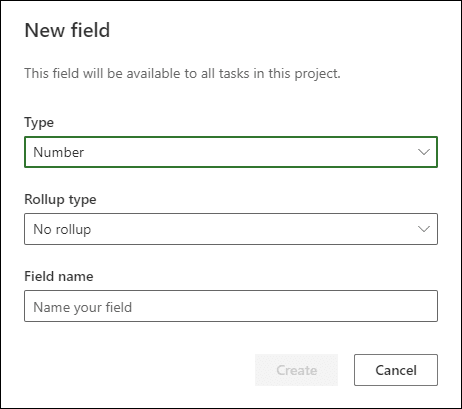
Project for the web displays the New field dialog. In this dialog, click the Type pick list and select the Number item. The software updates the New field dialog to include the options needed to create a custom Number field, such as shown in Figure 17.
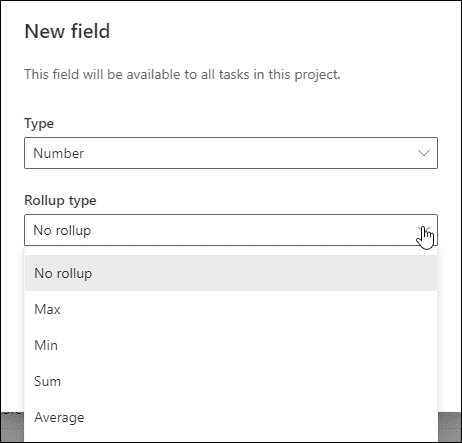
In the New field dialog, click the Rollup type pick list and select a value on the list, such as shown in Figure 18. Following is the behavior of each of the Rollup type options:
- No rollup – Project for the web leaves the custom field value blank for summary tasks
- Max – Project for the web displays the largest value in each summary task from all of its subtasks
- Min – Project for the web displays the smallest value in each summary task from all of its subtasks
- Sum – Project for the web displays the sum value in each summary task from all of its subtasks
- Average – Project for the web displays the average value in each summary task from all of its subtasks
In the New field dialog, enter a name for the custom field in the Field name field and then click the Create button. In your new custom Number field, enter a value in this field for each subtask in your project.
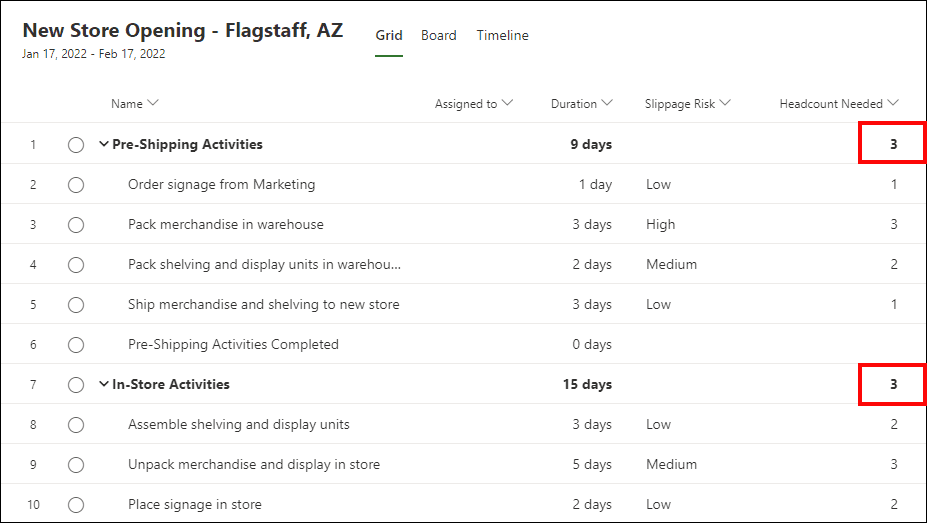
Figure 19 shows my new Headcount Needed custom Number field. Because I selected the Max rollup option for this field, the value in the Headcount Needed field for each summary task is the maximum value of all of its subtasks.






Varun Kumar Gupta PMP
Hi Dale,
This was an excellent article which brought into limelight the many features which I was struggling to learn as there are very few free resources out there that help someone to learn about project for the web. The menu system is also beautifully explained, which I could follow through. As my organization is not currently ready to pay for my professional development, and I am not able to afford expensive courses, I will be really grateful if you could help me with some good links/videos/articles about project for the web. God bless you
With Best Regards,
Varun.K.Gupta