While interacting with MS Project users across a couple of industry verticals recently, I encountered a question from a senior mechanical engineering lead regarding Planned and Actual Percent Complete fields. The lead was managing a bridge construction project in the Middle East.
The client’s requirement was to show both Actual Percent Complete and Planned Percent Complete in the MS Project Plan. The (Actual) % Complete should have been visible in the tabular view of the Gantt Chart and in the generated histogram reports for L2 or L3 tasks of the work breakdown structure, but MS Project doesn’t have a Planned % Complete field. This had to be created.
Another problem the engineering lead faced was getting negative values while having the planning percent complete with the created custom fields formula for the milestones. Obviously, this stemmed from the way the formulas were put in!
Inspired by his project, I decided to write this article on the topic of Planned and Actual Percent Complete data within MS Project. We will explore the concept of Planned Percent Complete and how to track it using the custom fields available in MS Project. I will also show the scenario by insertion of the milestone/task and recalculation. In the end, I’ll be creating a histogram report which compares the Planned and Actual Percent Complete.
Fundamentals–Baseline and Status Date
As a management professional, you need to understand that comparison always happens against the latest baseline after one sets the status date. Many miss this aspect. The whole idea of having a baseline is to have a comparison and measure progress.
To explain how to spot this comparison, I’ve created the below video [Duration: 3m:44s]. For the best experience, you may want to go full-screen in HD mode and plug-in your earphones.
With these fundamentals in mind, let’s proceed to checking a few functions and fields in MS Project.
Functions and Fields
MS Project becomes a very powerful tool when you use its custom fields, functions, and build your own formulas. Rarely a software project management tool comes with such a large number of in-built fields and functions. For the purpose of this article, we are going to use the Date() function.
ProjDateDiff
As per MS Project software API documentation, this function returns the duration between two dates in minutes. Hence, when we wish to calculate in days, we have to divide by 480, because a day will have 480 minutes.
Syntax:
ProjDateDiff( date1, date2, calendar )
In this function:
- date1 (required field): The date used as the beginning of the duration.
- date2 (required field): The date used as the end of the duration.
- calendar (optional): The calendar to use when calculating the duration.
DateDiff
Another widely used Date() function is the DateDiff() function, which, as per MS Project software API documentation, also returns a time interval between two dates in a long format.
Syntax:
DateDiff( interval, date1, date2[, firstdayofweek[, firstweekofyear]] )
In this function:
- interval and dates (required fields): The interval time between date1 and date2.
- firstdayofweek and firstweekofyear (optional fields): The first one is a constraint constant that specifies the first day of the week, whereas the second one is a constraint constant that specifies the first week of the year.
For the sake of example, I’m going to use the ProjDateDiff() function. Nevertheless, you can use the DateDiff() function, as well.
Fields Used
Of the available built-in fields in MS Project, we are going to use:
- Baseline Start: Gives the baseline start date of the task.
- Baseline Duration: Gives the baseline duration of the task.
- Status Date: Gives the status date of the project.
The Project Plan
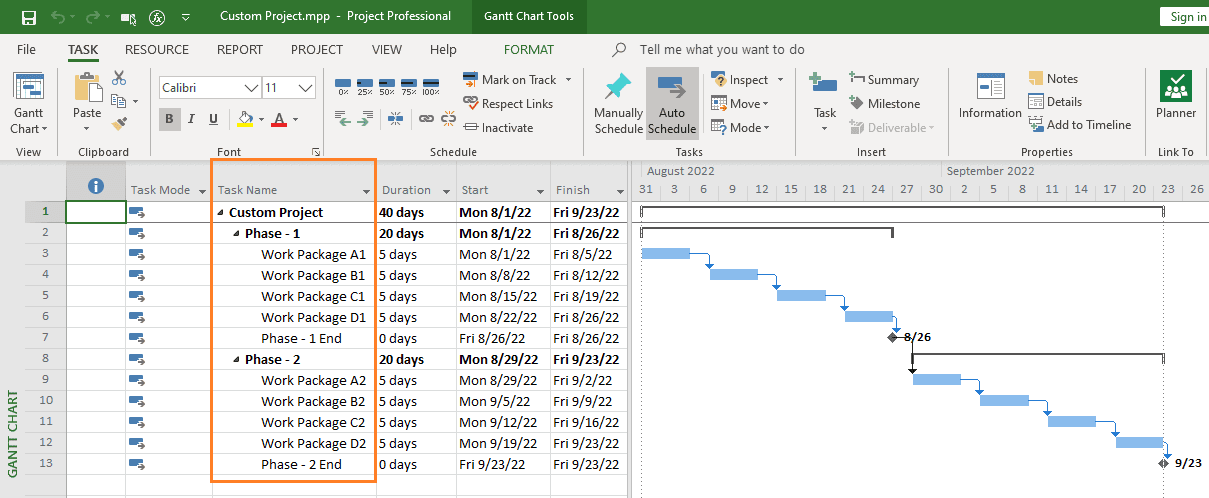
As you can see, we have the below project with its phases, work packages, and milestones.
Note:
- There are two phases, Phase 1 and Phase 2.
- Each phase has four work packages and ends with a milestone.
I am going to show you how to put in formulas to calculate the Planned % Complete for all the tasks in MS Project.
Steps Involved
To build and calculate the formulas, I’ll follow five steps.
Step – 1: Set the Baseline
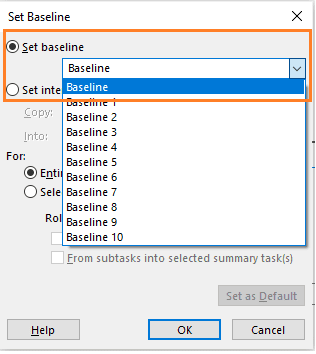
As I’ve said before, without setting the baseline, we can’t do the calculation. To the set the baseline, go to the Project tab > Schedule group > Set Baseline. Then, execute the “Set Baseline…” command, as shown below.
Step – 2: Set the Status Date
Next, we are going to set the status date, for which you have to go to the Project tab > Status group, and use the “Status Date:” command.
Note that as one works with the project and its progress, the status date can be updated accordingly.
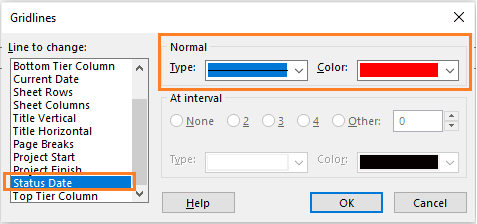
You may want to see the status date in the Gantt chart view, which can be done by going to the Format tab > Format group > Gridlines, and executing the “Gridlines…” command.
For the sake of this example, I’ve set the status to show with a normal line and red color coding. The status date will be visible now in the Gantt Chart View along with the baseline. This is shown below.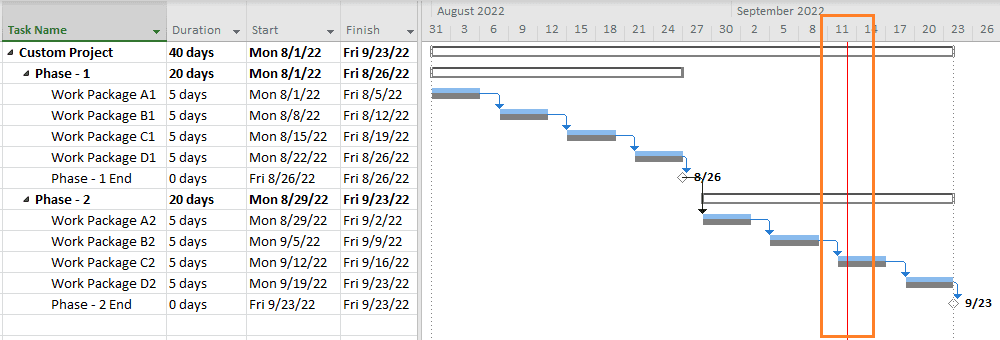
Step – 3: Create the Needed Custom Fields
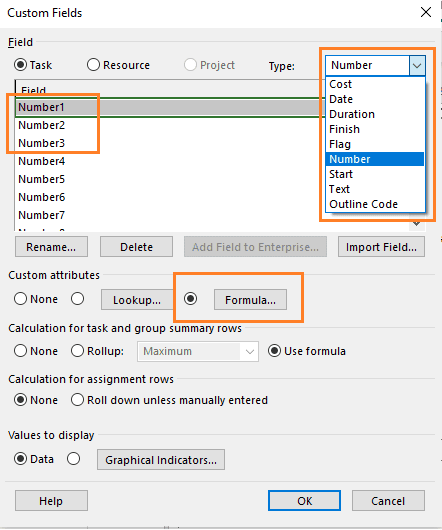
For the purpose of our calculation, we are going to have three number custom fields and one text custom field:
- Number1: This will hold the difference between the status date and baseline start.
- Number2: This will hold the baseline duration of the task concerned.
- Number3: This will hold the formula comparing the position of the status date with respect to the baseline values.
- Text1: This will convert the “Number3” into percentage representation.
To use these custom fields, go to the Format tab > Columns group, and execute the “Custom Fields” command.
As highlighted above, we will be using three number custom fields (and a text custom field). Ensure that the formula is applied and the calculation for task and group summary rows use the formula embedded into the appropriate custom field.
Step – 4: Determine Planned % Complete
For each of the three number fields, we will be using these formulas.
Number1: ProjDateDiff([Baseline Start],[Status Date])/480
The Number1 field will hold the value of difference between Baseline Start and Status Date. If the Status Date is ahead of the Baseline Start, then it will be positive, whereas if behind the Baseline Start, it will be negative.
Number2: [Baseline Duration]/480
This will hold the Baseline Duration of the task.
Number3:
IIf([Number1]<=0,0,
IIf([Number1]>=[Number2],100,
IIf(([Number1]<[Number2]) AND ([Number2]>0),
[Number1]/[Number2]*100,0)))
This custom field holds the main algorithm and uses the IIf() function of MS Project. The algorithm is built on explanations given in the first video.
Step – 5: Format Planned % Complete
Finally, we will convert the Number3 custom field into a Text one. I’ve used the below formula for the Text1 custom field:
Text1: cStr([Number3] & “%”)
We need to concatenate the string value of Number 3 with “%.” The “Text1” custom field also has to be renamed as “Planned % Complete”.
After you have populated the custom fields with the above formulas, you’ll see the below.
Let’s interpret the above figure:
- The status date is set as Sept 12, 2022.
- For Phase – 1:
- All tasks (work packages) are planned to be completed by the status date. Hence, these are shown to be 100% complete.
- The cumulative planned % complete for Phase – 1 is at 100%.
- For Phase – 2:
- “Work Package A2” and “Work Package B2” are planned to be completed fully. Hence, these are shown as 100%.
- The status date is 1 day into “Work Package C3,” because it starts on Monday, Sept 12, 2022. Hence, the planned % complete for this task will be 1/5 = 0.2 or 20%.
- The cumulative planned % complete for Phase – 2 is at 55%.
- The cumulative planned % complete for the entire project is 77.5%.
Planned Vs. Actual Percent Complete
Now that we’ve walked through how to calculate and use the Planned % Complete, let’s look at it alongside the Actual % Complete column. As noted earlier, “% Complete” in MS Project informs on the actual percentage completed for a task. To show both, I’ve added one more column into the tabular side of the Gantt Chart, as depicted below:
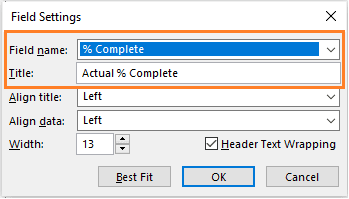
I’ve renamed the title field for “% Complete” by going to the Format tab > Columns group > Custom Settings, and executing the “Field Settings” command.
As we track the project’s progress, both planned and actual percent complete fields will populate, respectively, as shown.
Let’s interpret the above figure:
- The status date is again on Sept 12, 2022, when we started tracking.
- For Phase – 1:
- As on the status date, Work Package A1 and B1, as well the Milestone “Phase -1 End,” are actually complete, and, hence, are all showing to be at 100% completion.
- Work Package C1 started on time, but took 2 more days to complete.
- Work Package D1 has seen 2-days’ worth of work, but has 4-days remaining. While the actual % complete is 2/6 or 33%, the planned percent complete is 100%, as we have seen earlier.
- The cumulative actual % complete for Phase – 1 is 83%.
- For Phase – 2:
- Work Packages A2 and B2 are at 75% and 50% actually completed. Compared to the status date, the planned percent complete is 100%.
- Work Package C2 has seen 1-day’s work and still has 6-days of work remaining. Hence, the actual % complete is 1/7 or 14%, whereas the planned % complete is 20%, as we have seen earlier.
- The cumulative actual % complete for Phase – 2 is at 33%.
- The cumulative actual % complete for the entire project is at 58%. On the other hand, as seen earlier, the cumulative planned % complete is 77.5%.
More on Planned % Complete
There are certain scenarios where ‘#ERROR’ notifications are shown in the MS Project software. These confound many MS Project practitioners, and I felt that exploring a few such scenarios would be best done in the below video [Duration: 6m:07s], which I’ve created for this article. The scenarios explored are: No Status Date, No Baseline, Addition of New Tasks and Re-baseline.
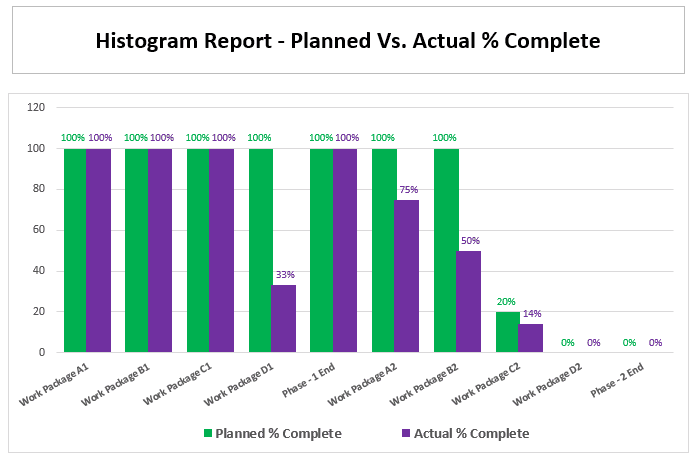
Creating Histogram – Planned Vs. Actual % Complete
So, what do we do with the data? MS Project comes with a large set of built-in reports, as well as allows you to create your own customized reports. Let’s create a histogram to show the Planned vs. Actual % Complete data to a customer or stakeholder.
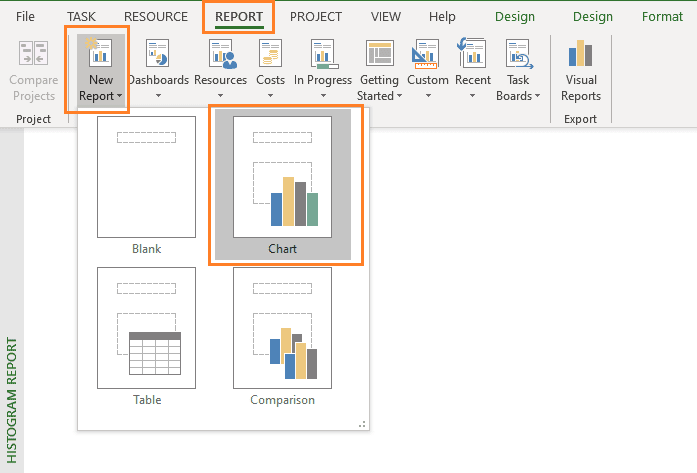
Create a custom Histogram Report by going to the Report tab > New Report > Chart, as shown below.
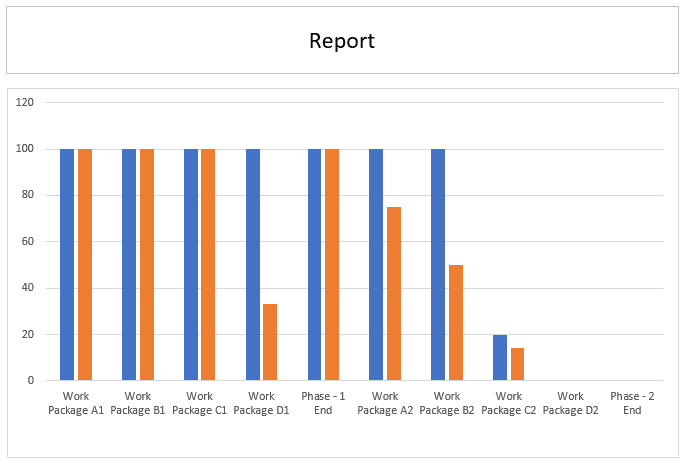
Select the custom field related to Planned % Complete and the already available field of (Actual) % Complete in the “Field List.” The histogram report will show both these fields in its report.
With a little bit of further customization, labelling, axis value population, and formatting, the histogram report will come out as shown below.
References:
[1] Online Course: MS Project Live Lessons, by Satya Narayan Dash
[2] Documentation: Project Functions for Custom Fields in MS Project, by Microsoft Corporation.






Hakan
A kind suggestion for step 5.
If, you are taking long decimal result after comma(1,1111111) in rows, you can try below expression. Also you have to go “Calculation for task group and summary rows” and select “Average” from rollup radio button in Number3.
Text1;
CInt([Number3]) & “%” ——– “you dont forget to “Calculate for task group and summary rows” and select “Use Formula”
Anonymous
hi Satya,
The conversion to text only works with this formula – cStr([Number3] & “%”) , as there is a typo/inconsistency with the one provided in this blog. FYI.
Thanks,
Sujeetha
Anonymous
Why is it not match the total % when I simulate the actual vs plan? there is a discrepancy range from 2-5%
Janderson
I’m using this formula: cStr([Number3] & “%”)
for my Planned % text field. How can I limit the number of decimal places when it shows the percentage. Currently it is showing about 10 decimal places on my planned %.
thanks,
Jeff