
 Background
Every few years I like to reprise some favorite topics during my career with the Microsoft project management tools. Today I want to reprise the topic of how to repair a polluted Enterprise Global file in either Project Online or Microsoft Project Server.
First of all, what do I mean when I use the term “polluted” in reference to the Enterprise Global? I mean that non-enterprise objects are present in the organization’s Enterprise Global file. Always think of the Enterprise Global file as your organization’s “library” of custom enterprise views, tables, filters, groups, etc. It is reserved for enterprise objects only, such as the default Enterprise Gantt Chart view and the default Enterprise Entry table. When the Enterprise Global contains local objects, such as the local Task Usage view or local Resource Sheet view, then this means the file is “polluted” and needs to be repaired.
How to Know the Enterprise Global Is Polluted
How do you know that the Enterprise Global file is polluted? Whenever a project manager opens an enterprise project in Microsoft Project, and the system displays a warning dialog similar to the ones shown in Figure 1 and Figure 2, these dialogs indicate that the Enterprise Global is polluted with non-enterprise objects.

Figure 1: Warning dialog

Figure 2: Warning dialog
The first warning dialog is the most common, and indicates that the Enterprise Global contains the local Gantt Chart view (misnamed as a report in the dialog, by the way). The second warning dialog indicates that the Enterprise Global also contains the local Task Usage view (also misnamed as a report in the dialog). Because these two views are local objects, they do not belong in the Enterprise Global file.
How the Enterprise Global Becomes Polluted
Your organization’s application administrators are the only users who can pollute the Enterprise Global. They can cause the pollution by performing either of the following actions while they have the Enterprise Global open for editing:
- They apply a local view, such as the Gantt Chart view, or they apply a local table, such as the Entry
- They copy a local view, such as the Task Usage view, to create a new enterprise view, or they copy a local table, such as the Usage table, to create a new enterprise table.
Either of these actions causes Microsoft Project to copy the local view and/or local table into the Enterprise Global, resulting in a polluted Enterprise Global file. Figure 3 shows the Views page of the Organizer dialog when I have an unpolluted Enterprise Global open for editing. Notice that the Enterprise Global contains only one enterprise view, the default Enterprise Gantt Chart view, and does not contain any local views.

Figure 3: No local views in the Enterprise Global
Figure 4 shows the Tables page of the Organizer dialog when I have an unpolluted Enterprise Global open for editing. Notice that the Enterprise Global contains only one enterprise table, the default Enterprise Entry table, and does not contain any local tables.

Figure 4: No local tables in the Enterprise Global
Suppose that I want to create a new enterprise task table, created by copying the task Work table, then renaming and modifying the copy. I open the Enterprise Global for editing, make a copy of the Work table in the More Tables dialog, and name the new table _Duration. By following this process, notice in Figure 5 what shows up in the Enterprise Global: the local Work table, along with the new enterprise _Duration table.
When I copied the Work table to create a new enterprise table named _Duration, Microsoft Project copied the Work table into the Enterprise Global without my knowledge and without asking my permission. This is not a bug, by the way. This is how the software has always worked. When you copy a table to create a new table, or you copy a view to create a new view, Microsoft Project copies the original table or view into the active project. The active project in this case is the Enterprise Global.

Figure 5: Local Work table in the Enterprise Global
Suppose that I accidentally apply the local Gantt Chart view, but then quickly reapply the default Enterprise Gantt Chart view. Notice in Figure 6 what shows up in the Enterprise Global: the local Gantt Chart view.
When I applied the local Gantt Chart view, Microsoft Project copied the Gantt Chart view into the Enterprise Global without my knowledge and without asking my permission. Again, this is not a bug. This is how the software has always worked. When you apply a view or table for the first time in the active project, Microsoft Project copies that view or table into the active project. By the way, when you apply a view for the first time, the software copies both the view and its table into the active project. Again, the active project in this case is the Enterprise Global.

Figure 6: Gantt Chart view copied to the Enterprise Global
How to Repair a Polluted Enterprise Global
The process of repairing a polluted Enterprise Global is as simple as deleting the local objects from it by completing the following steps:
- Launch Microsoft Project and connect to Project Web App.
- Open a new blank project, if necessary.
- Click the File tab to display the Backstage.
- Click the Info tab to display the Info
- In the Organize Global Template section of the Info page, click the Organizer pick list button and select the Open Enterprise Global
- Click the File tab again, and click the Info tab again, if necessary.
- In the Organize Global Template section of the Info page, click the Organizer pick list button and select the Organizer Microsoft Project displays the Views page of the Organizer dialog.
- In the list of views on the right side of the dialog (in the Enterprise Global), select all local views (do not select any enterprise views) and then click the Delete Notice in Figure 7 that I selected the local Gantt Chart view and am ready to click the Delete button.

Figure 7: Delete all local views
- In the confirmation dialog, click the Yes button (or click the Yes to All button if you selected multiple views), such as shown in Figure 8.

Figure 8: Confirmation dialog
- In the Organizer dialog, click the Tables tab to display the Tables This page initially displays only task tables.
- In the list of task tables on the right side of the dialog, select all local task tables (do not select any enterprise task tables) and then click the Delete Notice in Figure 9 that I selected the local Entry and Work tables, and am ready to click the Delete button.

Figure 9: Delete all local tables
- In the confirmation dialog, click the Yes button (or click the Yes to All button if you selected multiple task tables).
- In the upper left corner of the dialog, select the Resource option to display resource tables.
- In the list of resource tables on the right side of the dialog, select all local resource tables (do not select any enterprise resource tables) and then click the Delete
- In the confirmation dialog, click the Yes button (or click the Yes to All button if you selected multiple resource tables).
- Click the Close button to close the Organizer
- Save, close, and check in the Enterprise Global.
- Exit and relaunch Microsoft Project and then ask all users to exit and relaunch Microsoft Project as well.


When you follow the preceding process, you may also need to delete local task and resource filters on the Filters page of the dialog, and/or delete local task and resource groups on the Groups page of the dialog as well. You only need to perform these additional steps if your project managers see warning messages about duplicate Filters or Groups when they open an enterprise project.
How to Avoid a Polluted Enterprise Global
The best way to avoid polluting the Enterprise Global is never to do either of the following:
- When you have the Enterprise Global open for editing, never apply a local view, table, filter, or group.
- Never create new views, tables, filters, or groups directly in the Enterprise Global.
To avoid creating new objects directly in the Enterprise Global, I recommend that you follow this process instead:
- Launch Microsoft Project and connect to Project Web App.
- Open an existing enterprise project in Read-Only mode (do not check out the project).
- In the existing project, create any new views, tables, filters, and/or groups needed by the project managers in your organization. This step allows you to test the new objects in a real project schedule to make sure they work as desired.
- Leave the existing project open in Read-Only mode, but also open the Enterprise Global using the steps detailed previously.
- Open the Organizer dialog using the steps detailed previously.
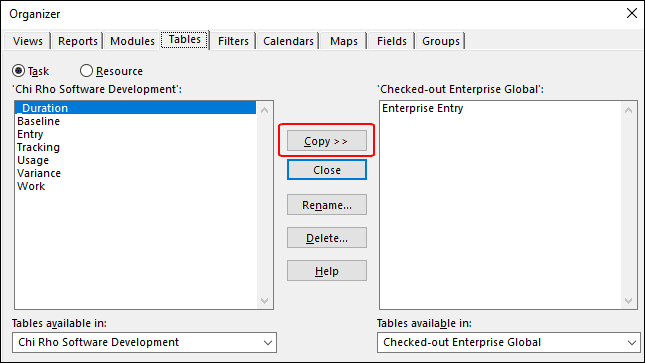
- In the lower left corner of the Organizer dialog, click the Views available in pick list and select the name of the existing project, such as shown in Figure 10 when I selected the Chi Rho Software Development The left side of the dialog now displays objects in the existing project, while the right side of the dialog displays objects in the Enterprise Global.

Figure 10: Organizer dialog – Ready to copy views to the Enterprise Global
- In the list of views shown on the left side of the dialog, select any custom views you just created, then click the Copy button to copy the custom views to the Enterprise Global. Notice in Figure 10 shown previously that I am ready to copy the custom _Duration Variance view to the Enterprise Global.
- Click the Tables tab to display the Tables page of the Organizer
- In the list of task tables shown on the left side of the dialog, select any custom task tables you just created, then click the Copy button to copy the custom tables to the Enterprise Global. Notice in Figure 11 that I am ready to copy the custom _Duration table to the Enterprise Global. This table is used as a part of the custom _Duration Variance

Figure 11: Organizer dialog – Ready to copy task tables to the Enterprise Global
- In the upper left corner of the Tables page, select the Resource option to display resource tables in the Organizer
- In the list of resource tables shown on the left side of the dialog, select any custom resource tables you just created, then click the Copy button to copy the custom tables to the Enterprise Global.
- Click the Filters tab to display the Filters page of the Organizer
- In the list of task filters shown on the left side of the dialog, select any custom task filters you just created, then click the Copy button to copy the custom filters to the Enterprise Global. Notice in Figure 12 that I am ready to copy the custom _Duration Variance > 0d filter to the Enterprise Global. This filter is also used as a part of the custom _Duration Variance view.

Figure 12: Organizer dialog – Ready to copy task filters to the Enterprise Global
- In the upper left corner of the Filters page, select the Resource option to display resource filters in the Organizer
- In the list of resource filters shown on the left side of the dialog, select any custom resource filters you just created, then click the Copy button to copy the custom filters to the Enterprise Global.
- Click the Groups tab to display the Groups page of the Organizer
- In the list of task groups shown on the left side of the dialog, select any custom task groups you just created, then click the Copy button to copy the custom groups to the Enterprise Global. My custom _Duration Variance view does not include a custom group, so I am not including a screenshot of this page of the dialog.
- In the upper left corner of the Groups page, select the Resource option to display resource groups in the Organizer
- In the list of resource groups shown on the left side of the dialog, select any custom resource groups you just created, then click the Copy button to copy the custom tables to the Enterprise Global.
- Click the Close button to close the Organizer
- On the Info page of the Backstage, click the Save tab to save the changes to the Enterprise Global.
- When the Save job is completed, close and check in the Enterprise Global.
- Close the existing Read-Only project in which you created the custom objects, but do not save the changes.
- Exit and relaunch Microsoft Project and then ask all users to exit and relaunch Microsoft Project as well.


The reason for the final step above is that your changes to the Enterprise Global do not impact you and your project managers until each of you exits Microsoft Project, launches the software again, and connects to Project Web App again.
