
Author: Ben Howard
Ben Howard – Awarded Community Leader for his very popular and comprehensive UK web training series and has over 30 years of experience of implementing enterprise solutions for customers worldwide. During that time, he’s worked for IBM, DELL, and Microsoft, as well as several smaller organisations. He now runs his own consultancy (Applepark Ltd), providing Project, Project Online and Power BI implementation and training services. He has been awarded the Microsoft Most Value Professional award for Project for the last 13 years, blogs semi-frequently at www.applepark.co.uk, produces video training for Pluralsight and his own YouTube channel, and finally was responsible for producing P2O, an application that exports tasks from Microsoft Project into Outlook. You can catch him at ben@applepark.co.uk
Webinar: Maximise Your Chances of Success for Microsoft Certifications in Project and Project Server
Project Management Institute (PMI)® Professional Development Units (PDUs): This Webinar is eligible for 1 PMI® PDU in the Technical Category of the Talent Triangle. Event Description: Join Microsoft MVP Ben Howard to learn what you need to do to prepare for the following two exams Managing Projects with Microsoft Project 2013 (exam 74-343) Managing Programmes and Projects with Project Server 2013 (exam 74-344) Ben was one of the team that developed and critiqued the questions for both exams, so he’s well placed to know the types of questions you’ll face, but please note that that this session will not provide you with any of the actual questions. About the Presenter: Awarded Community Leader for his very popular and comprehensive UK web training series. Ben Howard has over 20 years experience of implementing enterprise solutions such as MRPII, ERP, and latterly Microsoft’s EPM (Project and Project Server) solution. During that time he’s worked for IBM, DELL, and Microsoft, as well as several smaller organisations. He now runs his own EPM consultancy (Applepark Ltd), providing Project Server implementation and training services. His has been awarded the Microsoft Most Value Professional award for Project for the last 5 years, and has published the successful “Microsoft Project 2013 Plain and Simple” book. Have you watched this webinar recording? Tell MPUG viewers what you think! [WPCR_INSERT]
Working with Teams in Project Online/Project Server 2013
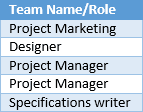
Introducing Teams The Team feature was introduced way back in Project Server 2007, and has persisted through to Project Online. The feature consists of the following parts. A Resource Enterprise Custom Field (ECF), called Team Name. This is hard coded in Project Online. A lookup table that is associated with the Team Name ECF. This isn’t hard coded, and in fact, needs to be created as part of the configuration of Project Online. Why use Teams? Teams become interesting, when we want to implement any of the following pieces of functionality: We want to Project Managers to assign activities to a Generic Resource, rather than a named individual. We want to easily view the demand and capacity for a team. The work should include all assigned work for the team (both named individuals and the Generic Resource, and the capacity should only be determined from the sum of the named resources. We want team members to “self assign” themselves to the activities. Set-up – Team 1. The 1st thing to do is to decide upon the teams that you have. Typically this would mirror the business units you have, or the skills that you utilise within the organisation. My team structure is fairly simple, it’s going to consist of the following roles…. Note that I’ve only produced a single level list here, but the list could consist of multiple levels. 2. Once you have decided upon the teams, then these are implemented in Project Server/Project Online by way of a Lookup Table and the pre-existing Team Enterprise Custom Field. 3. Set up the Lookup table by selecting Enterprise Custom Fields and Lookup Tables from the PWA Settings. Notice that there is no Lookup Table associated with the existing Team Name. 4. Click on New Lookup Table to create one to associate with the Team Name. Notice that I’ve called mine “Team Name”, but it can be anything you like. Once the lookup table has been created, it needs to be associated with the Team Name Enterprise Custom Field. 5. Click on the Team Name ECF to edit it. The only thing that needs to be done here is to associate the newly created Lookup Table with the Team Name ECF. Once this is done, it cannot be undone, modified, or edited. Ensure that you get this right, it’s a one hit opportunity! You do get a warning to this effect… So, that’s the lookup table associated with the Team Name ECF. Set-up – Generic Team Assignment Resources So now that the team structure is set up we can begin to create the Team Resources. This is very similar to creating standard generic resources, but with two following additions…. 1. The Team Assignment Pool check-box is selected – this is very important – it sets the capacity for this resource to 0 hours per period. 2. The appropriate Team Name is selected –this is optional, but useful, and in my mind performs two functions. 2.1 It easily allows us to group resources by Team Name, which is a useful function in reports, views etc. 2.2 It allows Team Members to Assign themselves to Team Tasks – This assumes that the Team Member is associated with the same team (and a Team Member can only be assigned to a single team). We can now see the Generic Team Resources in the Resource Centre…. Note the Max Units (which are set to 100% but will have no impact on capacity), the Team Name and the Team Assignment Pool. If I select these resources and look at the resource availability then I can see the capacity line is set to zero. Set-up – Named Resources Associate each Named Resource with a Team – do not check the Team Assignment pool checkbox. We can now see the all the Named and Generic resources in the Resource Centre…. and we can group them by team name… Using these resources etc…. Now that the setup is completed, let’s recap on how these can be used in a fairly typical scenario. 1. The Project Manager creates tasks, and assigns the Generic Team Resource to the task in the usual way…. 2. Once the project is published, we can see the demand in the resource centre. So the neat thing is that I selected all resources that are associated with the Product Manager “team”. Now I can easily see both the demand for each team member (including the individual members) and the supply (represented by the capacity line). As a the line manager of the Product Manager team, I can now decide whether ben or elaine should fulfil the demand for the Product Manager requirement – the project manager could make the switch by opening the project and changing the assignment. However, in this case, because we have set up the users as Team Resources, we can ask the users to assign themselves to the “team” tasks. Add Team Tasks 1. Logged in as “ben howard”, the user selects Add Row | Add Team Tasks. 2. Select the task(s), and click on “Assign to me”, and then select Tasks to return to your tasks view. 3. Now complete task statusing as per the usual process. Note that the Status Manager needs to approve the reassignment of the resource to the team task, and until this happens the resource demand will not be visible in the resource centre. Automatic approvals for reassignment, where the reassignment is from a specific resource, can be setup to run automatically. Here we can see that I have set up an automatic rule that accepts re-assignments from my Team Resources. Enjoy, Ben.

Hard and Soft Dependencies
One of my customers wanted a way to differentiate between mandatory and discretionary (or hard and soft) dependencies. For my customer, the idea was that they wanted to be able to enter both hard and soft dependencies, and then implement and remove the soft logic links at their own discretion. So it gives them the ability to implement “what if” scenarios if the schedule got a little “tight”, allowing them to remove the soft dependencies effectively crashing the project. Alas Project doesn’t allow use to add a flag to the dependency type, and so I figured the following work around. Please note that this is in early developmental stages and so feel free to use this code; and if you improve on it, please let me know; and if you use it, please credit me (oh, and buy me a beer when you see me). Step 1. Create a text custom fields, called soft predecessor(s) unique ID using Text1; if you cannot use this field, choose another one and modify the VBA accordingly. Note in the screen shot is shows that I have changed Text2 also; in the end I didn’t use this. Step 2. In your favourite table, add in the columns, unique ID and the Soft predecessor(s) unique ID. We need to utilise the unique task ID, as the usual ID field can change when tasks are moved/inserted etc. Typically I add these to the left of the predecessor column (which I typically move to the left of the task name anyway – the order isn’t important, but the visibility is). Step 3. Add the following VBA code into a module or macro in your favourite project client…. note that there are two proceduresAddSoftPredecessors and RemoveSoftPredecessors. Their individual use should be fairly self explanatory. Sub AddSoftPredecessors() ‘ 07/03/2014 Ben Howard – ben@applepark.co.uk www.applepark.co.uk/ben-howard-blog Dim TskID1, TskID2, TskID3 As Long Dim Tsks As Tasks Dim Tsk As Task SelectAll Set Tsks = ActiveProject.Tasks For Each Tsk In Tsks ‘ check to see if a task exists If Not Tsk Is Nothing Then ‘ MsgBox (Tsk.Name) ‘ Tsk.Text2 = Tsk.UniqueIDPredecessors ‘ ConCatPreds = string concat(tsk.UniqueIDPredecessors, tsk.Text1) If Tsk.Text1 <> “” Then ‘ MsgBox (Tsk.Name & ” has a predecessor”) ‘ Tsk.Text2 = Tsk.UniqueIDPredecessors & “,” & Tsk.Text1 If Tsk.UniqueIDPredecessors <> “” Then tempstr = Tsk.UniqueIDPredecessors & “,” & Tsk.Text1 Else tempstr = Tsk.Text1 ‘ MsgBox (Tsk.Name & ” ” & tempstr) End If Tsk.UniqueIDPredecessors = tempstr Else ‘ MsgBox (Tsk.Name & ” has no predecessor”) End If End If Next Tsk End Sub Sub RemoveSoftPredecessors() ‘ 07/03/2014 Ben Howard – ben@applepark.co.uk www.applepark.co.uk/ben-howard-blog Dim Tsks As Tasks Dim Tsk As Task SelectAll Set Tsks = ActiveProject.Tasks For Each Tsk In Tsks ‘ check to see if a task exists If Not Tsk Is Nothing Then ‘ check to see if we have both hard predecessors and soft predecessors If (Tsk.UniqueIDPredecessors <> “”) And (Tsk.Text1 <> “”) Then ‘ MsgBox (Tsk.Name & ” has this chacter ” & Tsk.Text1 & ” at position ” & InStr(Tsk.UniqueIDPredecessors, Tsk.Text1) & ” in the Predecessors”) If InStr(Tsk.UniqueIDPredecessors, Tsk.Text1) >= 0 Then ‘we know that some part of the string is matched ‘MsgBox (Tsk.Name & ” some match”) ‘MsgBox (“Unique Predecessor length of ” & Tsk.Name & “is ” & Len(Tsk.UniqueIDPredecessors)) ‘Find out if the next character is a delimiter nextchar = Mid(Tsk.UniqueIDPredecessors, InStr(Tsk.UniqueIDPredecessors, Tsk.Text1) + 1, 1) ‘ MsgBox (“next char ” & nextchar) newstr = Replace(Tsk.UniqueIDPredecessors, Tsk.Text1 & nextchar, “”) ‘ check if there is a ‘ as the last character If Len(newstr) > 0 And ((InStrRev(newstr, “,”) = Len(newstr))) Then ‘MsgBox (“we have a comma as the last char”) newstr = Left(newstr, Len(newstr) – 1) End If ‘MsgBox (“NewStr ” & newstr) Tsk.UniqueIDPredecessors = newstr Else ‘MsgBox (Tsk.Name & ” no match”) End If ‘ create a new string that removes duplicates from the two strings End If End If Next Tsk End Sub Step 4. Whilst we are playing around with adding the VBA/Macros, we might as well assign a couple of buttons to them in the ribbon. I’ll just include the final screen shot here. You can learn more on how to customise the ribbon in my newest book. Step 5. Enter your predecessors and dependencies as usually would. These will become your “hard” predecessors. Project schedules and accordingly based upon these dependencies and the existing constraints and task mode(s) within the project. Notice that task T2 has hard predecessors of both T3 and T1. Step 6. Now comes the “fun” part. In the schedule, for each task, enter the soft predecessor unique ID(s). In the UK, these are separated by a comma; if your regional settings are different, you’ll need to modify the VBA. For Task T3, I am going to create a “soft” predecessor of task T1. Step 7. To apply this “soft” dependency and see the effect on the schedule, click on the Add Soft Predecessors button to run the VBA. Notice how the Unique ID Predecessor (the hard predecessor) of task T3 now equals the Soft predecessor ID, and the consequence that it this then has on the rest of the schedule (task t3 and Task T4 have both moved). Step 8. You can remove the effects of the soft dependency by clicking on the Remove Soft Predecessors button. Enjoy, Ben.

Change Highlighting in Project 2010/2013 vs 2007
Change highlighting is beautiful, but there are times when you do not want to display it – when you want to print the view, for instance. Now, of course, you can just hit CTRL-S to save the schedule, and of course that removes any change highlighting. Of course this also clears the stack so that you can no longer undo anything…. There must be a better way! And of course, there is – we can toggle it on or off. Project 2007 In Project 2007 all one had to do was either Hide or Show Change Highlighting in order to toggle the change highlighting display on or off. Project 2010/2013 In Project 2010/2013, one has to find the the Display Change Highlighting button and add it either the the Quick Access Toolbar or the Ribbon. My preference is to add it to the Ribbon as it takes up a lot of space on the Quick Access Toolbar. Enjoy… Ben. Don’t miss Ben at the Microsoft Project Conference 2014 in Anaheim! He’ll be presenting two sessions: Come to see Microsoft Project Online on nearly any device from iPad to Surface! and Reports that jump off the screen with Microsoft Project desktop with Phil Allen.
Certificate Series: Microsoft Project 2013 and Project Online – Session 3
Project Management Institute (PMI)® Professional Development Units (PDUs): This Webinar is eligible for 2 PMI® PDU in the Technical Category of the Talent Triangle. Session 3 Welcome to Project Online – what, no MS Project! •What is Project Online, where to get it, what does it cost? •Using Project Online •What’s Project Pro for Office 365 Speaker Bio Ben Howard, MVP Awarded Community Leader for his very popular and comprehensive UK web training series. Ben Howard has over 20 years experience of implementing enterprise solutions such as MRPII, ERP, and latterly Microsoft’s EPM (Project and Project Server) solution. During that time he’s worked for IBM, DELL, and Microsoft, as well as several smaller organisations. He now runs his own EPM consultancy (Applepark Ltd), providing Project Server implementation and training services. His has been awarded the Microsoft Most Value Professional award for Project for the last 5 years, and has published the successful “Microsoft Project 2013 Plain and Simple” book. Have you watched this webinar recording? Tell MPUG viewers what you think! [WPCR_INSERT]
Certificate Series: Microsoft Project 2013 and Project Online – Session 2
Project Management Institute (PMI)® Professional Development Units (PDUs): This Webinar is eligible for 2 PMI® PDU in the Technical Category of the Talent Triangle. Watch session 3 Session 2 Use Project Like a Pro •10 steps to mastering Microsoft Project Speaker Bio Ben Howard, MVP Awarded Community Leader for his very popular and comprehensive UK web training series. Ben Howard has over 20 years experience of implementing enterprise solutions such as MRPII, ERP, and latterly Microsoft’s EPM (Project and Project Server) solution. During that time he’s worked for IBM, DELL, and Microsoft, as well as several smaller organisations. He now runs his own EPM consultancy (Applepark Ltd), providing Project Server implementation and training services. His has been awarded the Microsoft Most Value Professional award for Project for the last 5 years, and has published the successful “Microsoft Project 2013 Plain and Simple” book. Have you watched this webinar recording? Tell MPUG viewers what you think! [WPCR_INSERT]
Certificate Series: Microsoft Project 2013 and Project Online – Session 1
Project Management Institute (PMI)® Professional Development Units (PDUs): This Webinar is eligible for 2 PMI® PDU in the Technical Category of the Talent Triangle. Watch session 2 Session 1 Getting Started with Project Management and the Microsoft Toolset What Is a Project? What Is Project Management? Who are Project Managers Key Goals & Challenges Facing Projects Tools, tools and more tools Speaker Bio Ben Howard, MVP Awarded Community Leader for his very popular and comprehensive UK web training series. Ben Howard has over 20 years experience of implementing enterprise solutions such as MRPII, ERP, and latterly Microsoft’s EPM (Project and Project Server) solution. During that time he’s worked for IBM, DELL, and Microsoft, as well as several smaller organisations. He now runs his own EPM consultancy (Applepark Ltd), providing Project Server implementation and training services. His has been awarded the Microsoft Most Value Professional award for Project for the last 5 years, and has published the successful “Microsoft Project 2013 Plain and Simple” book. Have you watched this webinar recording? Tell MPUG viewers what you think! [WPCR_INSERT]