 How many times have you hidden a column in your MS Project plan that you think you might need in the future or don’t have space for when printing and later forgot about it or forgot where its location was in your plan?
Columns can easily be forgotten! You may even insert it a second time without realizing your error, which would be a waste of time and space. Let’s consider a few ways of finding hidden columns, so this doesn’t happen to you. We’ll start with discussing how columns get hidden in the first place.
There are two quick ways to conceal a column. The first is to highlight the column heading and right-click, selecting Hide Column. You’d normally do this temporarily for printing purposes (aka to avoid information overload when reporting). Unfortunately, Project doesn’t have an Unhide command like Excel does, so one option is to close your file after printing without saving it or press the Undo arrow to bring back the hidden column. If you accidentally save the file after hiding a column, you will have to insert the same column next time.
The second way is to move your cursor to the right edge of a heading’s cell. The pointer changes into a two-headed arrow, at which point you’ll want to drag it past the cell’s left border. The column vanishes! Now, if you happen to remember which columns were to the left and right of the missing column, put your cursor slightly to the right of the middle border line. It will again change into a two-headed arrow. Drag this arrow to the right until you can see the hidden column. These options work, but what are the odds of you remembering where the hidden column is in your plan as time passes? Probably low!
Let’s look at an example. Project 1 2 3 includes a highlighted Predecessor column (see Figure 1). I used the process described in the above paragraph to hide the Predecessors column (Figure 2).
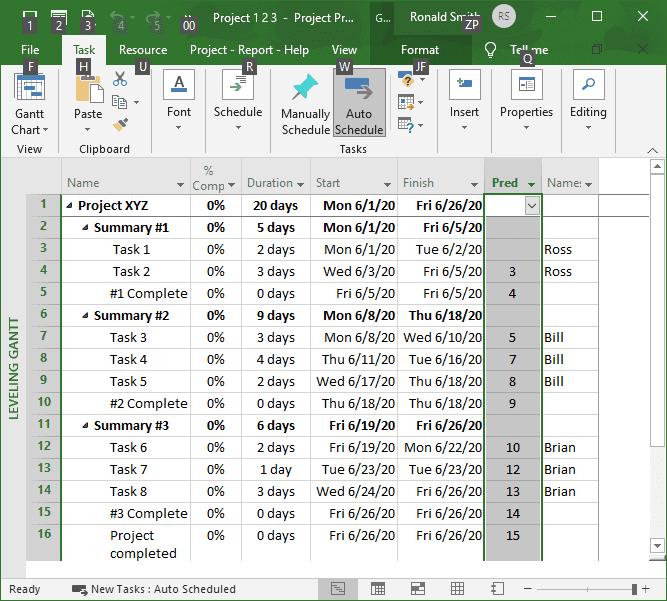
Figure 1: Project has a Predecessor’s Column
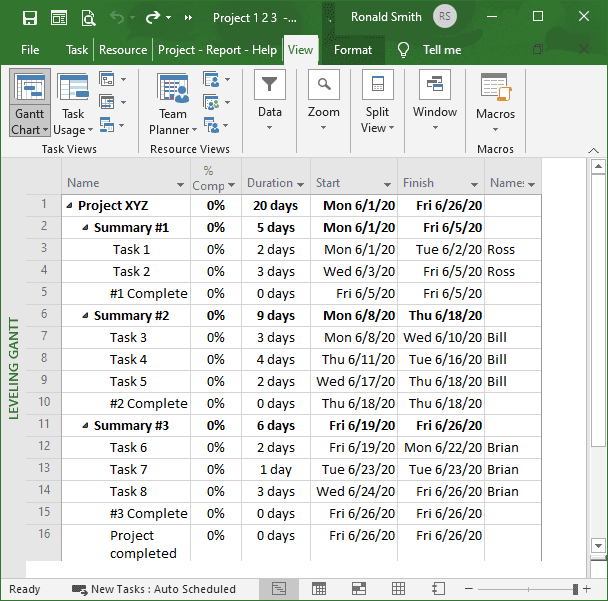
Figure 2: Project has a hidden Predecessor’s Column
To find the missing column, we will use the Table Definition dialog boxes. In the View tab’s Data section, click Tables > Save Fields as a New Table. Then enter the name (I usually use the Project file’s name). Then, click OK.
In the View tab’s Data section, click Tables > More Tables > (the Table Project 1 2 3 should be highlighted), and then select Edit (Figure 3). You will notice the width for the Predecessor’s field is “0,” and that’s why you don’t see this column in Figure 2. If you increase the cell width (from 0 to 9, for example), then click “OK” and “Apply” in the next More Tables dialog box, you will be back to where you started.
Even though the dialog box lists rows, you should keep in mind that they are columns in the table. Remember you have the following command buttons for modifying your table after you highlight a row.
- Cut Row removes the selected row from the table and temporarily stores it on the Clipboard (the Paste Row button will then be activated). While this removes the field from the table, it does not remove data from the field.
- Copy Row duplicates the selected row from the table, and temporarily stores it on the Clipboard (the Paste Row button will then be activated).
- Paste Row uses the Clipboard to insert the last row you cut or copied from the table above the selected row.
- Insert Row adds a blank row in the table above the selected one.
- Delete Row is like Cut Row, but it does not use the Clipboard at all.
In addition to these commands, you can define the attributes of each field, align data, and assign a title. There are other formatting options at the bottom of the table. As you can see, the Table Definition dialog box is an especially useful tool. Even more useful, the More Tables dialog box lists every table in your global template and existing Project file.
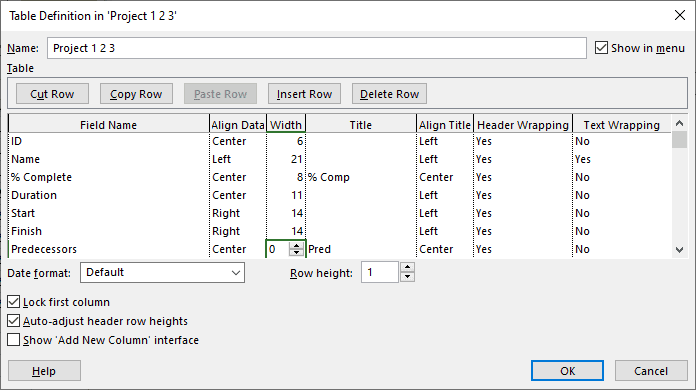
Figure 3: Table Definition Dialog Box
You might have a need to set up multiple tables or views for your project plan for the purpose of customizing only the data you want to demonstrate for different groups (for example, executives vs. team members). A quick way of doing this is to click Tables > More Tables > (the Tables name should be highlighted, or you can pick another one). Then, select Copy to make your changes. Replace the name in the Name box (see the top of Figure 3), as needed. To the right of the Name box is the “Show in menu” option. If you check this box, the table will appear in a dropdown “Custom” list when you click Tables in the View tab. When you are done, click OK to save the table and close the Table Definition dialog box.
Any comments on how you’ve successfully hidden or unhidden columns would be appreciated.