
Author: Praveen Malik
Praveen Malik, PMP, has two-plus decades of experience as a project management instructor and consultant. He regularly conducts project management workshops in India and abroad and shares his project management thinking in his blog, PM by PM.
Four Ways to Customize the Gantt Chart in MS Project
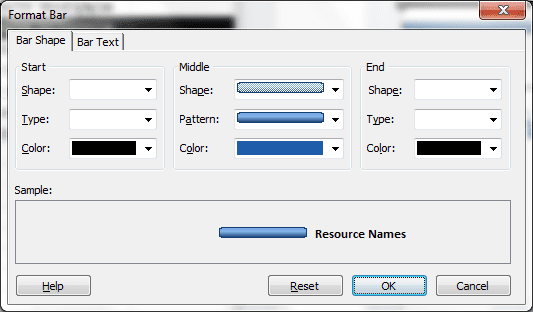
Gantt chart is the default view in MS Project. Since the inception of MS Project (MSP), Microsoft engineers have used Gantt chart as the default, although I have often wondered why they didn’t choose some other view. I think Network diagram may have been a better choice, as it is a much better tool for network analysis, but, as discussed in my article on scheduling analysis, even though Network diagram is a good tool, it has its shortcomings. Only a trained person can understand a Network diagram. On the other hand, Gantt chart can be understood by anyone. I believe that even a lay person could understand Gantt chart at first glance. Another reason for making Gantt chart the default view could have been the ease it provides for giving presentations and making status reports. Beautiful, informative reports can be created by simply taking screen shots of Gantt charts. Users can also create reports by printing the Gantt chart view(s). The figure below provides a screen shot of the default Gantt chart view of MSP. Notice that it is very easy to comprehend the information. Many can easily make out the start and finish dates and span of each task by just looking at the chart. Sometimes, the default view is enough, but you may want to show more information than only that which is shown by the default view. In this article, I will share several different ways to customize Gantt charts in MSP. You can use these features on Tracking Gantt, also. Four Ways to Change Gantt Chart in MS Project Use the Format menu in MSP to make changes to a Gantt chart. The figure below shows the Format menu. 1. Customize Bar Styles The normal style of a Gantt chart seem to be drab and not suitable for making formal presentations. You can change the styles and colors of Gantt chart bars in one of the following two ways: Use any one of the canned styles from the Format -> Gantt Chart Style. Create your own style by going to the advanced option menu. You can do this either by right-clicking anywhere in the blank area of the Gantt chart view and choosing ‘Bar Styles,’ or by clicking at the bottom right where you will see Format -> Gantt Chart Style. Refer to figures III and IV below. MSP shows different types of bars for different task types, and you can change the shape, pattern, and color of each of these. In addition to changing styles in theviewing area, you can also change the legends shown in the print view. This is very useful when you are printing Gantt charts for reporting purposes. Refer to another article that provides information about changing legends in MSP. 2. Add Text to Bars Another useful customization techniques is to add text to the bars. This makes the Gantt chart more informative. Do this either by right-clicking anywhere in the blank area of the Gantt chart view and choosing ‘Bar Styles -> Text, or by clicking at the bottom right on Format -> Gantt Chart Style. Refer to figures III and IV above and V below. MSP gives you five placeholders for adding text: left, right, top, bottom, and inside of a bar. You can even change the bar style of a specific task. This can be done by right-clicking on the bar in the Gantt chart view and choosing the ‘Format Bar’ option. Refer to the figures VI and VII below. 3. Change Layout Change the layout of the Gantt chart area, which includes date formats and link styles among a few other things. You can do this by right-clicking anywhere in the blank area of the Gantt chart view and choosing the ‘Layout’ option. Refer to figures III above and VIII below. 4. Change Timescale In the default view, timescale shows in weeks, but you can change it to hours, days, months etc. Do this by right-clicking at the top of Gantt chart view and choosing the ‘Timescale’ option. Refer to figures IX and X below. There are various other options in the Timescale dialog box. Just play with them and check those which are useful for you. 5. Change Gridlines MSP provides an option to add Gridlines to the Gantt chart area. Do this either by right-clicking anywhere in the blank area in the Gantt chart view and choosing ‘Gridlines,’ or by clicking on Format -> Gridlines at the bottom right of the screen. Conclusion Gantt charts are very useful for making client presentations and status reporting. They are easy to understand and provide a detailed status of a project at a glance. Utilizing the advanced formatting features available make Gantt charts more visually appealing. You can explore these features and play with different styles and text options to check what works best for your project. Do you use Gantt charts for status reporting or for client presentations? Which customizing options do you find most useful? I would love to hear your thoughts in the comments below.

PMO Best Practices: 7 Steps for Better Schedule Management
A few years ago, I was hired as a Project Management Office (PMO) consultant for a software products company. My assignment was to setup their PMO, implement best practices, and oversee projects for twelve months before handing over the setup to the client. My assignment ended up lasting thirteen months. Some would say it’s an unlucky number, but, barring a few hiccups, it was lucky for me. The PMO streamlined the company’s operations and improved productivity among employees. The assignment was extended by one month only because the client was facing some difficulty in finding the right person for taking the handover from me. Setting up a PMO is very challenging task. One cannot succeed without the support of a sponsoring organization. I, too, faced many challenges at the beginning of my assignment. There was an initial resistance in implementing new processes, but my client was very supportive. Since then, I have assisted a few more organizations in setting up their PMO. Every assignment is different, but I learned many useful things along the way. I have written this article to share the best steps for implementing and managing project schedules in a PMO. Implementing Best Practices for Managing Projects Schedule in a PMO Step I – Implement a Project/Portfolio Management Software A project management software is essential for managing the projects successfully. Nowadays, projects are very dynamic and things change very fast. Furthermore, resources are shared among many projects. It is very difficult to manage a project schedule without the help of a robust project management tool. A PMO’s job starts with shortlisting a good tool, and then implementing it throughout the organization. You might consider using MS project, as it is useful for most projects whether they are big or small. Step II – Create Processes and Guidelines The PMO should prepare processes and guidelines for the following areas: Establish Project Goals and create project charters. Estimate project and activity duration. Create a new project schedule. Track a project schedule. Update a project schedule for approved changes. Set up/allow resource sharing across multiple projects. Present project schedule reports to senior management and customers. Step III – Create Templates A PMO should prepare templates that are useful for managing the project schedule. These could include templates for schedules, resource requisition, the project charter, customer and senior management reports, meeting agendas and minutes, and feedback forms. These templates should be shared with project managers and their usage should be enforced across the board. Step IV – Hold Periodic Meetings The PMO should hold regular periodic meetings with the project managers and senior management. Project team members can also be included from time to time. A protocol for such meetings and frequency should be established and implemented. The periodicity of the meetings can vary based on the organization’s requirements. The agenda of these meetings should be predefined, so as to make the meetings effective. The PMO should ask project managers to present their respective project reports during these meetings. It should monitor the progress of the project and do periodic audits. Flags should be raised if a project is falling behind. Step V – Take Periodic Feedback The PMO should take periodic feedback of a project from the senior managers, customers, and sponsors, and then take appropriate actions (do the needful) based on the feedback gathered. Step VII – Employ Project Coordinators A PMO should employ project coordinators to support the project managers. Project coordinators perform regular tasks like data collection, report documentation, meeting preparation, meeting minutes, etc. In most organizations, project managers do these things, but a project managers’ knowledge and skills can be better utilized for problem solving, alternative analysis, and stakeholder management. Such time consuming tasks as listed above are best left to less skilled, support employees. Step VII – Train Project Participants The PMO should train project managers and team members on all aspects of managing the project schedule. The training should include process training, technical training, software training, and any other type of industry or organization specific training that is helpful for managing project schedules better. Conclusion A PMO is a coordinating and supporting body for managing projects successfully. It has to guide, mentor, and support project managers and other project participants, so that work and projects are executed smoothly. A PMO is a governing body, also. It should create project management processes, monitor the health of projects, and make necessary changes in project personnel to ensure that the projects stay on track. Do you have a PMO in your organization? Do you think PMOs are useful or is it just a waste of time? What is its role and how does it support your project managers? Who are the individuals who make up your organizations’ PMO? Here’s another article that shares some unique insights on about managing schedules within a PMO. I would love to hear your thoughts in the comments below.

A Beginner’s Guide to Resource Leveling in MS Project
How would you feel about someone else doing a job for you and not charging you a penny? I am sure we’ve all had moments when this would sound pretty good, but what if this person botched up the job or did something that you just couldn’t understand? Well, then you would likely be pretty angry. The resource leveling feature in MS Project is somewhat similar. You will fall in love with it if it works for you, but in most cases, it frustrates people to no end. It can optimize a project’s resource utilization if you use it judiciously; however if you are not careful, it will just spoil your project schedule. Resource leveling is a hotly debated topic among MS Project experts. Some people say that no one should ever use it, while others say that you should use it only if you understand the consequences. So, what is the reality? Resource leveling is an advanced feature in MS Project. In my opinion, you should not dabble with it unless you understand it properly. I have written this article to tell you how you can use resource leveling to optimize your project schedule. You can also read best practices of Resource leveling for a deeper understanding of the subject. Why should you Use Resource Leveling Feature of MS Project? Resource leveling is used to remove over-allocation of project resources. This is done by adjusting the scheduled dates of project activities. This may sometimes delay a project’s completion date. There are several methods to employ, which we will consider in the following paragraphs. Manual Resource Leveling Resource leveling can be done manually by analyzing various different views of MS Project simultaneously and then adjusting the dates of tasks to remove over-allocation. You can use views like Resource Usage, Resource Graph, Task Usage, and Gantt Chart for manual leveling. The manual method of analyzing various views simultaneously is cumbersome and tedious. It requires a lot of time and effort. Resource leveling is not just about delaying a task; it involves analyzing scheduled dates of predecessor and successor tasks also. Delaying a task can delay many other dependent tasks that are assigned to other resources. This can over-allocate other resources and eventually spoil the whole project schedule just as is possible with the automated option. In my opinion, the manual method is generally not advisable if you have a big project and/or a large pool of resources. Automated Resource Leveling Fortunately, there is a better, automated way to do resource leveling through MS Project. It is not possible for a human brain to analyze millions of permutations in a short period of time, but computer software (in this case, Project) can simultaneously look at relationships between hundreds of tasks and calculate a highly optimized schedule in a flash. In fact, you can save a lot of time by using the MS Project’s Resource leveling feature, but as I stated earlier, you need to know what you’re doing. How to Automate Resource Leveling Using MS Project? You should first ascertain that resources are over-allocated before doing the Resource leveling. This can be done by one of the following two ways: 1. Look at the Information column in the Gantt chart view. It will have a red resource icon suggesting the over-allocation of resource(s) in a particular task. 2. Go to the Resource Sheet view. The rows of over-allocated resources will be displayed in red. 3. Once you confirm that some resources are over-allocated, you can go to Level group in the Resource tab to remove the over-allocation. 4. Before leveling the resources, take a look at the Leveling options and change them as needed. The Leveling options are: Automatic vs Manual: MS Project performs automatic leveling as soon as a resource or a task is changed. Manual leveling is done only when you ask MS Project to do so. I would suggest you to use Manual leveling as it is a much safer option. Automatic leveling can be befuddling as MS Project makes real-time changes to your tasks in response your changes without asking you for the confirmation. Look for over-allocation on a _____ basis: You can level resources on a minute by minute, hour by hour, day by day basis etc. The day by day option is the most practical option, and it’s suitable for most projects. Clear leveling values before leveling: If this checkbox is checked, then MS Project clears the leveling values of existing tasks and starts afresh each time leveling is done. This should be left unchecked if you are doing Automatic leveling as it will hog your computer resources. Leveling range: You can either level the entire project or tasks between specified dates. Leveling order: There are three options here. ID Only: MS Project gives more priority to the higher Task ID. I would suggest you avoid this, as it has no practical utility. Standard: MS Project uses a combination of predecessor relationships, slack, priorities, and constraints to level the resources. Priority: MS Project gives higher precedence to tasks with priority and then uses the Standard algorithm for leveling the resources. After setting the Leveling options, you can level resources in one of the following ways: 1. Level resources allocated to the selected tasks. 2. Level a particular resource. 3. Level all the resources in the project. Conclusion Automated Resource leveling is a great feature, as it optimizes resource usage in a matter of seconds. However, it has some limitations. In those cases, manual leveling becomes useful. MS Project does not change the resources assignments of a task. It is important to note that because of changes to the tasks, leveling can delay the finish date of some tasks and consequently, the project’s finish date. Sometimes, it is more prudent to assign free resources rather than remove the over-allocation. Secondly, automation can level work resources only. It cannot level other type of resources, such as material and cost resources. Have you done Resource leveling in your project? Did you use a manual approach or automated method? What was your experience? I would love to hear your comments below.
Resource Leveling: How Can You Use it in Project Management?
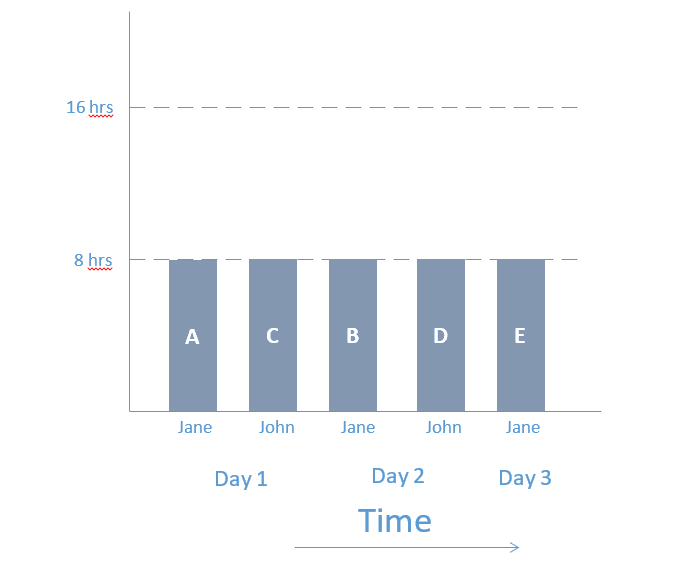
A person inexperienced in project management may think that resource leveling is a method of making use of resources having the same height. Most experienced project managers know that it is a resource optimization technique which tries to make the best use of available resources to create a workable project schedule. Resource leveling is often misconstrued as the only resource optimization technique, but there is another one—resource smoothing. Resource Optimization Resource optimization is a scheduling technique that tries to create a near perfect project schedule within the given resource and time constraints. In resource optimization, activity scheduled dates are determined or adjusted so that the available resources are not overloaded and the project’s target finish date is not compromised. Resource optimization can be done in one of the following two ways: Resource leveling Resource smoothing I have written this article to explain both techniques. Resource Leveling Resource leveling is the process of rescheduling activities such that the requirement for resources on the project does not exceed resource limits. The project completion date may be delayed in the process (Max Wideman PM Glossary). Sometimes a project resource is assigned to more than one activity simultaneously making the resource overloaded. You can resolve the over-allocation by using resource leveling. Level the resources by either delaying the activities or by splitting them. Let me explain it with the help of an example. Let us consider a small project having five activities—A, B, C, D, and E. The figure below shows a network diagram for our example project. We can see that activity E is dependent on activities A, B, C, and D. Activity E can start only after all of its predecessors are finished. Let us assume each activity can be done by a one person in an eight hour working day. The figure below shows the time-phased project schedule. The above diagram is just a network diagram. It is not a complete project schedule, since it does not show assigned resources. Generally a constant number of resources are allocated to a project. Looking at the above schedule only, the project would need four resources on Day 1 and one resource on Day 2 for completion. In this case, four resources would be too many. I’ll explain why. Let us assume that only two resources (Jane and John) are allocated to the project. Jane and John will work on Day 1 to finish activities A and B and C and D respectively. The figure below depicts the resource utilization levels of these two resources. Notice that both Jane and John are working 16 hours on Day 1. This is far from an ideal scenario. A resource can work for a maximum of eight hours per day. Hence, the schedule needs to be adjusted. The following figures depict the resource adjusted schedule with two resources. You will notice that activities B and D have been delayed to Day 2 in order to remove the over-allocation. Now, we’ll look at a depiction of the resource utilization level in the adjusted schedule. You will notice that, in the above figure, both the resources are leveled. Jane and John will each work for eight hours per day. In resource leveling, resource usage is maintained at a constant level, but the project schedule may be compromised. MS Project has a feature to automatically level the resources. It is very well explained in another post on resource leveling best practices. Resource Smoothing The process of rescheduling activities such that the requirement for resources on the project do not exceed resource limits is called resource smoothing. In smoothing, as opposed to resource leveling, the project completion date may not be delayed. Activities may only be delayed within their float (Max Wideman PM Glossary). In resource smoothing, you have to make the use of available resources to finish the project within the given target finish date. You can use total and free float to adjust the activities’ start and finish dates. Resource smoothing is much more involved than resource leveling. You can read my previous post on how to use network diagram to understand how total float is used to adjust the project schedule. As I said before, in resource smoothing, as opposed to resource leveling, the resource usage is maintained at a constant level, but the project finish date is not changed. Conclusion You should use both resource leveling and resource smoothing to optimize the resource utilization while developing a project schedule. Usually resource smoothing is done after resource leveling, but they can be done in parallel, too. Generally, resource leveling increases the cost of a project, whereas resource smoothing introduces an extra amount of scheduling risk. Have you used any of the resource optimization techniques in your project? If yes, what was our experience? I would love to hear about it in the comments below.

A New Look at MS Project Task Types: Fixed Duration and Effort Driven
What would you think if you were steering your car right, but it turned left, as if it had a mind of its own? You would probably curse the machine and say it is not meant for you. You might also think that there is Artificial Intelligence working in the background. MS Project (MSP) is a software. It is a virtual machine, but not unlike the car we mentioned, it sometimes changes things on its own and you are left wondering what happened. The most unexpected behavior occurs when there is a change in task duration or assigned resources. You may want to change the duration of a task, but you know that if you do, MSP would automatically change the percentages of assigned resources. This typically happens due to the underlying task types. I have written this article to explain the different types of tasks in MSP. I will give an example of “Fixed Duration” and “Effort Driven” tasks that I hope will be helpful especially if you are working under a strict time constraint. After reading this article, you will be able to use the MS Project task types properly in your project schedule and avoid the unexpected. Refer back to this post (MS Project 2013) or this one (MS Project 2007) for further support if you are using an older version of the software. MS Project Task Types Basic Definitions and Scheduling Formula Duration refers to the length of working time or the time required to complete a task. It is usually represented in Hours, Days, or Weeks. In MSP, a Day is considered eight hours of working time and a Week is considered 5 working days. Work refers to the amount of exertion or the number of labor units required to complete a task. It is usually represented in Person Hours, Person Days, or Person Weeks. In MSP, work and effort are synonymous to each other. Units refer to the Resource Units (number of resources) available to complete a task. Resources could be people, equipment, facility, or materials required to complete a task. The above three terms are related to each other, meaning that if work increases then either duration or units should increase to complete the work. This can be simply represented by the following scheduling formula: Work = Duration x Units The units in the above formula are usually entered in percentages. Example 1: If one person (100% units) works on a task X for six days (duration) then the total work done would be worth six person days. Example 2: If three people work four hours a day (150% units) on the same task X (work required six person days), then the task would be completed for four days (duration). Task Types Supported By MS Project There are three different task types supported by MSP. These are: In addition to the task types, a Fixed Duration or Fixed Units task can be made “Effort driven.” MSP provides an “Effort driven” checkbox for these tasks types. The figure below shows the three task types and “effort driven” checkbox. Fixed Duration is the duration of a task that’s deemed to be constant (fixed). Any changes to the assigned units or work does not affect the duration of the task. Fixed Work is the amount of work of a task that’s deemed to be constant (fixed). Any changes to the assigned units or duration does not affect the work of the task. Fixed Units is the number of assigned units of a task that’s deemed to be constant (fixed). Any changes to the duration or work does not affect the assigned units of the task. By default, each task in MSP is set to Fixed Units. If there is a change the Duration of the task, then MSP automatically recalculates the Work by using the above scheduling formula. Let’s consider task X, which is by default set to be a Fixed Units type. If one person (100% units) works on the task X for six days (Duration), then the total Work done would be worth six person days. However, if one person (100% units) works on the same task X for four days (Duration), then the total Work done would be worth four person days. The Units will remain fixed. How to Change a Task Type in MS Project? Follow the steps I’ve outlined below to change a Task Type in MS Project. 1. Go to Gantt Chart view in MSP. 2. Create a new task named Alpha. 3. Double click on the row containing the task in the Gantt chart. This will open the “Task Information” dialog box. 4. Go to “Advanced” tab in the “Task Information” dialog box. 5. Use the drop down for the “Task Type” to change it to Fixed duration. 6. Click on the “Effort driven” checkbox. 7. Click OK. What is the Significance of Fixed Duration and Effort Driven Task? A Fixed duration task is usually required when there is strict time constraint and there is no flexibility on Duration. By making a task Effort driven, Work also becomes constant. So, MSP can automatically change only Units in a Fixed duration effort driven task. Let’s understand this with the help of an example. 3. Currently, there are no resources assigned to Alpha. 4. Go to Resources Menu, and click on Assign Resources. 5. Add four resources, as shown in the figure VI below. Do not assign any resource to the task at this point. 6. Select all the resources by using ‘Shift’ key and mouse. 7. Click the Assign button. 8. You will notice that total Work is 160 person hours. MSP assumes that all four resources will work 40 hours (five days) to make a total of 160 person hours. 9. Undo the last action by pressing “Ctrl’ and ‘Z’ keys together. 10. You will again see Figure VI. 11. Select Falcon in the Assign Resources dialog box. 12. Click the Assign button. 13. You will now notice that total Work is only 40 person hours. MSP assumes that only one resource will work for 40 hours. 14. Select Ironman in the Assign Resources dialog box. 15. Click the Assign button. 16. You will now notice that total Work is remains as 40 person hours. Both the resources will now work for 20 hours each. 17. Since the task is “Fixed duration Effort driven,” MSP does not change the Duration or the total amount of Work. It reduces the individual Work of the assigned resources. 18. This is repeated when we assign the remaining two resources to the task. 19. You will now notice that total Work remains as 40 person-hours. All four resources will now work for 10 hours each. Conclusion MS Project supports three different task types. Each one has relevance in scheduling. However, you should be careful while changing the task types lest MSP automatically changes something else and spoils your whole schedule. Which task types have you used in your schedules? Which one have you found most useful? I would love to hear your comments below.
How to Use Forward and Backward Pass for Activity Assignments
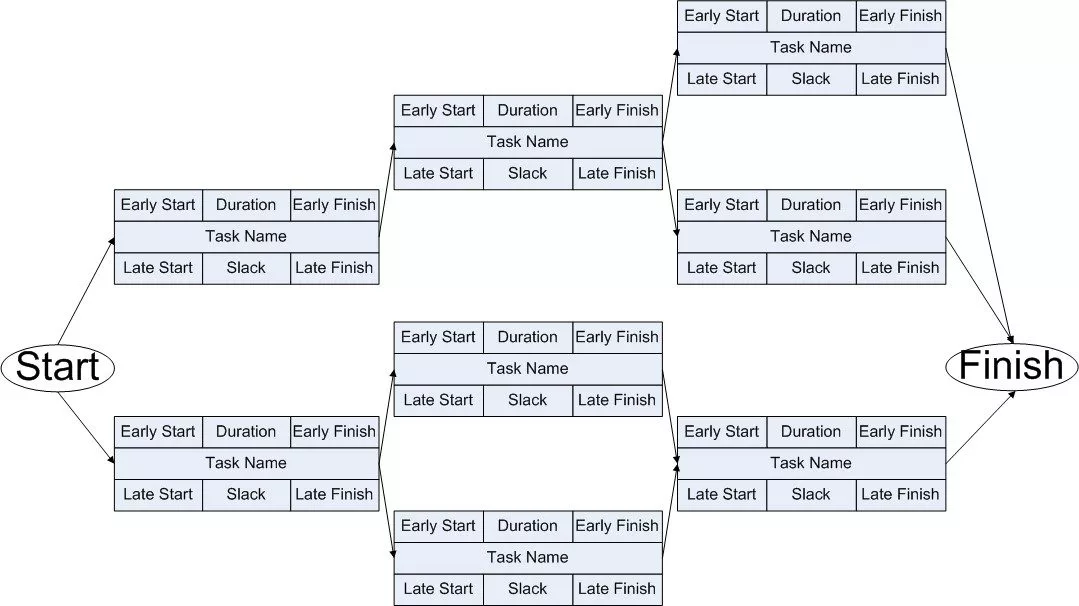
I’m sure you know that a good schedule is critical for the project success. However, did you know that network diagrams are extremely important for creating a good project schedule? In my experience, many senior project managers and project planners shun network diagrams. They just don’t see any value in creating or analyzing them. In fact, I have noticed that some experienced project managers don’t even know what a network diagram is. I have not written this post to explain the basics of a network diagram. Instead, the following article will be useful for you if you already know how to prepare a network diagram and can do forward and backward pass. The Not-so Popular Network Diagram There are many reasons for mixed feelings towards network diagrams. They tend to be bulky and difficult to create and maintain. Furthermore, before advancement of software scheduling tools, creation and analysis of network diagrams required a lot of time. In the past, there were valid reasons for not using network diagrams. However, in the last twenty years or so, scheduling software (like MS Project) has become extremely powerful. You just need to enter project activity data, and viola! your scheduling tool will automatically generate a network diagram for you. Even so, many project managers still avoid using network diagrams. It could be because of time constraint. Most project managers are under the gun to finish their projects in a limited amount of time, so they avoid (seemingly) unnecessary tasks like creating and analyzing network diagrams and choose instead to create a rudimentary project schedule and jump right into executing their projects. Lack of enthusiasm for the network diagram could also be due to the popularity of scheduling bar charts (aka Gantt charts). Many project managers believe that the Gantt charts are panacea for all scheduling problems, and, although Gantt charts are good for tracking and reporting, network diagrams are much more useful for scheduling analysis. I believe, in today’s day and age, there is no excuse for not using network diagrams for project scheduling. Some people choose cheap web based scheduling tools or spreadsheets, which do not even support network diagrams, but even that is not a good enough reason to avoid them. To make a good project schedule, you need to analyze network diagrams, especially when it comes to activity assignments. Analyzing Network Diagrams Activities (or tasks) are represented as nodes or boxes in a network diagram. A typical node is shown in the figure below. Each node in a network diagram has seven elements: Activity (Task) Name Duration (D) – Number of time units required to finish an activity Early Start (ES) – An activity can start as early as this date Early Finish (EF) – An activity can finish as early as this date Late Start (LS) – An activity can start as late as this date without delaying the project Late Finish (LF) – An activity can start as late as this date without delaying the project Slack (Float) – The amount of time that a schedule activity may be delayed from its Early Start date without delaying the project finish date Let’s take a small scheduling example and analyze its network diagram. The figure below depicts a sample project schedule. The network diagram for our sample project is shown in the figure below. We will now use the above schedule for doing activity resource assignments. Let’s assume the following things for further analysis: Only one resource is required for each activity. The resource skills are interchangeable. The tasks are noncontiguous and can be split. The project can use a maximum of 2 resources on any given day. Figure IV depicts early schedule of the project. It is made using forward pass dates. The top of the chart shows the resource requirement for each activity on each day of the project. It also highlights total available float in yellow. The bottom portion of the chart shows total requirement, availability, and shortfall of resources on each day. Figure V below depicts late schedule of the project. It is made using backward pass dates. Compare the Forward Pass Project Schedule with the Backward Pass Project schedule. You’ll notice that on some days there is a shortfall of resources while on other days there is an excess. Now let’s consider a resource optimized schedule. The next figure shows a resource levelled schedule where resources are completely utilized. This schedule was made using activity floats and by adjusting the Start and Finish dates. By doing this, we are able to fully utilize the available resources. This schedule can only be prepared by finding the activity floats and analyzing the network diagram. It should be noted, also, that this type of analysis is not possible just using tabular charts or a Gantt chart. Gantt charts are complementary to network diagrams, and they too should be used for project scheduling, but they do not provide the whole picture. Conclusion I believe network diagrams are extremely important for scheduling analysis, and network diagrams, as well as analysis of network diagrams, is next to impossible without a scheduling tool like MS Project. What do you think? Have you used network diagrams for project scheduling? Do you think they complement scheduling bar charts? Or, do you think project scheduling can be done without network diagrams? I would love to hear your comments below.

Do NOT Resolve Project Risks for Good Career Growth
Having been a project manager for all of my working life and now a teacher of project management skills for more than a decade, I always tell my students to follow sound project management principles and to manage risks proactively. Proactive project risk management is integral part of project management. In fact, I think good risk management is half of project management. That said, in this article, I am going to preach against proactive risk management. I will make a case for something that totally goes against my project management philosophy. I will talk about why proactive risk resolution is not such a good idea in the corporate world. What is Proactive Project Risk Management? Proactive project risk management is a five steps process. The steps are: Plan for risk management Identify risks Analyze, identify, and prioritize risks Document strategies to resolve prioritized risks Constantly monitor and control risks The fifth step involves implementing risk resolution strategies, those of which were documented in step four. I think, a career oriented project manager should perform all the five steps of proactive risk management diligently, but should stay away from resolving them as part of step five. Career oriented project managers should wait till the very last moment before resolving the risks. Let me explain it with the help of a project scenario. Project Risk Management Scenario Got Ham Inc. was a medium-sized IT services and consultancy company. They were awarded a major project from the government. The project was very prestigious for them. It was the first time they were working with the government. Naturally, the senior management of Got Ham Inc. wanted the project to be handled by the best personnel in the company. They appointed Bat Mahn as the project manager and Rob Hen as the lead sponsor. Bat Mahn was one of the most experienced project managers at Got Ham. He had proven himself many times in the past, and had an uncanny ability to complete challenging projects successfully. Senior management and customers loved him for his sharp project management skills. Rob Hen, unlike Bat, did not have any practical experience managing projects. He was a financial whiz measuring everything from the financial angle, and yet, somehow his financial management skills had given him a lot of success in the past. Bat and Rob had never worked together prior to this project, and Bat soon realized that it was very difficult to work with Rob. They had contrasting working styles. Bat was an experienced and diligent project manager. He took project risk management very seriously. He was ably supported by his team in identifying, analyzing, strategizing, and resolving the risks. However, Rob had completely different ideas. Rob thought that risk management was a complete waste of time. He would often proclaim that project management was all about solving real problems and that risks were not real. He would push the team to concentrate on project deliverables without looking at the underlying risks. Rob would always decline Bat’s requests for extra time or resources to resolve project risks. He would say that the good financial management is key to project success and that risk management is just a theoretical exercise. How do you think the project ended? Was it successful? Well, that’s a story for another day. However, I have a question for you. Does this story sound familiar? Have you experienced sponsors and/or senior managers interfering with your day to day work and saying risk management has no significance? I have experienced it many times in my career. On most occasions, project cost takes precedence over everything else in the project. Reactive Risk Management The truth of corporate life is that the execution always gets precedence over planning. Risk analysis is important part of planning, but it is not given its due importance in the corporate world. The risks are tackled as they become issues. In the corporate world, project managers who overcome hard times and solve real problems are rewarded in the performance appraisal. Meticulous planning and proactive risk management is somehow never recognized. What Should You Do? Is reactive risk management the right way to manage projects? Hardly! However, this is how many corporate projects are managed. I dare say that you should do the same if you want to grow in your career. You can follow the five steps of proactive risk management, but stop short of resolving the project risks. Yes, you should analyze the risks and have a plan ready for them, but wait till the very last moment when it becomes absolutely necessary to implement the risk resolution plan. At the same time, I would advise that you communicate heavily to the senior management how you overcame a very difficult situation. Conclusion Senior Managers (and even some project managers) don’t understand the difference between risks and issues. They think that risk management is a worthless exercise and that it is overrated. A good PM realizes that risk management is not only about resolving risks, but about following the complete risk management process. If you love your career, as I used to when I was working as a corporate project manager, you will heed my advice and not resolve project risks till the very last moment. What is your opinion about the risk management process? What problems do you face while doing it? How much support do you get from your senior managers for doing risk management activities? I would love to hear your opinion.

Why Time Constraint is the Most Important Project Management Constraint
Frederick P. Brooks Jr., in his famous book, The Mythical Man-Month, wrote, “Adding human resources to a late software project makes it later.” His statement is popularly known as Brooks’ law. Even before the book was published, project managers and other project stakeholders knew that project duration cannot always be shortened by adding more resources. However, customers and sponsors have always pushed project management teams to reduce timelines. In my previous article, I raised the question of whether or not duration estimation can be done without making any assumptions. In that article, also, I briefly mentioned that project time duration is probably the topmost concern of most project stakeholders. You might be wondering why project stakeholders give so much importance to the project time duration. Aren’t there other project management factors that influence a project? Let’s discuss the importance of time and other factors in project management. Project Management Constraints A project constraint is defined as a factor that limits the options of the project management team. Historically, project management literature recognized only three constraints: scope, time, and cost. These three were called the triple constraint of project management. The three constraints were deemed to be the three edges of a triangle that were firmly intertwined with each other. It was thought that changing one constraint would change at least one of the other two. This triangle is referred to as the project management triangle or iron triangle. Later, Quality was added as a fourth constraint that resided inside the triangle. Today, modern project management literature recognizes six project management constrains. These are scope, time, cost, quality, risk, and resources. It should be noted that a project could have many other constraints (political, geographical, and environmental constraints) apart from the six project management constraints. Importance of Project Management Constraints Project management constraints define the competing demands of a project. Different stakeholders have different needs. All the constraints are important and should be balanced for making a project management plan. Let’s take a look at a few examples. Consider a major sporting event like the Olympics. Such a mega event starts with an opening ceremony at a scheduled date and time. Do you think it is possible to delay the opening ceremony by a day or even an hour? No, with thousands of people in the stadium and millions of people glued to their TVs, the opening ceremony of such an event cannot be delayed. There is a hard time constraint on the start date and start time of such an event. A medical equipment company announces that it will launch a new pace maker on a designated date. Just before the launch of the product, the company’s’ engineers realize that there is a small snag in the design that can increase the chances of malfunction by a factor of 0.01%. They believe that they will need another 6 months and additional $10 million to rectify the snag. Should the company delay the launch, given that the chances of malfunctioning are just 0.01% and the potential loss of $10 million? Yes, here we are talking about human lives. If the product is good, the company can recoup the losses, but human lives cannot be compromised. The quality constraint is most important in such type of projects. A bulk mobile phone manufacturing company announced that it will launch their cheapest mobile phone for only $10. However, a few weeks before the launch, the company’s engineers realized that they will need to use slightly older technology to meet the internal cost objective. They believe that the cost of the end product cannot be increased, and that the sales will not be impacted by using older technology. Should the company move forward with older technology given that it will reduce the quality? Yes, the cost of the end product should be kept as low as possible because the company wants to produce the cheapest mobile phone. The cost constraint is paramount in such type of projects. A Government department has announced a public welfare scheme that should benefit every citizen. Can the department’s officials decide to leave out even 1% of the citizens to save time or cost? No, 100% of the citizens should be covered even if it means extra time and cost. The scope constraint becomes most important in such types of projects. The above examples are essentially programs, but they can be considered as projects to understand the importance of different constraints. After considering these examples, you can see that different projects have different objectives. We cannot say across the board that any one constraint is more important than another. Let’s ask another question thought. Why do project stakeholders treat time constraint as the most important constraint? Importance of Time Constraint Most people are involved with commercial projects in highly competitive industries. Usually, these projects are done to generate profit. The objective of such projects is to produce a for-profit service or product that can be commercially marketed. Any delay in producing the end result of such a project can reduce the time to market and lead to reduction of profits. As the often heard cliché states, “time is money.” You can see why most project stakeholders give more importance to the time constraint than any other constraint. Conclusion I think when Frederick P. Brooks Jr. wrote “adding human resources to a late software project makes it later,” he realized that most project stakeholders were giving too much importance to the time constraint. In subsequent years, his statement went on to become a law, which proves and the fact that most project stakeholders tend to focus on time constraint and ignore others. I believe a good project manager evaluates every recognizable constraint while defining the project management plan. The mantra should be to balance the competing demands of a project. Have you experienced a hard schedule deadline as a project manager? What is your take on time vs. the other five constraints? How do you treat them in your project? Can you share some real examples where the other constraints became more important than the time constraint? I would love to hear your comments below. Learn how an MPUG Membership helps individuals and teams become better project managers and Microsoft Project users through Microsoft Project Training. Join MPUG to attend live training webinars, access 500+ hours of on-demand sessions, receive certificates of completion and earn the Project Management Institute (PMI)® Professional Development Units (PDUs) that you need. Watch an MPUG training webinar for free and improve your Microsoft Project skills in less than 1 hour.