Reflection and growth are part and parcel of life. These processes allow us to not only think back, but also act. In Agile, we reframe these as “inspect and adapt.” Retrospectives in Agile provide such opportunities to inspect, adapt and grow. When done correctly, retrospectives can bring out the real pain points and show when team members were mad, sad, or glad! Indeed, it’s the most important event in Agile frameworks.
With the recurring event of the retrospective, we explore work accomplished and improve based on the results. For Scrum, it happens at the end of the Sprint, whereas for Kanban, it can be based on cadence. The improvement happens when the retrospective items are undertaken.
For this article, our case study will refer to the Hybrid-Scrum project modality. As with the Scrum framework, we will have retrospectives built into our Hybrid-Agile plan. But then:
- How do we manage these retrospective items?
- Can we create a separate Retrospective Board for it?
- Can dedicated resources be applied and tracked on the board?
Yes, we can, and we will see how in this article. At this stage, I’d strongly recommend that you review this article on Hybrid-Scrum management, before delving deeper.
Current Scenario: Our Hybrid-Scrum Project
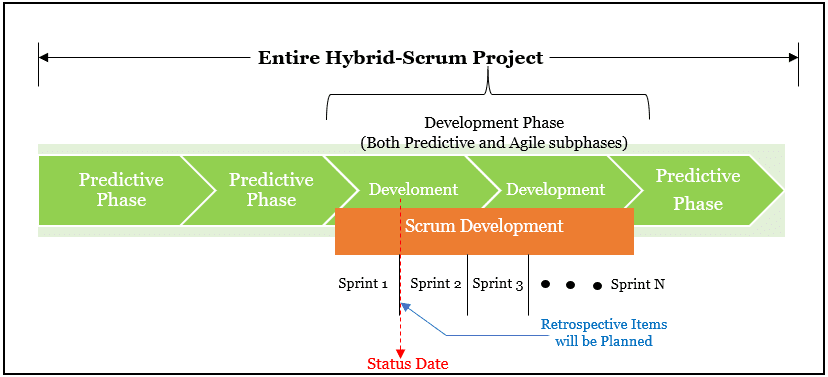
We will take the plan from our earlier Hybrid-Scrum project, where we have multiple Sprints planned along with the predictive/waterfall elements. One of the Sprints is complete and quite a few retrospective items were decided to be put into action. This is shown in the below figure.
 waterfall elements.” class=”wp-image-566264″/>
As shown in the multi-Sprints Scrum Development phase, we have completed Sprint 1. In the next Sprint’s planning meeting, the retrospective items that can be executed will be taken-up and planned for.
Next, let’s proceed with our creation of the Retrospective Board with the MS Project Agile software tool. The board will have retro work items. We will take the following steps.
Create isRetro Custom Field
As shown, first you have to create the isRetro custom field. It’s a Boolean Field.
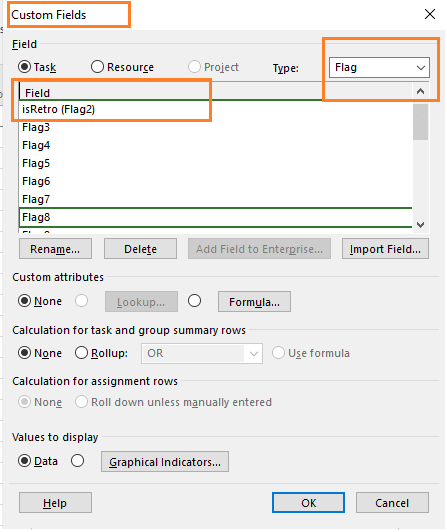
You don’t have to change the:
- Custom attributes
- Calculation for assignment rows
- Values to display
Just keep it simple for now. Further customization can be done if you choose.
Create a Retro Board Filter
Next, we will use the Retro Board Filter, a new custom filter. This can be created by going to View tab > Data group > Filter option > More Filter dialog box. Click on the “New…” command to create a new filter.
As shown below, the new filter created is the Retro Board filter.

The above filter has the following parameters:
- Show on Board is “Yes” or enabled.
- Summary (Tasks) is “No” or disabled.
- %Work Complete is 100%, i.e. incomplete work items will be shown.
- Active is “Yes”, i.e. only Active tasks will be shown.
- isRetro custom field is enabled for this filter. We created this custom field earlier.
Create the Retro Board
Next, we will create the Retro Board, which will include the Retro Board filter that we just created.
To create this board, go to View tab > Task Views group > Task Board drop down > More Views… command. This will open-up the More Views dialog box, where you can create a new Retro Board using the “New…” command.
As shown below, we have the Retro Board view available when the Retro Board Filter applied. Don’t forget to apply this filter.
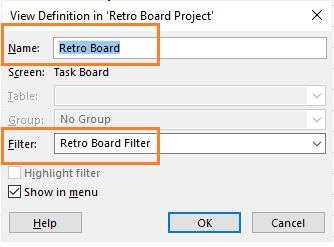
Be sure to enable the “Show in menu” option, which helps in showing the Board when you quickly need it.
Add the Retrospective Items
As retrospectives happen in your Hybrid-Scrum project, you can add the improvement work items into the task items and hence the board. For this purpose, I’ll create another summary task and put all my retrospective items under that summary task.
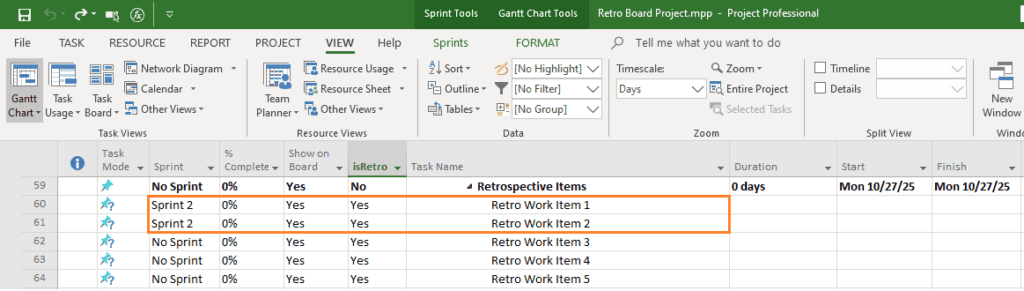
Now, you may be wondering, why not keep these items as parts of the Sprint? Because at this stage, you really don’t know which items will be taken in which Sprint, correct? Rather, the items will be prioritized and then taken. As shown below I’ve created a summary task called Retrospective Items, with a number of retrospective work items under it.
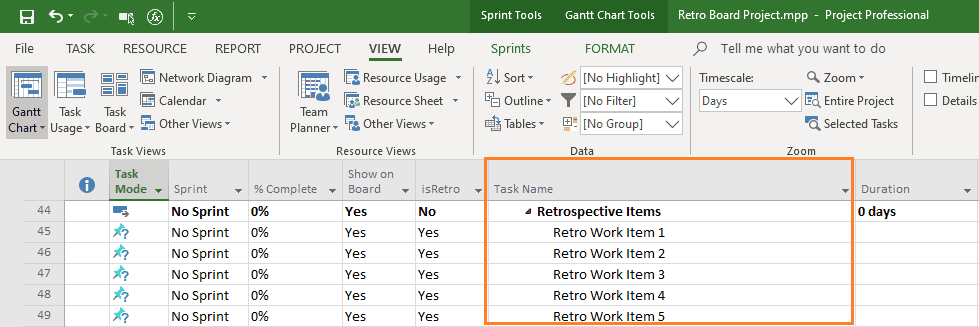
Also, as you can see in the above figure:
- No Sprint has been associated with the Retro work items.
- The Show on Board field has been enabled.
- The duration is not decided for the work items.
We can’t decide on the work items’ duration as that will happen during the upcoming Sprint’s planning meeting. Also, it’s a good idea and practice not to take more than three items for the upcoming Sprint. In my experience, a Scrum Team can complete at most one or two items for an upcoming short Sprint of 2-week duration.
Next, we are going to visualize these work items in the newly created Retro Board.
Visualizing the Items in the Board
From your current view, switch to the Retro Board. This can be done by going to View tab > Task Views group and then selecting the Retro Board from the custom section.
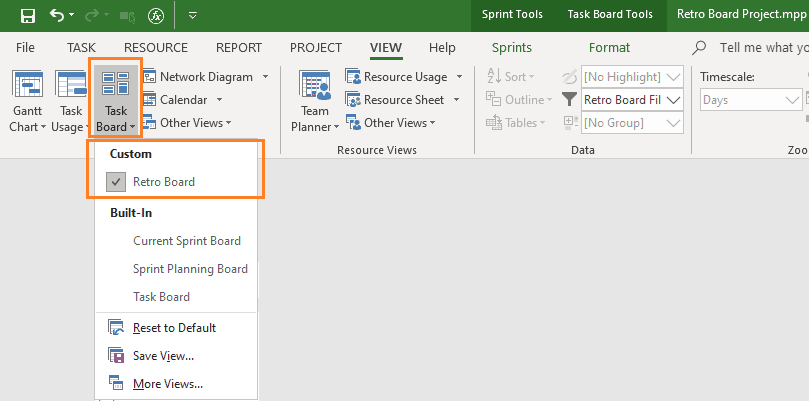
This will display the newly created Retro Board view.

As shown in the above Retro Board view, all the retro items are part of the Backlog column.
- There are other columns such as TODO, DOING and DONE.
- I’ve customized the existing columns by renaming them.
- % Complete values are also customized.
Note that there is no Sheet view related to the Retro Board view because we have not created one. As you proceed and use the board, we won’t be needing a sheet view. Hence, this corresponding view need not be created.
Associate Improvement Items with Sprints
Next, we are going to associate the work items with the upcoming Sprint. This will happen during the Sprint Planning Meeting for Sprint 2. Note that at this stage, Sprint 1 is complete with all its work items. Next, as you take the retrospective items for Sprint 2 and associate them with Sprint 2, you will have the following view in the Gantt Chart.
So, let’s see these items in the Retro Board view, too. But before that, one more twist! We have to customize the Cards to know the Sprints or which Sprint the retrospective work items belong to. This can be done by going to Task Board Tools > Format tab > View group > Format command. It’ll launch the Customize Task Board Cards dialog box, shown below.
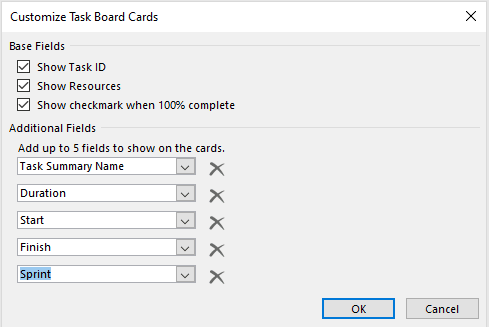
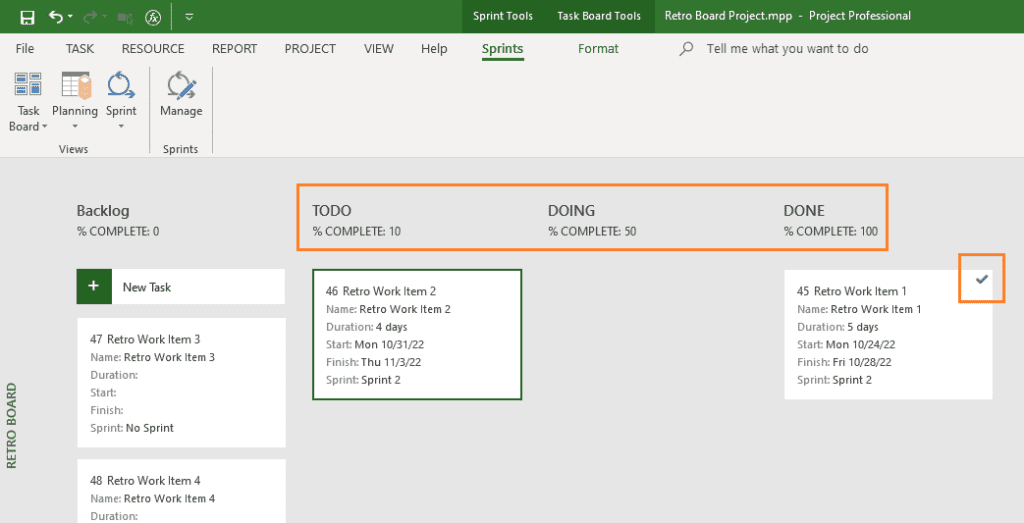
As shown, Sprint is now added as one of the fields, so that we clearly know which items are taken in which Sprint. With the retro board’s card customization, the Retro Board will now be populated as shown as below.
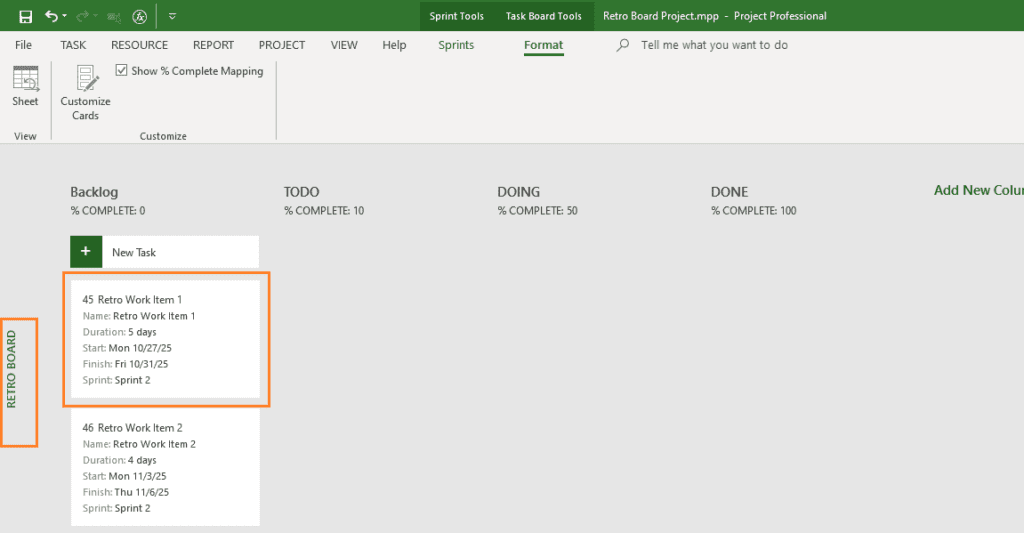
Now the cards are customized for each retro work item, and they show:
- ID, Names, Durations, Start and Finish dates.
- It also shows the Sprint names.
Customizing the cards provides you with a better visualization as you manage and track the items.
Manage Retro Work Items
To manage, simply drag and drop the work items, move them across the workflow states as with other work items in the Hybrid-Scrum project. When a work item reaches the DONE state, then you’ll find a tick mark towards the top right corner of the card. This is shown below.
If you have come this far, then you can quickly create a Retro Board, populate the work items, associate them with the Sprints, and track them to completion.
This can be seen as well in the Hybrid-Scrum project with all the elements of predictive and adaptive parts. It’s shown below.
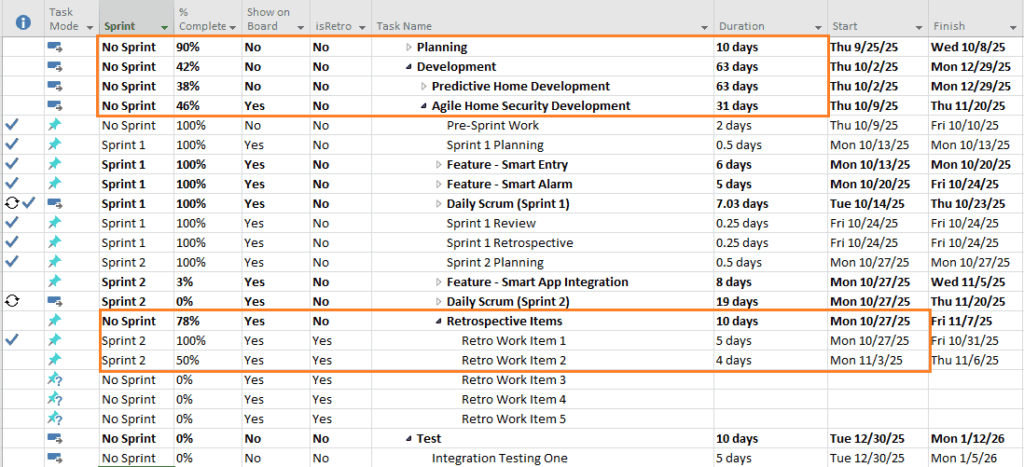
As you can see in the above figure, for our Hybrid-Scrum project, Sprint 1 is complete and Sprint 2 is currently under execution. For Sprint 2, you are not only completing the feature related work items, but also completing retrospective items.
Key Points to Note
As we reach the end of this article, here certain key points to note about the Retro Board and associated items:
- It can be used in Lean-Agile (Scrum or Kanban), or Hybrid-Agile projects. Hence, you don’t have to create a separate project. The created retro board is integrated in.
- Your team should take a maximum of two items for the next iteration or Sprint. When taken, they will be part of the Sprint Backlog. Ensure that they are tracked and completed.
- The retro items can be considered as part of the Burndown Charts and Burnup Charts.
Conclusion
As the saying goes, simple things are always easy to remember compared to complex things. I believe this is the simplest way to track the retro items in a separate board.
It is also a good practice to track the items in a separate board because the retrospective items are usually neglected by Lean-Agile teams as feature completion fever takes over considering the small iteration duration.
However, as I noted in the beginning, a retrospective is the most important ceremony among all and to honor it, you need to take and execute the retro work items. MS Project with its Agile (Scrum) features surely helps you in this regard.
References
[1] Certification Course: Certified Hybrid-Agile Master Professional (CHAMP), by Satya Narayan Dash
[2] Scrum and Microsoft Project: Agile Project Management Training, by MPUG.com
[3] Online Course: Mastering MS Project Agile, by Satya Narayan Dash
[4] Online Course: ACP Live Lessons – Guaranteed Pass, by Satya Narayan Dash
Related Content
Tracking A Hybrid-Scrum Project with MS Project Agile
Building and Managing A Hybrid-Agile Plan with MS Project
Lesson: Practical Scrum using MS Project Agile (1 of 3)

Elevate your project management skills and propel your career forward with an MPUG Membership. Gain access to 500+ hours of PMI-accredited training, live events, and a vibrant online community. Watch a free lesson and see how MPUG can teach you to Master Projects for Unlimited Growth. JOIN NOW


Ronald B. Smith, PMP
Nice article/work!