
Background
A number of organizations in the United States, including agencies of the US federal government, use a compressed work schedule to manage projects. A common type of compressed work schedule is known by the names 5/4-9 and 5/4/9. In this compressed work schedule, during each bi-weekly pay period, a full-time employee works eight consecutive 9-hour days, followed by one 8-hour day, followed by a nonworking day. This yields 80 hours of work per bi-weekly pay period and gives each employee a three-day weekend every other week. I personally find this type of work schedule appealing. If you need to use this type of compressed work schedule in your own projects in Microsoft Project, I will teach you how to create it in this article.
Solution
To create a 5/4-9 working schedule for your own projects in Microsoft Project, complete the following steps:
- Launch Microsoft Project and open a project in which you need to create the 5/4-9 compressed working schedule.
- Click the Project tab to display the Project ribbon.
- In the Properties section of the Project ribbon, click the Change Working Time button.
- At the top of the Change Working Time dialog, make sure you have the Standard calendar selected.
- In the Exceptions grid of the Change Working Time dialog, delete any company holidays you may have previously entered as nonworking time, which will leave a blank exceptions grid such as shown in Figure 1. At the end of this process, you can re-enter your company holidays, as needed.
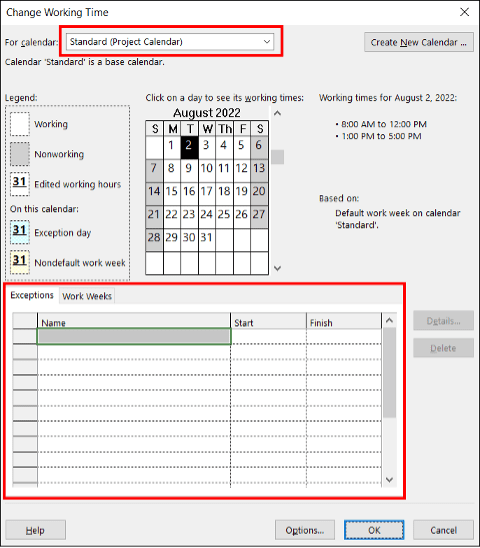
Figure 1: Change Working Time dialog
- Click the Work Weeks tab in the bottom half of the Change Working Time dialog.
- On the Work Weeks page of the dialog, leave the [Default] item selected in the data grid, and then click the Details button, such as shown in Figure 2.

Figure 2: Change Working Time dialog – Work Weeks page
- In the Details dialog, select Monday through Friday in the Select day(s) list on the left side of the dialog.
- In the Details dialog, select the Set day(s) to these specific working times option, and then enter 6:00 PM in the To cell for row 2, such as shown in Figure 3.

Figure 3: Details dialog
- In the Details dialog, click the OK button.
By completing the preceding steps, you have now set the schedule for every working day, Monday through Friday, to a 9-hour working schedule.
- In the bottom half of the Change Working Time dialog, click the Exceptions tab.
- In the calendar grid at the top of the dialog, scroll to and select the first Thursday that you want to set as an 8-hour working day. For example, notice in Figure 4 that I selected Thursday, October 13. Notice in the upper-right corner of the Change Working Time dialog that Microsoft Project shows the current schedule for that day as a 9-hour working day.

Figure 4: Change Working Time dialog – first 8-hour Thursday selected
- In the first blank row of the Exceptions data grid, enter 2nd Week Thursday – 8 Hour Day in the Name field, and then press the Right-Arrow key to navigate to the Start cell for that row (you may need to press the Tab key before you press the Right-Arrow key).
- With the first row of the data grid still selected, click the Details button, such as shown in Figure 5.

Figure 5: Change Working Time dialog – first exception entered
- In the upper left corner of the Details dialog, select the Working times option, and then change the 6:00 PM value in the To cell to 5:00 PM instead.
- In the Recurrence pattern section of the Details dialog, set the following options:
- Select the Weekly item
- Set the Recur every value to 2 weeks
- Select only the Thursday checkbox
In the Range of recurrence section of the Details dialog, leave the Start value set to the date of the Thursday you selected previously in the calendar grid.
- In the Range of recurrence section of the Details dialog, set the End after value to 260 occurrences. Entering this value will give you approximately 10 years of the compressed work schedule. Figure 6 shows the settings in the Details dialog.

Figure 6: Details dialog with 2nd Thursday settings
- In the Details dialog, click the OK button.
Figure 7 shows the Change Working Time dialog with every second Thursday set to an 8-hour working day. Notice in the upper-right corner of the dialog that the working schedule for Thursday of the second week is an 8-hour working day from 8:00 AM – 12:00 PM and 1:00 PM – 5:00 PM.

Figure 7: Change Working Time dialog – 2nd Thursdays schedule
- In the calendar grid at the top of the Change Working Time dialog, select the first Friday that will be a nonworking day. In my case, I need to select Friday, October 14.
- In the Exceptions grid, select the Name cell in the second row.
- Enter 2nd Week Friday – No Work in the Name field, and then press the Right-Arrow key to navigate to the Start cell for that row (you may need to press the Tab key before you press the Right-Arrow key).
- With the second row of the data grid still selected, click the Details button.
- At the top of the Details dialog, leave the Nonworking option selected.
- In the Recurrence pattern section of the Details dialog, set the following options:
- Select the Weekly item
- Set the Recur every value to 2 weeks
- Select only the Friday checkbox
In the Range of recurrence section of the Details dialog, leave the Start value set to the date of the Friday you selected previously in the calendar grid.
- In the Range of recurrence section of the Details dialog, set the End after value to 260 occurrences. Again, this value will give you approximately 10 years of the compressed work schedule. Figure 8 shows the settings in the Details dialog.

Figure 8: Details dialog with 2nd Friday settings
- In the Details dialog, click the OK button.
Figure 9 shows the Change Working Time dialog with every second Friday set to a nonworking day. Notice in the upper-right corner of the dialog that Friday of the second week is set to nonworking time.

Figure 9: Change Working Time dialog – 2nd Fridays schedule
Adding Company Holidays to the Compressed Working Schedule
Complete the following additional steps to add your organization’s holidays as nonworking time exceptions in the Change Working Time dialog:
- In the calendar grid at the top of the Change Working Time dialog, select the first company holiday after the date you selected for first Thursday that will be an 8-hour working day. Because I selected October 13 as the first 8-hour Thursday working day, I need to navigate to November and select Thursday, November 24, which is the Thanksgiving Day holiday in the United States.
- In the first blank row of the Exceptions data grid, enter the name of the holiday and then press the Right-Arrow key (you may need to press the Tab key before you press the Right-Arrow key) to navigate to the Start cell for that row.
- Leave the holiday row selected in the data grid, and then click the Details button.
- In the Details dialog, enter the information for the company holiday. For example, notice in Figure 10 that I entered the information for the Thanksgiving Day holiday, and set the holiday to recur 10 times (this creates 10 years’ worth of occurrences).

Figure 10: Details dialog for the Thanksgiving Day holiday
- In the Details dialog, click the OK button to create the holiday.
In the Change Working Time dialog, continue the process of creating company holidays for a one-year period of time after the first 8-hour Thursday selected previously in the calendar grid. In my case, this means I need to create the following company holidays in the following order:
- Thanksgiving Day 2022
- Christmas Day 2022
- New Year’s Day 2023
- Memorial Day 2023
- Independence Day 2023
- Labor Day 2023
Set up each of your company holidays so that they recur 10 times, which will give you 10 years of company holidays. You will probably also need to create exceptions when a company holidays occurs on a Saturday or Sunday, according to your organization’s holiday policies. Figure 11 shows the Change Working Time dialog with all our organization’s company holidays entered as nonworking time.

Figure 11: Change Working Time dialog – company holidays entered
At this point, you have finished setting up the Standard calendar with the 5/4-9 compressed working schedule, along with your company holidays. Click the OK button to close the Change Working Time dialog.
Changing a Project Options Setting
After successfully setting up the Standard calendar with the 5/4-9 compressed working schedule, there is one option that you will need to change in the Project Options dialog. This option defines what constitutes a “Day” in Microsoft Project. To specify this setting, complete the following steps:
- Click the File tab, and then click the Options tab in the lower-left corner of the Backstage.
- On the left side of the Project Options dialog, click the Calendar tab.
- On the Calendar page of the dialog, change the Hours per day value to 9, such as shown in Figure 12.

Figure 12: Project Options dialog – Calendar page
- In the Project Options dialog, click the OK button.
At this point, you are now ready to begin using the 5/4-9 compressed working schedule in your Microsoft Project schedules.
