 In MS Project, filtering is a way to see or highlight only the task or resource information that meets the criteria you choose. Filtering does not change any underlying data but changes what data is displayed. You can use filters in two ways. Apply an AutoFilter from a column heading in a table or apply a built-in or custom filter you create to your view.
AutoFilter
When you have a quick, ad hoc, or simple question, use AutoFilter (think like from within Excel). To display a task-centric or resource-centric view that includes a table, I would recommend using the Gantt Chart or Resource Sheet views.
If you click the arrow icon in the column heading that you are interested in, you will see a drop-down menu that covers sorting, grouping, or applying a simple filter based on the data in the column. Filter choices vary depending on the column chosen. Highlight Filters and select the filter you want (i.e., for the Duration column, you could select the 1 day or less) and only the data you’ve selected will be displayed. On most of the filter choices you pick (i.e., Equals or Custom), you will have to insert simple information (i.e., number of days) in a pop-up Custom AutoFilter dialog box which is like a simple version of a filter definition. Then, click OK to display the data you want. After the selected data is displayed, you will notice the arrow icon has turned into a funnel icon. To remove the AutoFilter and get back to your original screen, click the funnel icon and then Clear Filter from [field], which is Duration.
Built-In Filters
In the View tab’s Data section, click the Filter down arrow, and you will see a drop-down menu that shows about a dozen commonly used Built-In filters (i.e., Late Tasks and Milestones), Clear Filter, New Filter, and More Filters. In total, there are about four dozen built-in filters to choose from. The built-in filters can act as tutorials when you want to create your own custom filter.
Custom Filters
As mentioned, when you click the Filter down arrow, you will see the New Filter option. I would rarely use this option because I don’t want to start from scratch. Instead, I recommend using More Filters to find an existing regular filter that meets my needs. This is shown in Figure 1. Remember to click Apply. If you are viewing a Resource Sheet, you will see a different set of filters. So, let’s look at different types of tests for tasks you can make.
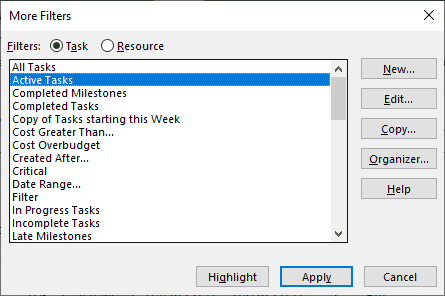
Figure 1: More Filters for Task
Single Tests compare a field with a particular text string, number, or some other value. See Figure 2 which shows the provided Milestones filter. If you Edit and Save it, use a more descriptive file name. Notice there is a check mark to the right of file name (shown in menu), which means when you use the filters pull-down menu, you will see this filter listed towards the top under Custom. If you un-check this cell, you will be able to find this filter under More Filters.
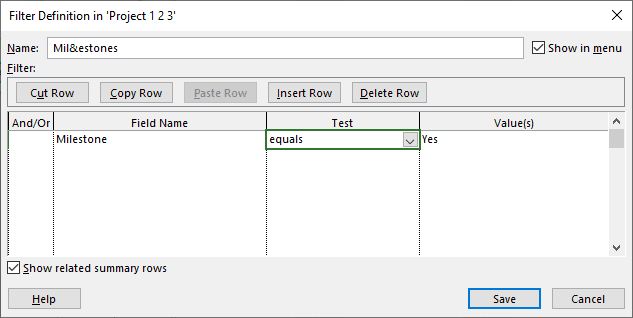
Figure 2: Single Tests
Notice that in the above figure that the pull-down arrow to the right of “equals” is located in the test column. Other tests available in the pull-down-menu are does not equal, is greater than, is greater than or equal to, is less than, is less than or equal to, is within, is not within, contains, does not contain, and contains exactly. We could use does not equal with a No value to get the same result.
Multiple Tests, such as using And/Or, are basic operators from Boolean algebra specifying that an item must pass both tests or only one. Let’s look at the second line (and) in Figure 3 from a modified Figure 2. The Test (is within) and the values are 0,99. This means the value must be equal to or between the two values you specify. The second line could have the same meaning by changing the Test to “is less than” and changing the Value to “100.” Also, notice the name changed to Copy of Non-Completed Milestones.
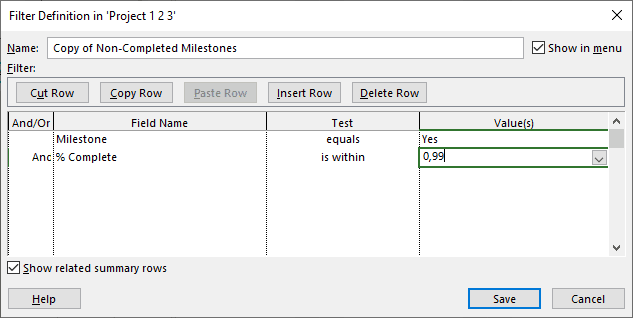
Figure 3: Multiple Tests
Interactive Tests come into play when a filter is used, but you want to filter by a different value each time you use it. Let’s say, I want to know what tasks start on a particular day, so I use a regular filter – Tasks starting this Week. See Figure 4A for the Filter Definition, and notice the value “Enter the start date”? Always make sure the value text is enclosed in double quotes and then a question mark. The question mark after the quotes tells Project that this filter is interactive. If you Apply this filter (refer to Figure 1), you will get a Dialog Box shown in Figure 4B. You can type in the date or use the pull-down arrow to pick the date from Project’s calendar. Click OK to execute and display the results.
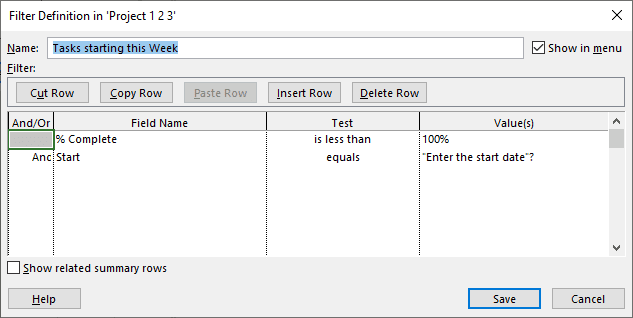
Figure 4A: Interactive Tests
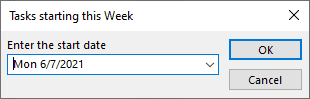
Figure 4B: Dialog Box
Comparing Fields can be helpful when you are trying to come up with some useful information on how your project is coming along. In Figure 5, the filter is checking to see if the Finish field is greater than the Baseline Finish field. If it is, then you know the task is slipping and you should check it out. Notice in the Values column you see “NA” which means “not applicable.” Project uses this value to mark some fields that do not yet have a value. Note: Some filters will not have a check mark for “Show in menu” after the file name, but you can check it if you want to show it at the top of the list under “Custom” when you use the filter’s pull-down menu.
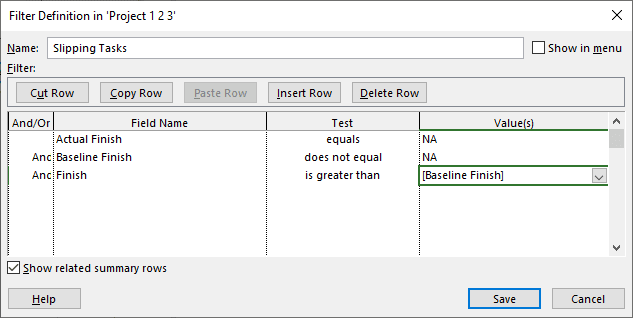
Figure 5: Comparing Fields
Overseeing Filters
Periodically you will have a need to copy, rename, or delete a filter. If you click the Organizer button (refer to Figure 1 again), you will see a dialog box like the one pictures in Figure 6 open for the Filters tab.

Figure 6: Organizer Dialog Box
Click the filter that you want to change and the required command button to make the change. The two arrows on the Copy button switch direction when you select a filter from your project on the right side. All the other tabs have a similar structure: elements in the global template appear on the left side and the elements that have been used in the active plan appear on the right side. I would recommend you explore the other tabs. If you do, you will soon realize the Organizer is a powerful tool for managing your projects. Another way of finding Organizer is go to the file tab and selecting “info” from the left side of the backstage view. In the area to the right, click the “Organize Global Template” button to open the Organizer dialog box.
Summary
As you can see, regular filters are a valuable tool and one that will save you a lot of time looking for task or resource information that can be important to running your project. Remember, regular filters hide the details that don’t meet its’ criteria.
If you want to see the whole schedule with your filtered choices, you should use the yellow highlight feature by clicking the highlighted down arrow, which is above the Filter down arrow. The Highlight and Filter features offer similar options. For example, if you had 100 tasks and you ran the regular filter for late tasks, you could display 10 tasks that are late. If you ran the highlight filter for late tasks, you would see the entire schedule and the 10 late tasks would be highlighted in yellow.
Any related comments would be appreciated.