Please find below a transcription of the audio portion of Praveen Malik’s webinar, Ten Best Microsoft Project Tips, being provided by MPUG for the convenience of our members. You may wish to use this transcript for the purposes of self-paced learning, searching for specific information, and/or performing a quick review of webinar content. There may be exclusions, such as those steps included in product demonstrations. You may watch the recording of this webinar at your convenience.
Melanie: Welcome. Hello. Welcome to the Ten Best Microsoft Project Tips and Tricks. We’re excited to be here with you today. Please join in today with questions and comments. You can post questions to the question chat window. Just click and drag that window out of the control panel for easier use so it’s easier to type questions in there. I’d also like to take one moment and announce this event that just gone onto our schedule using Agile PM with Microsoft Project online. The authors for this session also did the Agile section in the Microsoft Project step-by-step, so please join in for that next week.
Melanie: And our PDU activity code is on the screen. We are going to be doing some polls in the beginning of the session, just so we can anonymously get familiar with each other and have our speaker get familiar with you as well. So you’ll see those coming up in about a minute here. And now I’d like to introduce our organizer and speaker for this event, Praveen Malik, PMP. Praveen has two decades of experience as a project management instructor and consultant. He regularly conducts project management workshops in India and abroad and shares his project management thinking in his blog, PM-by-PM. Welcome Praveen.
Praveen: Thank you Melanie. It’s nice to be here on board with everybody here, and I’m thinking that this session is going to be useful for everybody. Let’s just hope for the best. So as Melanie said that this session going to last for about an hour and we will hold 50 minutes of discussions that as I’ll tell you a few things about Microsoft Project, and after our 50 minutes you’ll get a chance to ask questions and I’ll answer them. Of course, you can ask questions in the chat window at any point in time, but the last 10 minutes are reserved for the question-answer sessions only. So talking about myself a little bit, Melanie has already given a small introduction about me, but let me just briefly say that my Microsoft Project experience dates back to 1998 when I first got accustomed to it.
Praveen: My manager at that point of time just told me, “Okay, this is Microsoft Project, go ahead and create a Microsoft schedule, a project schedule.” And I didn’t have any idea of what MSP was. I didn’t have any knowledge about what scheduling is or how to do all these things. I was new at that point of time, but then I got the hang of it. Of course, I learned by doing a lot of mistakes at that point of time because we didn’t have the internet resources at that point of time. But nowadays you have plethora of resources on internet. You have a lot of books on Microsoft Project, so it’s quite easy to get a hang of it.
Praveen: And secondly over the years Microsoft Project has grown more internship and more user friendly. So having said that, it has been nice experience over the years. I have used Microsoft Project consistently over so many years now. And it has given me a lot of experience and knowledge about how MSP works, what are the pitfalls, how to use it in the best manner possible. So without taking too much of time on about my introduction on Microsoft Project and anything else, I’ll just start with the topic at hand.
Melanie: Praveen, our first poll as well has come in. So have you done planning using Microsoft Project? 56% of respondents use it extensively and 44% said they have created small plans.
Praveen: That’s good. So most of the people have used it, whether they have created small plan or they have been using extensively. That’s very good. And so they will be able to follow me and I hope they will pose some serious questions.
Melanie: And I’m also sharing the poll about expectations for the webinar.
Praveen: Okay. So, I’ll wait for maybe one more minute before I start, let the people answer the poll question.
Melanie: And we’ll share this poll as well. So our expectations from this webinar, 93% of the audience wants to get new insights. 4% wants to earn PDU and 4% want to start using MS Project.
Praveen: Okay. So its new insights then?
Melanie: Yes.
Praveen: Okay.
Melanie: And then let’s do one more for ease of usage. So how would you rate Microsoft Project on ease of usage? And we’ll share that poll as well. So 3% thought it was very easy to use, 26% easy, 65% neither easy or difficult and 6% difficult.
Praveen: Okay.
Melanie: Thank you so much.
Praveen: So most people think that it’s neither too difficult nor too easy. That’s okay.
Melanie: Just enough to get in trouble.
Praveen: Yeah. Okay, so let’s get started. So I created a small PPT for the topic at hand, I’ll just go to the first slide. So the topic as Melanie had already told you about it’s the Ten Best Microsoft Project Tips for the beginners. So we already see that most of you are using it extensively or at least have used a little bit of it, so you are not exactly a beginner.
Melanie: I don’t have your screen up yet, can you share your screen?
Praveen: It’s not there, okay, I’m sorry for that. [inaudible 00:07:04]
Melanie: Now I see your PowerPoint.
Praveen: Can you see that?
Melanie: I see your PowerPoint deck.
Praveen: Okay. And can you see my Microsoft Project screen?
Melanie: Yes I can.
Praveen: Okay, then that’s great. Okay, let’s go back. Okay. So let me just restate the topic, the best 10 Microsoft Project tips for beginners. So we already know from the full questions that there are no bigness here, most of the people have been using it extensively and many of you also have used it for small projects. So, that way it’s not for the beginners, but I’m saying you are not really the beginners but I’m sure this session is going to be useful for you. So we’ll talk about 10 points, 10 things that you’ll find useful when you are starting to create a Microsoft Project schedule. So what I’ve done is I’ve created a slide deck where we are going to talk about these 10 points, and the first point… I’ll go point by point. And the first point is define the project start date.
Praveen: So I’m just jumping over to Microsoft Project and I’ll show you what start date is and how do you define it. So this is the Microsoft Project screen and you see the top menu over here, you have file, task, resources and there’s a project menu over here. And when you go to the project menu, there is something called project information. So if you click on it, a small dialogue box opens up and by default you’ll see the start date as today’s date which is 4/52022. Now here I’m in India, so by default Microsoft Project uses DD/MM/YY format.
Praveen: So if you are in United State you will see maybe MM/DD/YY format. And of course you can set it up, you can change the format. So I’m not going into the how to set up the format or do those kind of things, but we’ll stick to the point at hand which is the utility of start date and how to set it up. So by default it is today’s date but if you want you can change it. You can just click on this drop down here and a calendar will show you, it’ll show you a calendar and then you can select any date that you want. You want let us say coming Monday, you can say 9/5/22 which is May 9th 2022. And you will also see field for the current date, which is of course today’s date. So I’m not going into the rest of the fields here because we need to concentrate on the start date. So whatever the start date may be, so you should define it and why you should define it I’ll come to that in a minute.
Praveen: I’ll just go over to the second point, I’ll explain what the second point is and then come back to this point and through an example I’ll show you why do we need a start date and what happens if you don’t have a start date? Okay, so this is… I have set it up for 9/5 which is May 9th, I’m just saying okay here and let us go to our power point. So the second point here is change the default task setting to auto schedule. So going back to the Microsoft Project. So by default the task in Microsoft Project are manually scheduled. And as soon as you open up new project, you should change that to auto schedule. So what is manually scheduled? What is auto scheduled? Let’s just understand it in a minute. Right now if you see on the bottom of the screen it says new task manually scheduled.
Praveen: So manually scheduled is also okay. Let’s just look at an example first and then I will be able to differentiate better. So let’s say I have a task alpha and I have a task bravo. Now both are manually scheduled here. Here you’ll see in the second column task mode, in the task mode if you click on that drop down here it has automatically selected as manually scheduled, but you can change it to auto scheduled if you want. But right now let us keep it at manually scheduled. So I have a task called alpha, I have a task called bravo, and what I want to do is let us say… you will see that there is no start date here. I want to select a start date. So we wanted to start the project on 9th, so let’s say ninth year, and let’s say the duration for this task is two days.
Melanie: Praveen, quick question from the audience. Can we start the start date earlier than today’s date?
Praveen: Yes you can. You can, I’ll show you. I’ll go back to the project information dialogue, I’ll show it to you.
Melanie: Thank you.
Praveen: Okay, so this is alpha, so when you set two days it automatically calculated the finish date as 10/5 which is 10th of May. And similarly let us say this is a three day task and I want to… I don’t want to put a date here, I’m just saying the predecessor. I just want to have the predecessor as .alpha for the task one. So I’ll put number one here in the predecessor column. If I put predecessor as one, what it means is that bravo is dependent on alpha and it should start immediately after alpha is finished. So let me press enter here. I have put already entered number one, let me press the enter key. So when you press the enter key, this is what happens that automatically the data is calculated and the start date is calculated, which is 11/5, and the finished data calculated as 13/5 which is three days from 11/5.
Praveen: So now I have these two tasks, let us go to project information. And here I had the start date as 9/5. Now let me change the start date to… let us say for the timing to 13, something I’m just putting a number here. So now even though I have put the start date as 13, these two dates are not changing. Biologically they should change, why they should change because the project started itself with 13. So the first task should start at least on 13 if not be after that. So this is not happening because these tasks are manually scheduled. Basically the thing… the difference between manually schedule and auto schedule is that whenever you change something in the system, whatever that may be, the rest of the things should be automatically calculated.
Praveen: If the tasks are manually scheduled, then those things are not automatically calculated, but if they’re auto scheduled then those things are calculated. So, let’s take another example. Let us say instead of two days, I am putting it as one day here. So now when I put one day here, the task was started on nine. The task started as nine and finished it is also nine that is starting in the morning and finishing in the evening. But if you see bravo start date has not changed, it’s still 11th. Let me just undo it.
Praveen: So this was a previous date that is two days starting on nine and finishing on 10th, and then bravo finish the starting on 11th and finishing on 13th. So now what I’m going to do is instead of two days I’m putting the duration as one day, by putting it as one day the finished date of alpha will change, but start date of brow is not changing. The reason is that these tasks are manually scheduled. So what I’m going to do now is… so we will use our best practice, that the best practice is that the all task should be auto scheduled. So what I’m going to do is I’m going to make it auto scheduled and new tasks also at the bottom of screen, I’m just saying all the new tasks should be auto scheduled. So whenever I add a new task here, now a third task here it’ll be auto scheduled.
Praveen: Let’s say I add a task called Charlie here. Now you will see this is also auto scheduled in the third call. So rather than going into the column and changing task by task from manual schedule to auto schedule, you can just go to the bottom and change that task from manually scheduled to auto schedule. There are users of manually scheduled tasks also, the users comes when you don’t want Microsoft Project to do the calculations for you. You want to have a complete control over your schedule, but in most of the situation you want Microsoft Project to do the calculations automatically. Otherwise, things like these will not happen. Like this task is finishing on a particular date and this task should start immediately after that, if it is not auto schedule it’ll not start immediately after that. And that might create a problem in your project schedule.
Praveen: So right now I have over two or three tasks, but if you have hundreds of tasks you cannot possibly look at all the tasks and the start dates and the finish date of all the task and see whether it should have started or not started, or the start date is correct or incorrect and all those kind things. So it’s better to leave the things that are auto calculation more and let Microsoft Project tell you what it is doing and what it is not. Okay, so coming back, what I did was I just made them auto scheduled, and you would notice that it automatically… the start date of this task, alpha became 13th because our start date for the project was 13th, right? So automatically it calculated it. So, now let’s take that question that we had, can start date before today’s date? Yes, it can be. So let us say I wanted to start this project on, let us say April 25th.
Praveen: So I’ll say, “Okay,” so it’ll not give me any warning or anything like that. It’ll just say, “Okay, do you want to start on 25th April?” I don’t mind it, you go ahead and do it. What I’m going to do is I’m automatically going to calculate everything for you. So now you’ll notice that since we changed the project start date to 25th, alpha is starting on 25th, finishing on 25th. Bravo which is a successor to alpha is starting on 26th and finishing on 28 or whatever. And Charlie has no predecessor, so the Microsoft Project is all thinking that Charlie will also start on 25th. Now whenever Microsoft Project does any calculation, it highlight the changes in a light blue color like this. So for example right now what I’m going to do is I’ll just say instead of one day for alpha, I’m going to make it let us say two days again. Okay. So, when I press the enter key here, it’ll change the alpha start date… Oh, sorry. It’ll change the alpha finished date and it’ll change bravos start and finish date. So let’s see, I’m pressing enter.
Praveen: So, that’s what it has done. It has changed the finished date, it has changed the start date and finished it of Bravo. And you will see that these three cells are highlighted in blue. Microsoft Project is telling me that these are the three cells I have changed. If there’s anything wrong, please take notice of it, make a note of it and do the necessary if you want. Okay, so going back to our Microsoft Projects slide. So these are the two things that we discussed, so quickly let me just summarize. You want to define the project start date upfront at the very beginning, because it is possible that the start date might change after you scheduled your project. So let’s say today you wanted to start the project on 9th of May, but for some reasons after two days that maybe client informed you that no the project has to be started on 15th of May, so you have to change the start date. So you don’t want to change the whole schedule, you just go there and change the start date and Microsoft Project will do this other calculations for you.
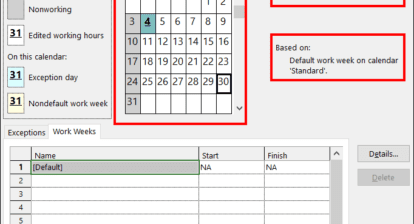
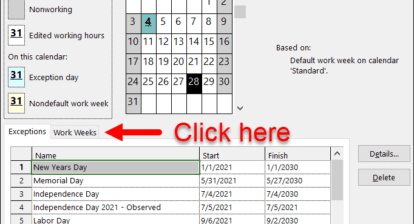
Praveen: And second point is related that if you want Microsoft Project to do the calculations for you, you want to change the default task setting from manual schedule to auto schedule. Let’s go to the third point, define your project calendar. Let’s go back to Microsoft Project. Okay, so if you go to the project menu, there is something called change working type. And if you click on it, you’ll see a fancy screen over here. This is a project calendar. So by default Microsoft Project has three calendars, 24 hours calendar, night shift calendar and standard calendar. I’m not going into too much of detail, I’ll just stick to the point that you should have a calendar. But let me just briefly tell you that 24 hour calendar means that the people are working 24 hours a day. And so of course the same person will not work probably 24 hours, they might be three shift or something like that. Or maybe there are equipment which are being used 24 hours a day. So in those cases 24 hour calendar is useful.
Praveen: Night shift calendar is useful when you have a night shift. So from let us say 8:00PM in the evening till let us say maybe 4:00AM in the evening or something like that. Again, if you want you can change these calendars. By default the Microsoft Project uses a standard calendar. Standard calendar means a normal day calendar, which says if you look at this portion here, it says the working times are 8:00AM to 12:00PM, and then 13:00PM… or we can say 1300 hours to 1700hrs. So what it essentially means is that Microsoft Project is saying that it is a eight hour working day, with a one hour break in between. If you want you can change these working times also. Again, I’m not going into that thing because I’m not talking [inaudible 00:24:12] What I want to tell you is that right upfront you should define your project calendar. What does it mean? So, our project was starting on… right now it is starting on 25th April, and let me just close it for the time being.
Praveen: And maybe Charlie let me just say the predecessor is number two, which is… and Charlie the duration is let us say four days. So right now if you see the project is starting on 25th and finishing on 5th of May. So I’m going to change working time, what I’m going to do is I’m going to add a holiday. Let us say for some reason… let us say this 3rd of May is a holiday. So what I’m going to do is I’m saying some holiday, and I’m saying third is a holiday, third start and third finish, and I’m clicking okay. So as soon as you click okay, so what will happen is you will see that Microsoft Project has made this cell as blue, which is the finished date of Charlie has changed from fifth to sixth. Why it has changed from fifth to sixth, because third is a holiday.
Praveen: So going back to change working time, let’s take one more example. Let us say… I’m just saying another holiday. And I’m saying fourth is also a holiday for some reason. So I’m saying okay. The date has changed from sixth to ninth, why six to ninth? We’ve taken a one day holiday. The reason is that Saturdays and Sundays are counted as weekend and a holiday. So, third is a holiday, fourth is a holiday, fifth and sixth they’re Saturday and Sunday. [inaudible 00:26:39] So the project at the Charlie will finish on 9th of May.
Praveen: So, basically what I’m trying to say is if you do not have this calendar, these dates will not be automatically calculated and obviously for every project you have some holidays in between. So I have a small exercise for you and that exercise involves read more about project calendars. Read what 24 hour calendar is, what night shift calendar is. Can you make a six day working calendar? [inaudible 00:27:19] A five day working calendar? Can you make it six day calendar? If yes, how? Can you add a new calendar? Yes, you can. There’s a button here. Create a new calendar If you want to. You can, if you want to. So that’s another exercise. Create a new calendar and see and play around with it and see how it happens. Read about task calendar, read about resource calendar. So these are like… I’ve given a whole list of tasks to you. I’ll just open the note. [inaudible 00:27:57] Yeah.
Melanie: Before you switch off this screen with the [inaudible 00:28:02] we have a question from the audience. I cannot change a task from auto to manually scheduled, is there a setting that is preventing this change?
Praveen: See, there is a setting that I know. So the person should… let me just close that first. So if you click on the bottom of the screen, this should come up. Auto scheduled, manually scheduled. That happens every time. If you have it disabled, then again you can do it. For each task you can do it from here in this column but if both the things are disabled, then you have to go to settings. So you go to file and there is options here and there are so many settings here. I don’t remember on the top from top of my head, how to do it, where the exactly that setting is. But if you search for it about, I think it’ll be scheduled somewhere and you can change it. By default, it might not be allowing you to change but you can find the adoption somewhere here and right now I can only… yeah, here it is. New tasks are created auto scheduled here, just check in your Microsoft Project setting what does it say here in the project option schedule and there’s a drop down here.
Melanie: That’s super helpful, thank you. There’s another question while you’re on here.
Praveen: Yeah.
Melanie: What I find difficult is that duration can be a week, [inaudible 00:29:52] during that week for that task is not a hundred percent. It will only be four hours out of the whole week, how do you show that?
Praveen: Okay, that can be done. That’s not part of the points that I wanted to cover but let’s take this question at the end of the webinar. The 10 minutes that we have done it for Q&A. So let’s take up this question because it’s going to take up maybe three, four minutes to explain about duration, and effort and maybe related things. So just hang on to your question for a little while and we’ll answer it, of course IF the time permits. Okay. So going back, I wanted to write down something, the exercises that I was talking about. Read about these things. Task calendar, resource calendar, 24 hours calendar and night shift Calendar and lastly, create a new calendar. Let’s not read about… read about those four calendars and create a new calendar for yourself. Okay. So I hope… I’ll just give you five seconds to note it down. Okay, let us go to our presentation. Okay, let’s look at the fourth point. So it says create a complete list of tasks. Create a complete list of task means…
Praveen: Like this is a list of tasks, Alpha, Bravo and Charlie. So whatever the tasks are there, please first of all identify those tasks in your project and create a complete list of those tasks. So I have another project schedule here where I have just entered some tasks. So I entered 11 tasks here. Just to save some time, I just entered it before the session began. So it says interview users, old system walkthrough, old documentation study, document requirements, use case analysis, present requirements document, get requirements approval, create prototype, create system architecture, create DB design and create design. Oh sorry, get design approval. So I created these 11 tasks. So it is not important what these tasks are.
Praveen: Maybe some of you might have realized it’s about something about to do with requirement analysis and design of a project. Now it could be a software project, it could be maybe a machine requirement, requirements and design of new machine, or it could be anything else also. But basically, the thing is that I have listed down all the tasks without thinking about what the duration of the task would be, what would be the start date? What would the finished date? I just list it down the task. I’m just going to do a change it to auto scheduled, all the new task. And what I’m going to do is make this task also as auto schedule. I’ll have to do it now one by one, because I didn’t do it here. Okay, my bad. Okay, just take maybe 20 more seconds. Meanwhile think about your questions. put it on chat.
Praveen: Okay, here we go. I just added these tasks and automatically you have the start date and finished date and the duration as well. But don’t worry about the duration start and finished date right now, don’t worry about the start date of the project also. I’ve taken it as default as today’s date. What I’m trying to say is that you should create a completive list of tasks before doing anything else. The reason here is that if you have… the project is about listing the tasks and then completing those tasks. So first, if you have the list of tasks then only you should start scheduling. Then only you should start putting up your duration and the start and finished it. If you miss out any task, then it’ll create a problem at a later point of time.
Praveen: Let us say, I have 11 tasks here but let us say a project would have easily have maybe 200, 500 tasks, or maybe sometimes even more than that. And I have entered maybe 200 tasks but I didn’t do with auto analysis and later when I started doing the project, I’m halfway through the project and I realized, “Oh, I have missed maybe 50 tasks.” In that point of time it’ll create a serious problem because initially you didn’t think about those 50 tasks. Of course, in a real project, you will tend to miss out maybe a few tasks five, 10 tasks here or there but that is pardonable, that is given because we are all humans we tend to miss a few things here or there. But we should do a deeper analysis before actually beginning the project so that we do not consciously lose out the tasks.
Praveen: Okay. So going back. Point number fifth is, do not assign dates and duration at first which is what I have already told you. this one. So do not worry about what the duration is, what is the start date? What is the finished date? Do not worry about this at point at the point of time. Just concentrate on listing down all the tasks. Even if it is going to takes you two days, five days a week just to let down the task, do that. Of course it’ll depend on the size of the project and the complexity of the project, but do that first. Let’s go to point number six. Create WBS using indent and outdent. WBS is a acronym for work breakdown structure. So I’m not going to explain what work breakdown structure is.
Praveen: Most of you would know about that but basically work breakdown structure means that you divide the whole project into smaller, more manageable tasks. So there’s a higher level task and then there are lower level tasks. So what I’m going to do is I’m going to write out a list of tasks, I’m going to change it to a proper WBS. So what I’m going to do is I’m going to insert a task right at the beginning. So how do you insert? You just right click here and you say insert tasks. So automatically Microsoft Project will insert a task here. So I’m going to say requirements analysis here and all these tasks, that is number two till number eight, are part of requirements analysis. So what I’m going to do is I’m going to shift them inside, that is indent. How do you do that? To go to task here and click on indent task. There’s a small green right arrow. If you take the mouse over it, it’ll say indent task.
Praveen: So click on indent tasks. So what will happen is now all these tasks are shifted inside and this requirement analysis is the major task, this is called summary task. What is the meaning of summary task? I’ll tell you in a minute. Let me add another task here. So I’m going to add another task in between and let’s say design and I’m going to the tasks below it. Okay, because the design is also shifted so I’m going to outdent it. So just like indent you have an outdent which is a left arrow. Okay. So I have two summary tasks requirement analysis and design. So this is a WBS. WBS means you have a higher level task which is called requirement analysis and then you have a lower level task which is called all these tasks. If you want, you can go to another level also. So let us say I wanted another indentation. So I’ll just insert one more task here, I’ll just say collect requirements. What I want to do is these three task number three, four and five. These are three ways to collect requirements so I’m going to indent them here.
Praveen: So it’s not important whether you are understanding the task, or the nature of the task, or the meaning of these tasks, it is not important. What is important is that I have a higher level task then I have a slightly lower level task and then I have a lowest level task, which is this one. So the higher level tasks are called summary tasks, right? And similarly design is also a summary task. So what is a purpose of the summary tasks? So for example, let us say interview user is a one day task. So Microsoft Project is automatically you will notice calculating the start and finished date and all system walkthrough it will happen after interview users. So I’m putting a predecessor heres three days and I’m just putting a predecessor as four here. Okay.
Praveen: So for all system walkthrough, let us say that duration is two days. So Microsoft Project will automatically calculate the start and finish date. And for this, the duration is three days. So again now my Microsoft Project will calculate the start and finish. Now you notice this summary tasks. So automatically the duration is coming out to be six days and there’s a start date and there’s a finished date for the summary task. What it means here is that the first task in this group, which is interview user is starting on four, five which is fourth May. So in the summary task, the start date is four, five and the last task in this group is finishing on 11, five. So the finished date is 11, five. So the duration is calculated, finished minus start. That is the difference between the start and finished date, which is coming out to be six days. Similarly, the next higher level task which is requirement analysis, the dates are automatically calculated. So once you have… let’s go back to the PPT.
Praveen: So once you have listed down the task, you create the WBS, you do the indentation, indent or outdent as the case needed maybe, and you create a proper WBS and you define the whole structure of the project. At this point, you start defining the task relationships. What is task relationships? I have already shown them to you, like here predecessor. So the relationship is there’s a relationship between task three and task four, task three is a predecessor and task four is a successor. What it means is as soon as the task three finishes, task four will start. So there are actually four types of relationships. Let me write them down in the note pad and I want you to read about it. Read about relationships.
Praveen: Finish to start, it is also called FS. Finish to finish, it is called FF. Start to start, is called SS and then last one is start two finish, which is called SF. Okay. So read about them. By default, Microsoft Project creates all relationships as finish to start. Finish to start basically means that the predecessor task finishes then only the successor task can start. Okay, let us go back to Microsoft Project here. So if I add predecessor here for this task, let us say number five here, automatically you will see the start and finished date will be calculated and the summary tasks also will be changed if the calculations change them. I’m going to press enter now, just notice the blue cells.
Praveen: So these date are changed and the summary task, this cell is changed. So this is about defining the relationship. Now, what you want to do is you have to define relationship through for all the tasks in the project. Why do you want to do that? Because after you do all these things and you change the start date, then automatically the Microsoft Project will calculate everything for you. If the predecessor successor relationships are not there and you change something, then the Microsoft Project has no way of knowing how to do that calculations. So the point here is going back to the PPT. You create the list of tasks, you do the WBS, then that define the task relationships. And at this point of time after defining the task relationship, now you can enter the task. You enter the duration and the dates.
Praveen: Okay, the next point is making note of date constraints. What is date constraints? Let’s go back to project again. When you click on any task, sorry. When you double click on any task, a small dialogue box open up. In that small dialogue box, there are multiple tabs and there’s a tab called advanced tab. And here you can define some constraints if you want to. So why default the constraint here is as soon as possible, what does it mean? As soon as a predecessor task completes start the current task, that is as soon as possible. But there are other constraints also like finish new earlier then and… yeah, must finish on et cetera and there is something called deadline also. So let us use this task and constrain called deadline as an example.
Praveen: So here, what I’m going to do is let us say I’m putting a task constrained for this as fifth May. That is deadline as fifth May. So this task should finish, the deadline for this task is fifth May. It should finish on fifth may. I’m pressing okay. So right now nothing happens, right? But what I’m going to do is because this task is finishing on fourth, what I’m going to do is this use case analysis. What I’m going to do is let’s say the duration of this task is four days, I’m going to press enter. So yeah, it was not visible earlier. Let me just undo it and let’s do it again. So right now if you will see.
Praveen: This is one day and the task is finishing on 4th of May but the there’s a task constraint, there’s a task deadline of fifth may. Now what I’m going to do is I’m going to change the duration to four days. As soon as say four days, the finished date changes to ninth which is beyond the deadline. So automatically Microsoft Project shows you a warning. This warning says this task goes passes deadline which is Thursday, fifth may. So whenever you see some symbol here, just take your mouse over it and it will tell you what it means. So in our case, this task is breaching the deadline and that’s why it’s showing us warning So the point here was that you should always make a note of different data constraints. So as an exercise what I want you to do is I want you to study all different task constraints.
Praveen: So there are number of them here, study them, understand what works in which situation. By default, you will not have a deadline. By default, you will have as soon as possible if you have a finish to start relationship. Okay, let’s go to the next point. Okay. Avoid putting predecessors in summary tasks, this is quite simple. Basically do not put a predecessor here or here, in any of the summary tasks. So let us say design is dependent on let’s say requirement analysis. So don’t put one here. Of course you can do it, Microsoft Project will allow you to do it but do not do it because the reason is design is not in itself a task. It’s a summary task, it’s a summary of all these lower level tasks. So it is possible that the create prototype, this one, task number 11 is dependent on task number eight which is quite possible. So you can write eight here which is perfectly okay but do not put one here, completely no. Sorry, here. Completely no, because design is not dependent on requirement analysis. One of the task under design is dependent on one of the task under requirements.
Praveen: Okay, let us go back to our PPT. Let’s look at the last point. It says, save your baseline. This is again very simple. Okay, let’s say you have completed your schedule, you have all the duration start date, finished date, all the relationships are defined, everything else is finished. Now, what you want to do is you want to save a baseline. What is a baseline? Baseline is a standard, meaning that these dates are now your benchmark. You will measure your performance, that is your project performance against these dates. So you want to save a baseline. So to show it to you what I’m going to do is I’m going to right click on this column and here when you are in right click, you will see a dropdown menu here. There’s something called insert column. So I’ll say insert column and I’ll say baseline. So there’s something called baseline start. I’ll insert another column which is called baseline finish. This one.
Praveen: So right now you will see the baseline start and baseline finish, they are blank. It says NA. What it means is, right now you have not defined your baseline. What you want to do is you want to define it. So you go to project menu, there is an option called set baseline. You click on set baseline and there’s another dropdown type of menu appears. You say set baseline and there’s a dialogue box here. I’m not going to explain this dialogue box to you, you just say okay. When you say okay, all the baseline start… all the dates in the baseline start and all the dates in the baseline finish will be populated. Let’s say I’m going to press okay now. So what Microsoft Project has done is it has copied the start dates to baseline start, copied the finish to baseline finish. Now what will happen is even if you change any particular date here, the baseline will remain the same.
Praveen: So for example, right now our project is going to start on four five. So what I want to do is… for some reason, client told me, no, no, you cannot start on four, five you have to start on, let us say six, five. So I said, okay. I put six here. So as soon as I put six here, the start dates would change. I’m going to press okay now. So you’ll see the start date six, five changed, the finished date changed. So all the dependent tasks, everything, you will see all these blue cells, everything changed, even the summary task changed but the baseline start and the baseline finished they are not changing, they’re intact. So even if you change something in the middle of the project, the baseline dates will remain same. Now you can measure your performance. That is your project performance, whether you’re delayed, not delayed, et cetera against the baseline dates.
Praveen: Okay, so these are the 10 points that I wanted to cover. Of course, I’ve covered it quickly. Assuming that all of you have the basic knowledge about Microsoft Project and given the [inaudible 00:54:57] of time we had one hour, so five minutes are left. So we’ll do go to the quick Q&A session quickly and maybe take up a few questions. So first of all, let’s take up the question that was there earlier which was about effort and duration. I’m going to the project, the sample project that I had. So basically what I’m going to do is let’s insert a column here. There’s a column called work. You should put work here and so right now you will see that this alpha as a duration of two days with eight hours working day, but the work is zero hours. Work is duration into duration in days, into eight hours. That’s a very simplistic formula but for the timing to explain it, just remember this. Work is number of days into eight hours, that is one days eight hours working. Notice change are because there is no resource assigned to this task.
Praveen: So let us assign a resource. Let’s say Praveen assigned to this task. So automatically you’ll say two into eight is 16 and automatically it says it’ll calculate the work for you. Let us say bravo is assigned to my clone. Praveen’s clone if there is one. So now you notice the word column. So it is three days, three into eight, which should come out to be 24 hours. Just notice the blue cell. Whenever you change anything, just notice the blue cells. Okay. So basically work is number of days multiplied by eight. However, it is possible that you want to change. You want only to work for fours a day. That is possible, so what you can do is I’m going to quickly show you something, some [juglary 00:57:27]. I’ve gone into resource menu here and I’m going to… not this one. Where is resource? Yeah, the resource sheet. Yeah, here. I’m going to resource here. So these two resources are here, Praveen and Praveen clone and what I’m saying is this is 100% assigned.
Praveen: Instead of 100% assigned, I’m going to say Praveen is only 50% assigned. 50% assigned means he’s going to work only four hours a day for whatever reason, maybe he has earned it. He’s the best resource out there, so only 50% of the time. So now you’ll see Microsoft Project is making this in red and it’s showing me some warning, I’m not going to overlook it. It says the resource is overlooked. Why this is overlooked, let’s go back to [inaudible 00:58:31] Yeah, this is overlooked because on two days he’s working 16 hours, but he is supposed to work only four hours a day. So what I have to do is, instead of two days I have to make it four days. And instead of 32 hours, I have to make it 16 hours, right? Again, it’s okay changing. I have to change the task type here instead of fix two durations. Again, I’m doing some juglary those who understand it fine, otherwise just ignore it. So I’m saying four days, 16 hours. Now there should not be any warning, let’s go back to our associate. Now you’ll see the Praveen is not in red, it’s perfectly okay.
Praveen: Okay, so I answered this question very quickly. I don’t know the person who asked this question was able to understand it or not, but just a quick pointer how to look at it. Number one, work is equal to duration into eight hours. Eight hours is the standard working time for a person. Second pointer is you can change a location from a 100% to 50% or even 25% if you want to. So if you change it from a 100% to 50% what it means is, instead of working eight hours a day this person will work only four hours a day. The third thing is when you do these kind of juglary you have to be conscious of the fact what is happening in the duration column, what is happening in the work column. To look at that there is something called task type. When you double click on a task, go to general… oh, sorry, go to advance. There’s something called task type. There are three task types, fixed duration, fixed unit, fixed work. So read about them. What I’ve done is right now, I’ve changed it to fixed work.
Praveen: Okay, I’ve explained it very quickly, maybe not complete justice to the question but that’s how much time we have. Okay, so we have… it’s end of time for us but I think we can take one or two more questions if Melanie permits.
Melanie: Praveen if it’s okay with you, I will show the PDU for a minute here for people who have to have a hard stop at one, and then I will stop the recording. And if we have questions I can open up the mic for a couple questions right afterwards if that’s okay.
Praveen: Yeah.
Melanie: For those of you who have to leave, thank you for being here today. The PDU activity code is MPUG on the screen, and please join us in the next few weeks. We have this great agile session coming up which I mentioned next week, we’ll finish off with the overview of the pin box guide that was a three part series, and then data visualization with Excel which is also a three part series, exciting step. I will close out of this presentation… Well, I will end the recording here and then we’ll open up for questions. Thank you.