There’s an old joke: How do you eat an elephant? The answer is: one bite at a time. While the joke may be goofy, it illustrates an important concept. A step-by-step ordered approach can be used to address any big problem.
Leveling a new schedule for the first time can be just like that. The initial leveling results can be intimidating. There may be dozens of issues and questions like, “How do I fix this?” “What do I look for?” and “Where do I start?” flying through your mind. Don’t panic. Remember the elephant joke and let’s discuss how to fix your schedule, one issue at a time.
Want more? Watch Daryl Deffler’s two-part webinar series on resource leveling, now available, on demand.
Read Daryl’s articles in this resource leveling series here:
“Scheduling vs. Leveling”
“Problem Indicators”
“Leveling Mechanics”
“Leveling Hierarchy, Part 1”
“Leveling Hierarchy, Part 2”
“Resolution Options”
“Understanding Split Task Options”
“Leveling Fields”
“Limitations”
“Preparing to Level”
“Resource Leveling: It’s Time to Level Your Schedule”
“Resource Leveling: The Leveling Cycle”
“Resource Leveling: Recommendations”
Also, download a resource leveling “cheat sheet” in PDF format!
The Leveling Cycle
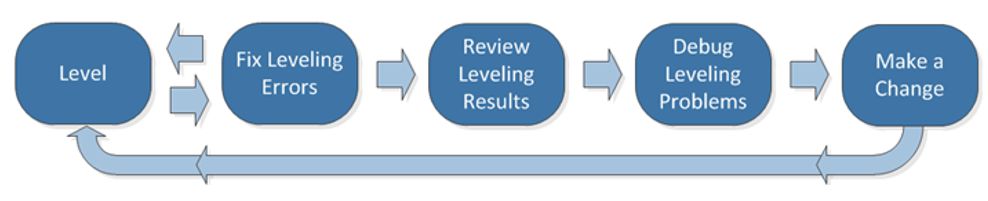
What is the leveling cycle? Simply defined, it’s a repeated process. The process, illustrated by the blue boxes below, is designed to fix one schedule issue. The leveling cycle represented by the backwards arrow from process end to process start, is the iterative repetition of this process until all schedule issues are resolved.
The process shown below is a suggested approach. It’s certainly not the only approach. If you don’t have an approach, it’s a good starting point — akin to the “Plan | Do | Check | Act” continuous improvement process, in that it’s intended to improve the schedule one correction at a time. Let’s examine each process step.
Level
This is the first and simplest step of the process. It’s clicking one of the leveling functions (Level All, Level Selection or Level Resource). As I discussed in “Resource Leveling: It’s Time to Level Your Schedule,” the function selected is dependent upon what your leveling objectives are.
Fix Leveling Errors
As the leveling engine does its processing, it may find a situation it can’t resolve and therefore displays an error. This step in the process is about fixing those errors. Therefore, our first leveling objective is to complete the leveling function without any displayed error messages.
The sample below is an example of an error message displayed by the leveling function. It indicates that Joe’s Assignment Units value is larger than his Max Units on Task 15. It’s a task-specific overallocation that must be corrected by the project manager. When these types of messages appear, click Stop to terminate the leveling function. Here’s why.
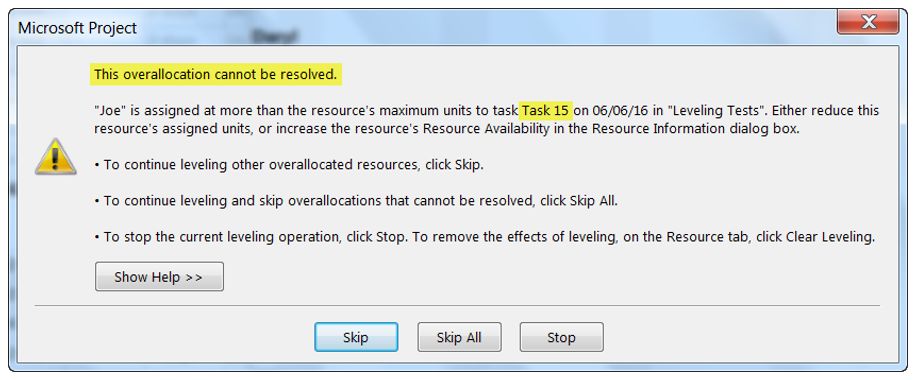
Contrary to some beliefs, clicking the Skip button doesn’t just skip leveling the problem task, it skips leveling of every task for that resource. Skip All is even worse because it skips leveling of every task for every subsequent resource that encounters this error without telling you!
The sample below illustrates “Skip” results. The left side shows the schedule before leveling. During leveling, the message above was displayed for Task 15. The Skip button was clicked. The sample on the right shows the results. Even though the error was only on Task 15, none of JW’s tasks were leveled. But DD’s tasks were.
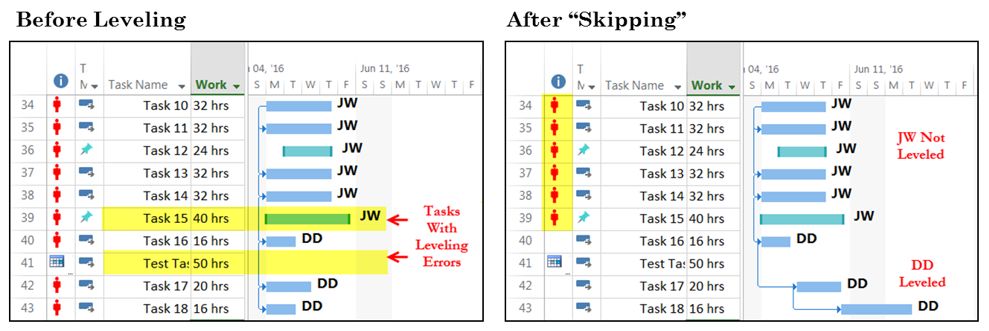
As this example illustrates, skipping a leveling problem results in a partially leveled schedule. And a partially leveled schedule is really no use at all.
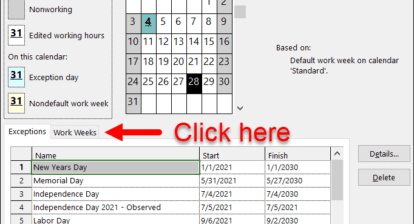
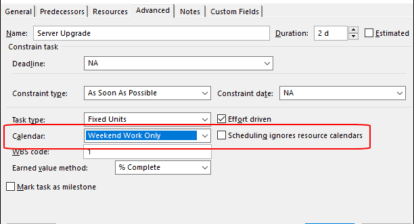
Other leveling errors, such as the following sample, are informational. This type of error tells us about a problem and what action the leveling engine took to avoid the issue. In this example, the task calendar and the resource calendar don’t provide common time for the resource to perform the work. As a result, the leveling engine has decided to ignore the resource calendar and level based on the task calendar only. These types of errors should be reviewed and corrected after leveling is finished.

Once the problem identified by the leveling function has been corrected, restart the leveling process.
Read Daryl’s articles in this resource leveling series here:
“Scheduling vs. Leveling”
“Problem Indicators”
“Leveling Mechanics”
“Leveling Hierarchy, Part 1”
“Leveling Hierarchy, Part 2”
“Resolution Options”
“Understanding Split Task Options”
“Leveling Fields”
“Limitations”
“Preparing to Level”
“It’s Time to Level Your Schedule”
“The Leveling Cycle”
“Resource Leveling: Recommendations”
Also, download a resource leveling “cheat sheet” in PDF format!
Review Leveling Results
After you can complete the leveling function with no error messages, it’s time to review the results. This step is twofold:
- Verify prior changes have corrected an identified issue.
- Identify a new issue to be resolved.
Verify Prior Changes
First, and foremost, if any changes were applied in the prior leveling cycle, determine if those changes corrected the previously identified issue. If the issue still exists, proceed to the Debug Leveling Problem step. If the problem was corrected, continue with the second aspect of this step to identify the next schedule issue.
Identify New Issues
Post leveling issues come in two flavors. There are obvious errors like overallocations or constraint violations. These are the easiest issues, typically identified by a problem indicator in the Indicator column such as red text, red graphics or an icon. These issues should be resolved first. When one of these issues has been identified, proceed to the next process step.
After the easiest of issues have been resolved, it’s time to look for stage two problems: resource usage gaps. Gaps are spans of time ranging from several days to several weeks where the resource is under-utilized. This could mean they’re only allocated a small amount of work each week or not allocated any work at all. You might be asking, what’s the harm in that?
The answer depends on which resource has the gaps and when the gaps occur. If it’s a key project resource producing a sizable percentage of the project deliverables, their gaps tend to artificially delay the project completion date. However, if it’s a resource with only minimal project involvement, their gaps may have no impact on the project completion date.
As the project manager, you’ll have to determine which gaps are worth resolving. If there are many resources with gaps, start with the most critical project resources. Reducing gaps on these resources tends to have the most impact on project completion date.
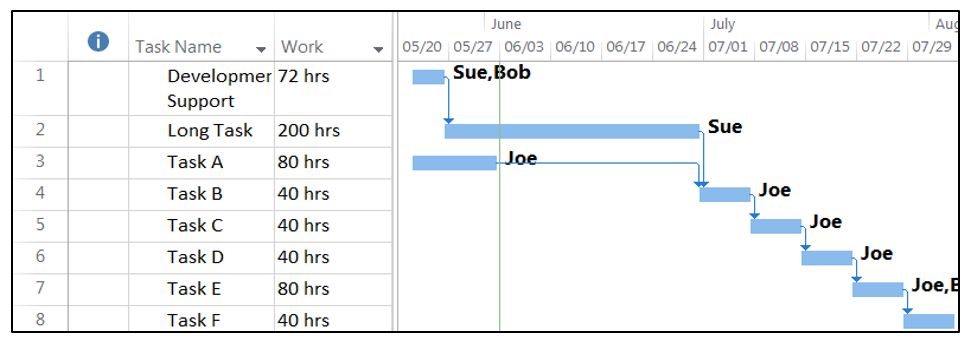
The samples below illustrate resource usage gaps (highlighted). The first sample is a resource usage view configured to summarize weekly planned work. Gaps are found by visually scanning each resource summary row looking for time periods where the resource is not used at all or not effectively used. If you look at the sample, you’ll see that Joe has a four-week gap with almost no work assigned; Sue has a five-week gap; and Bob’s gap is eight weeks. The second sample is the matching Gantt view illustrating the task dependency relationships causing the gaps.

Debug Leveling Problems
After you’ve identified an issue, your next step is to determine the cause and resolution. Unfortunately, this step could yield a book worth of explanatory text, so I’ll limit this discussion to identifying some of the common causes.
Overallocations
Time overallocation is caused by one or more tasks scheduled in the same period. Identify the conflicting tasks and then the reason for the conflict. Look for:
- Priority 1000;
- Manually scheduled;
- Manual constraints;
- Started tasks; and/or
- The “Split in-progress tasks” option isn’t checked.
Task-specific overallocations occur within one task. Look for:
- Fixed duration tasks; and/or
- Assignment-level Peak units exceeding Assignment Units, indicating more Work has been assigned than can be completed in the defined fixed Duration.
Constraint Violations
Constraint violations typically occur when the “Tasks will always honor their constraint dates” option is left unchecked.
Gaps
Gaps are a bit harder to debug because the analysis is looking for the reason resource work wasn’t scheduled in the gap. Typically, these reasons are related to schedule construction. Look for things such as:
- A predecessor task with a different resource assigned, driving the start of the first post-gap task. Referring to the gap sample above, Joe’s second task is the post-gap task. Its start date is being driven by Sue’s second task. The result is a four-week gap between Joe’s first and second tasks.
- Lag values on dependency relationships.
- Manual constraints such as “Start no earlier than.”
- Manual tasks / Priority 1000.
- Multiple resources are assigned to the same task and the “Leveling can adjust individual assignments on a task” option is left unchecked. This forces the task to start only when all resources assigned to the task are available.
- Work Contours on any task type can cause periods of under-allocations because of how they ramp up or ramp down assigned work.
- Dependency relationships between summary tasks. ALL tasks under the predecessor summary task must be completed before ANY of the tasks under the successor summary task can start.
- Low Assignment Units; for example, Joe is assigned to Task 1 at 5%.
- Summed Assignment Units on tasks that should run in parallel exceed Max Units. For example, Joe’s Max Units is 100% and the PM wants Joe’s Task 1 and Task 2 to run in parallel. Joe is assigned to Task 1 at 50%, but the PM assigns Joe at 60% on Task 2. Because the sum of the two Assignment Units (110%) exceeds Joe’s Max Units of 100%, one task will be delayed to start only after the other task has finished.
- Dependency logic.
Note: The above points are items that can cause gaps. There are valid reasons for using some of these items within a schedule. It’s up to the project manager to determine if the use is valid or if it should be corrected.
Make a Change
The last step in the process is to make a change. After homing in on a problem and determining the cause, adjust the schedule to (hopefully) correct the problem. Once the fix is applied, restart the leveling process.
Limit the number of changes applied per leveling cycle to one or two. If the change ends up making the schedule worse, it’s simple to determine which change caused the new problem and fix it. When many changes are made and the results make the schedule worse, it’s much more difficult to determine which individual change is the problem. So keep it simple. Make one or two changes and then initiate the leveling cycle again.
Give It a Try
If you already follow a structured approach to debugging and refining a project schedule, I salute you. If you don’t, give this one a try. I think you’ll find that this, or any other structured approach will reduce frustration and ultimately save you time.